Author Topic: 1981 Turbo Trans-Am Project  (Read 18560 times)

roadking77

  • Oracle Forum Member
  • *
  • Posts: 13228
Re: 1981 Turbo Trans-Am Project
« Reply #120 on: August 18, 2023, 05:28:23 AM »
Thanks for the update Tom,

I have been meaning to shoot you a line to see how things were coming along. Glad to see youre nearing the finish line. I hope the other drivers insurance has been treating you kindly. I also would not be surprised if the headliner was tweaked in the accident.
Finished!
77 T/A - I will Call this one DONE!
79 TATA 4sp-Next Project?
79 TATA - Lost to Fire!
86 Grand Prix - Sold
85 T/A - Sold
85 Fiero - Sold
82 Firebird - Sold
'38-CZ 250
'39-BSA Gold Star
'49-Triumph 350
'52-Ariel Red Hunter
'66-BSA Lightning
'01-HD RoadKing

ryeguy2006a

  • Oracle Forum Member
  • *
  • Posts: 6039
Re: 1981 Turbo Trans-Am Project
« Reply #121 on: August 18, 2023, 05:45:49 AM »
Wow, that lower quarter section was pretty bad! Glad that you were able to get at it now, before it became a problem in the next few years. You probably don't think so, but you are getting very close now Tom. The great thing is you can still drive the car without the headliner  :cool:. Heck, I drove my Camaro after it was painted with some seats bolted in and the dash board haha. Didn't even have the door glass installed!

1976 Trans Am LS1 and much more...SOLD
1968 Camaro LSA, T56 Magnum, and much more...SOLD

Current Project: 1955 Nomad LC9, 4L80e, C5 brakes and etc...

N PRGRES

  • Oracle Forum Member
  • *
  • Posts: 1075
Re: 1981 Turbo Trans-Am Project
« Reply #122 on: August 18, 2023, 06:22:13 AM »
Looking great and will be a comfort knowing these issues were addressed while it was already tore apart
Dave

81 Trans Am

5th T/A

  • Oracle Forum Member
  • *
  • Posts: 1384
Re: 1981 Turbo Trans-Am Project
« Reply #123 on: August 18, 2023, 07:42:36 AM »
Looks like you have made great progress. Since you don’t want to paint again it’s fortunate you found the rust and took care of the lower front fender now.
1980 T/A with a Pontiac 461

Gone but not forgotten;
1973 T/A 455
1975 T/A 400
1978 T/A W72
1982 T/A cross fire injected

Two wheel toys;
2014 Harley Ultra Classic Limited
2013 Honda CB1100
2010 Yamaha Vmax
1982 Yamaha Seca 750

TATurbo

  • Active Forum Member
  • *
  • Posts: 817
Re: 1981 Turbo Trans-Am Project
« Reply #124 on: August 31, 2023, 09:55:31 PM »
Thx guys.
It WAS really nice to feel like progress is being made. Now that this ordeal is almost over I AM glad we got to repair some sketchy spots and defects that had popped up over the past 3 seasons.
And Ryeguy is also right that…all of a sudden,  just like that, it’s Almost done!  But, not without what I hope is one last hiccup…

Last trip down I got the power door lock actuator and power window regulator installed with the 'correct' peel rivets.  The new door was not marked or drilled for the actuator, so we had to make a template from the original door in order to mark the holes...

Untitled by Tom Sherer, on Flickr

While installing the window motor I noticed that, although I ordered the same part number as before, the peel rivets I got this time appeared to be a little long.   One, of the rivets in particular didn't peel back entirely but my initial check indicated it was clearing the window fine.   Turns out...It wasn't.  The window in a certain position, and just the right vibration from a TN thunder storm lead to this...
Untitled by Tom Sherer, on Flickr

No need to zoom in...That is a door full of shattered glass.

So, I spent time replacing the window and the poorly installed rivet while Chris worked through a guide coat on the body worked areas...

Untitled by Tom Sherer, on Flickr

And Julie wet sanded the rest of the car to prep for a fresh coat of black
Untitled by Tom Sherer, on Flickr

Untitled by Tom Sherer, on Flickr

The hood isn't getting repainted for budgetary reasons.  But Classic Auto did work to touch up a couple of areas that required some maintenance/touch up...

Untitled by Tom Sherer, on Flickr

Untitled by Tom Sherer, on Flickr

We learned during the first go around that I was not good at bodywork stuff. But...with all the bodywork and sanding complete, I finally got to apply MY body shop, paint prep related skill...Cleaning!
For the first time this summer my TTA got a proper wash ahead of moving into the paint booth:

Untitled by Tom Sherer, on Flickr

Three months in a body shop left the interior a mess too...
Untitled by Tom Sherer, on Flickr

So, yeah...this is me cleaning and vacuuming our interior at around 9:30PM

Untitled by Tom Sherer, on Flickr

.  We had stopped work for the day around 3:00 with the TTA ready to move into the booth.  Because it was literally 100 degrees outside Chris didn't want to open the big bay doors to the climate-controlled shop.  So, went out on the boat for a few hours, then stopped at the shop around 9:00 to move the car to the booth.  The car hadn't run in a month or so, so I convinced Chris and Julie to wait while the car ran a while and got up to temp.   Really, I just needed to buy a few minutes to clean things up inside.  It was driving me nuts.

The next day I continued cleaning every nook and cranny of the car while Chris and Julie taped it up...

Untitled by Tom Sherer, on Flickr

We left TN last Thursday.  This past Tuesday they finally had a break in the heat/humidity where Classic Auto felt comfortable laying down the paint.  And...

BAM!
Untitled by Tom Sherer, on Flickr

Untitled by Tom Sherer, on Flickr

It's all the same color again!   Whoo Hoo!  Next trip to TN we'll be bringin' a trailer for the TTA's ride home!

I got this update from Classic today...
Untitled by Tom Sherer, on Flickr

They've 'de-nibbed' the paint and made a first cut with 1500 Grit.  I'm told this is a little trick...knocking off the top layer about 48Hrs after laying down the clear coat helps the last remnants of solvent 'gas out' of the clear?  It'll sit like this for about a week.  Before a final cut with 2000 grit and polishing.   

The plan is to make one last trip to TN next weekend.  Spend a few days getting things back together such that the car will be happy bouncing around on a trailer. Then, the 800 mile, slow, careful, butt-clinching tow back to Philly.

I'm guessing it'll take a week or so to install the interior, weather stip, decals...stuff like that...Then we're back on the road!
As part of this final assembly, we'll be adding something new...

Untitled by Tom Sherer, on Flickr

The plan is to install this LED CHMSL inside, across the top of the rear window. I'm also working on a setup that'll use the four individual tail lights (with LED bulbs) as sequential turn signals. I'll let you know how I make out on a mounting solution for the CHMSL.   The sequential turn signals will come after the season is over.   I'm jonesing to get some miles under our belt this season.

Thanks again for the words of encouragement everyone.  It's crazy, but I was having a real physical and emotional response to seeing my car torn apart.  Right up until our 4th or 5th visit to the shop in TN. (We've made 6 trips so far.)  It was nice to have this little support group!

Thanks for checking in.
Take care.

-Tom


« Last Edit: August 31, 2023, 11:19:08 PM by TATurbo »
Tom
King of Prussia, PA

1981 Turbo Trans-Am
Build thread - http://transamcountry.com/community/index.php?topic=83354.0

Re: 1981 Turbo Trans-Am Project
« Reply #124 on: August 31, 2023, 09:55:31 PM »

roadking77

  • Oracle Forum Member
  • *
  • Posts: 13228
Re: 1981 Turbo Trans-Am Project
« Reply #125 on: September 01, 2023, 06:01:28 AM »
Tom, so glad youre nearing the end of this automotive nightmare. Not one that any of us want to go through. It all could have been a lot worse, you were spared serious injury, and you were able to save your beloved car. Looking back you can call it the  4 year refresh! Not that a repaint is what you wanted, but you now have a 'new' fresh car to tool around. Only this time you have the mechanicals dialed in and should be good to go. At least fall is a good time cruise with our dreaded heat and humidity on the decline.
Finished!
77 T/A - I will Call this one DONE!
79 TATA 4sp-Next Project?
79 TATA - Lost to Fire!
86 Grand Prix - Sold
85 T/A - Sold
85 Fiero - Sold
82 Firebird - Sold
'38-CZ 250
'39-BSA Gold Star
'49-Triumph 350
'52-Ariel Red Hunter
'66-BSA Lightning
'01-HD RoadKing

ryeguy2006a

  • Oracle Forum Member
  • *
  • Posts: 6039
Re: 1981 Turbo Trans-Am Project
« Reply #126 on: September 01, 2023, 06:13:38 AM »
Heck Yeah Tom!! That's a fantastic update. So crazy about how that window shattered though?!

1976 Trans Am LS1 and much more...SOLD
1968 Camaro LSA, T56 Magnum, and much more...SOLD

Current Project: 1955 Nomad LC9, 4L80e, C5 brakes and etc...

5th T/A

  • Oracle Forum Member
  • *
  • Posts: 1384
Re: 1981 Turbo Trans-Am Project
« Reply #127 on: September 01, 2023, 02:21:57 PM »
Tom,
What a roller coaster ride you have been on this year. Your TA is looking really nice! Bet you can’t wait to get behind the wheel again.

 I am looking forward to seeing what you do with LED CHMSL.  Maybe something I would consider if it’s not very noticeable until it’s illuminated, then I would want the whole world to see it. I like these subtle little touches you have incorporated into your car.
1980 T/A with a Pontiac 461

Gone but not forgotten;
1973 T/A 455
1975 T/A 400
1978 T/A W72
1982 T/A cross fire injected

Two wheel toys;
2014 Harley Ultra Classic Limited
2013 Honda CB1100
2010 Yamaha Vmax
1982 Yamaha Seca 750

TATurbo

  • Active Forum Member
  • *
  • Posts: 817
Re: 1981 Turbo Trans-Am Project
« Reply #128 on: October 04, 2023, 09:25:55 PM »
You're right 5th T/A...A roller coaster ride is a good analogy for our '23 Summer.  Our Summer '23 coaster has had loops and everything!  And, although I love a good roller coaster ride...I'm ready to get off this one!
Another good analogy would be a game of “Rock 'em Sock 'em Robots”. This thing has been fighting us all the way!

We headed down to Nashville a couple (or 3) weeks ago.  We had two days to get the car together and closed up such that it'd be happy on a trailer for 800+ miles.  I'll spare you the gory details, but here are some highlights (and lowlights)...

All the body work and paint seems to have come up really well...
Untitled by Tom Sherer, on Flickr

Untitled by Tom Sherer, on Flickr

That said...For a bunch of reasons, we didn't have time to get a fully detailed cut and buff completed.  So our already significant @Home To-Do list grew longer.  We'll have to do some of the final cutting ourselves.

Step one was reinstalling the front facia.  This is the original nose which was not repainted because repairs from the first go 'round had been holding up and a replacement wasn't in the budget.
Unfortunately,  at some point, just handling the thing led to a nasty crack

Untitled by Tom Sherer, on Flickr

This was one of my worries all summer.  And it has come up time and time again.  Just being in a shop environment and the act of spending hours and hours working on and around the car, things that were fine beforehand now require additional attention.

Step two was something that DID need attention before the collision, and would finally get addressed as part of this process…Replacing the T-Top weatherstrip.
 The stuff we installed back in 2019 never fit great, and already had developed holes at the seams.   This time around I chose an OER-branded weatherstrip (ThePartsPlace PN WS1012Z).  IMHO, these seem to be an improvement over the Metro Supersoft set that was in the car.  The locating tabs are hard plastic (not rubber).  And, the intersection where the T-Top Panel meets the strip on the body is a different design.  The joint is moved about an inch inward (toward the center of the panel).   I think this is an improved design.  But, It meant that I had to unexpectedly take the T-Top panels apart to replace the weatherstrip on the panel. just to get the top in the hole.
THEN I had to adjust all 8 T-Top adjusting points to get the T-Tops locked down on the new weatherstrip.
 
And, of course...This situation added another item to my @Home To-Do after we got home...Properly adjust the T-Top panels. 

Next up I had to install the outer window sweeps to protect the windows while the car is bobbing and weaving on the trailer home.   Step three...Problems 3 and 4...

Out of the box the new outer window sweeps were super crappy.  Now, I can't speak to every set of window sweeps that come from this brand ("Reprops" PN C-10710-14KBR @ one of the big CLASSIC restoration parts sources).  I’d like to think that they can't all possibly be this terrible.   They were more gray than black. They were super thin, and not the least bit straight.  Additionally, they did not have all the mounting locations drilled out.
Look at these things!

Untitled by Tom Sherer, on Flickr

For the record...Here's what that crappy one looks like next to the OER replacement (sitting loose on the door):
Untitled by Tom Sherer, on Flickr

One more addition to the @Home To-Do list...Replace the outer window felts again.

Worst of all this where the fourth problem of the day (And the straw that broke my emotional camel's back) came up...
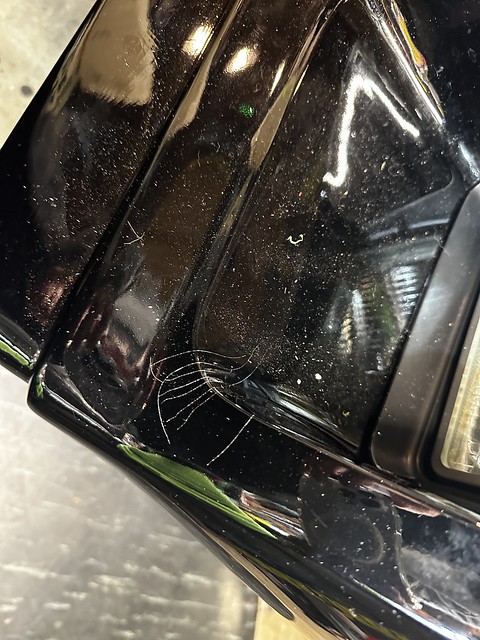
 While installing the outer window felt/sweep two of the screws pushed on the outer door skin causing a couple of dings and waves! Right at the top of the driver's door where I have to see it every time I get in the car. 
 I don't know if you noticed it in the pic above...Here's a closer look...

 Untitled by Tom Sherer, on Flickr

I thought I was being careful. I did not crank down on the screws. And I even reused the screws that came off the last set(A couple of which were original parts).  Regardless of whether it's the replacement door or the sweep shape/tolerances that are different,  this was a stupid mistake on my part.
 
Coming where it did within the day, and within the project as a whole, this little mistake almost led me to a full-on meltdown.   I'm a very level-headed person, but I felt my eyes start to tear up when I saw the nasty outward ding in my fresh, newly painted door.   Then, I started laughing at myself for almost crying over such a silly mistake...Simultaneously laughing and crying!  My wife walked in and thought I might need to be committed.   But I'm all better now.  :???:

Other issues included busting my Satellite radio antenna (Which will be a PIA to reinstall), A couple of lug nuts that decided to cross-thread, and a realization that interior parts that were painted (or repainted/touched up) while we had them out of the car, do not match.  Even though we used the same color paint (Some of it literally left over from in a can we used to paint everything the first time)! A different color primer/base coat is the most likely cause for the color difference.  Oh…and a lost set of ‘68 rear marker lights (Since found in the glove box…Ugh.)

All in all, I think we added around 8 additional items to our @Home To-Do list.  But we did get the car closed up, out in the sun...

Untitled by Tom Sherer, on Flickr

...on the trailer...
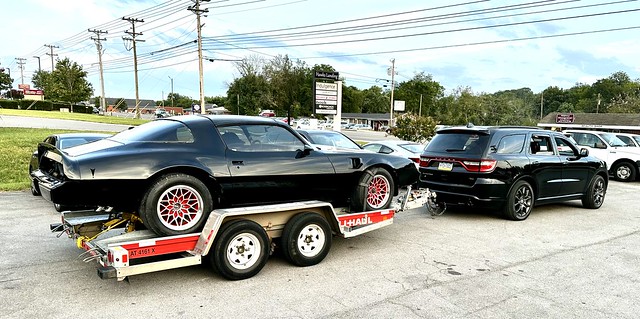
Untitled by Tom Sherer, on Flickr

...and had a safe trip home...
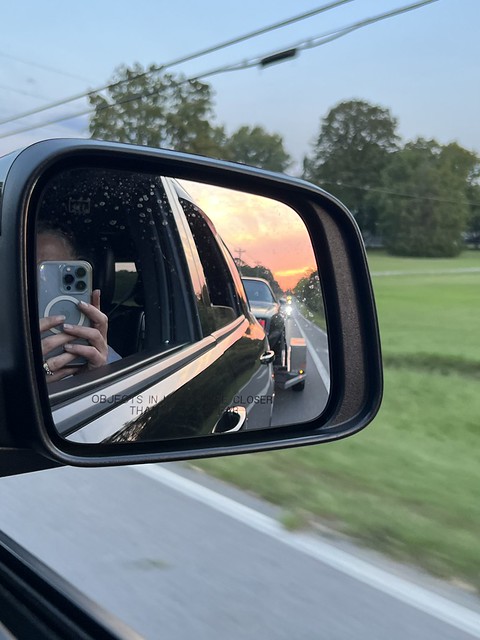
Untitled by Tom Sherer, on Flickr

Untitled by Tom Sherer, on Flickr

Untitled by Tom Sherer, on Flickr

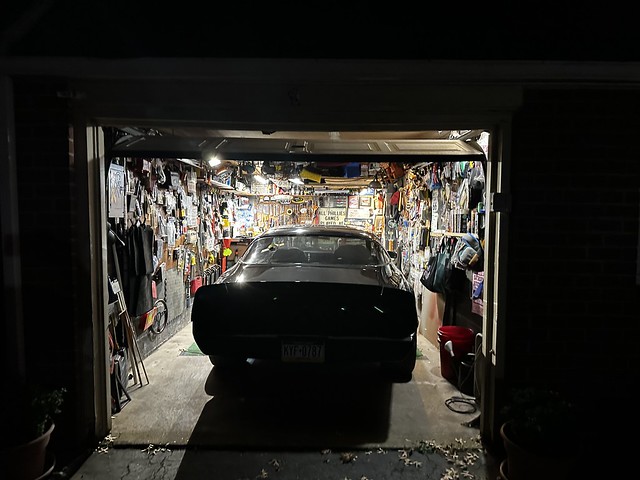
We've started knocking stuff off of that @Home To-Do list.  And, the good news is the car's been cooperating more now that it's back in its own garage.

So, it looks like the coaster train is pulling back into the station...I just hope the operator hits the brakes as we approach the platform!  I want OFF!

Thanks for checking in.

Take care.

-Tom

« Last Edit: October 04, 2023, 10:43:58 PM by TATurbo »
Tom
King of Prussia, PA

1981 Turbo Trans-Am
Build thread - http://transamcountry.com/community/index.php?topic=83354.0

737driver

  • Oracle Forum Member
  • *
  • Posts: 2228
  • "Life is hard, It's Harder when you're Stupid.."
    • My Trans Am - Restoration Project
Re: 1981 Turbo Trans-Am Project
« Reply #129 on: October 04, 2023, 09:48:58 PM »
Been following the progress and it looks like things are shaping up for you. Great to see the progress and looking forward to more updates!
Jim
1979 Trans Am- Heritage Brown -W72 (Pontiac 400) -4Speed-WS6
1972 LeMans Convertible
1977 Trans Am
1972 Firebird
2000 TransAm WS6
1968 Lemans Converible
1979 TransAm Gold WS6 400/4speed
1971 Firebird
1977 MGB  Roadster Convertible

N PRGRES

  • Oracle Forum Member
  • *
  • Posts: 1075
Re: 1981 Turbo Trans-Am Project
« Reply #130 on: October 05, 2023, 05:30:55 AM »
Sorry about the door but man, overall it looks fanfastic!  Glad she is back home!
Dave

81 Trans Am

roadking77

  • Oracle Forum Member
  • *
  • Posts: 13228
Re: 1981 Turbo Trans-Am Project
« Reply #131 on: October 05, 2023, 05:50:54 AM »
Glad your car is back home Tom, things will def. be looking up now that its back in its own garage. Will make working on it a lot easier!!
Finished!
77 T/A - I will Call this one DONE!
79 TATA 4sp-Next Project?
79 TATA - Lost to Fire!
86 Grand Prix - Sold
85 T/A - Sold
85 Fiero - Sold
82 Firebird - Sold
'38-CZ 250
'39-BSA Gold Star
'49-Triumph 350
'52-Ariel Red Hunter
'66-BSA Lightning
'01-HD RoadKing

ryeguy2006a

  • Oracle Forum Member
  • *
  • Posts: 6039
Re: 1981 Turbo Trans-Am Project
« Reply #132 on: October 05, 2023, 06:18:34 AM »
Congrats on getting the car home Tom! Bummer about the dent, but you should contact a local PDR guy. They can do amazing things and that dent is pretty accessible for them.

1976 Trans Am LS1 and much more...SOLD
1968 Camaro LSA, T56 Magnum, and much more...SOLD

Current Project: 1955 Nomad LC9, 4L80e, C5 brakes and etc...

5th T/A

  • Oracle Forum Member
  • *
  • Posts: 1384
Re: 1981 Turbo Trans-Am Project
« Reply #133 on: October 05, 2023, 07:39:59 AM »
Tom, car looks beautiful, and even though it’s not quite perfect you’re 99% there. Keep in mind the paint and body work on your car is far above anything GM could produce back in the 70’s. I know you drive your car a lot and it’s hard to avoid tiny stone chips. In reality no one else is likely to notice these minor imperfections that annoy you. It’s time to go for some nice drives and enjoy your car,

Last year there was a thread on inferior quality window sweeps. At that time the general consensus was Fairchild sweeps through Summit were pretty decent.
http://www.transamcountry.com/community/index.php?topic=84471.0
1980 T/A with a Pontiac 461

Gone but not forgotten;
1973 T/A 455
1975 T/A 400
1978 T/A W72
1982 T/A cross fire injected

Two wheel toys;
2014 Harley Ultra Classic Limited
2013 Honda CB1100
2010 Yamaha Vmax
1982 Yamaha Seca 750

MNBob

  • Oracle Forum Member
  • *
  • Posts: 2018
Re: 1981 Turbo Trans-Am Project
« Reply #134 on: October 05, 2023, 07:54:28 AM »
5th said what I was going to post.  I replaced my sweeps in 2011; I don't remember the brand but they were pretty good.  The Fairchild brand on Summit gets good reviews:

https://www.summitracing.com/parts/fcd-kg2096a/make/pontiac/model/firebird/year/1979

I also have a set of metro T-top seals I need to put in but maybe I should switch.

That paint looks fantastic!  Sorry about the door and window.  You have done a crazy amount of work on that car and I am sure you will look back on the latest round as quite an improvement over the way it was before.
1979 TATA Extreme TKO .64
Hedman elite; Pypes 2.5; Borla XS; MSD 6A; Performer intake; open scoop; Sniper QJ;  110 Amp Alt; 4 core radiator/Mark VIII fan; RobbMc mini starter; subframe connectors; solid body mounts; fiberglass rear springs; poly sway bar and link bushings; 81 master; D52’s; Blazer disks; 225/60 & 235/60 17's TrueContact's; relays for PW, PDL, lights; keyless entry

Re: 1981 Turbo Trans-Am Project
« Reply #134 on: October 05, 2023, 07:54:28 AM »

FormTA

  • Oracle Forum Member
  • *
  • Posts: 5563
  • Life is short, have fun, Drive a T/A
Re: 1981 Turbo Trans-Am Project
« Reply #135 on: October 05, 2023, 06:44:49 PM »
Tom, I feel you on the door ding. I worked so hard on my car and I'm super careful with it. I then dropped a wrench kn the fender the other day....  I almost lost it but then, like you reminded myself,  it's just a car and I get to drive it and we'll, $&%@ happens....

You car looks awesome man! Glad you are seeing the light at the end of the tunnel.
79 Trans am low buck LS swapped
79 Formula 301 (Work in progress)
67 RS Camaro (waiting it's turn)
69 Dodge charger on late model charger chassis
49 Ford F1 on a 2003 Chevy ZR2 Chassis (current project)
Names, Luke. If I hear anyone telling me they're my father....

TATurbo

  • Active Forum Member
  • *
  • Posts: 817
Re: 1981 Turbo Trans-Am Project
« Reply #136 on: October 21, 2023, 08:36:45 PM »
Hello again TAC,

 My car and I seem to have settled on a truce.  Since the car's been home it has been much more cooperative.
Nothing too interesting came up while going through the punch list.   But, I did try something new with the windows and I wanted to share where I'm at with the CHMSL third brake light.  Let me know what you think of it...

During the initial restoration, it took pretty much the whole first summer of driving to get the side windows dialed in.  I had eyeballed the manual, but that first time through the 'adjust-check-drive-readjust' method was frustrating to go through. This time around I combined an actual study of the Fisher Body Manual AND the use of the correct tools.
Specifically these things...
Untitled by Tom Sherer, on Flickr

Those are Glass Alignment Gage Blocks.  GM PN J-23394-1 and J23394-2 (x2).  People are 3-D printing these things now, and the set I got from EBay fit very precisely.  I followed the instructions in the Door section of the Fisher Body manual,   Chapter 5, Page 59:
Untitled by Tom Sherer, on Flickr

And got the windows pretty much dead on in one session.     

The only downside is that the weatherstip has to be out of the car in order to use these tools.  But, if you plan ahead, these can save some time and frustration.  Worth the couple of bucks in my opinion.

I kept the manual out to get the T-Tops adjusted too...
Untitled by Tom Sherer, on Flickr

One thing I -was- looking forward to knocking off the punch list was installing a new set of tail lights.  These weren't being reproduced when I started the restoration in 2015.  So, I had spent a lot of time trying to get my old tail light lenses looking acceptable.  Those came out improved, but still not great.   These new ones (PN 5937036 &5937034 from FBCentral) were not cheap @ $300.  But, they make the rear of the car look way cleaner...
Untitled by Tom Sherer, on Flickr

(Note: In the pic above the old gas door with it's worn hinge was still in place.  A new gas door assembly is on there now...looking much more straight.)

One thing did come up with the new lights installed...
The gap between the tail lights and the bumper was much larger then I remember it being...

Untitled by Tom Sherer, on Flickr

I can't say if it is the tail lights that are different, or if things just aligned differently after having the car apart.  Either way, this was easily corrected by installing a couple of washers between the bumper cover and the metal bumper inside there.

Untitled by Tom Sherer, on Flickr

One last thing about the back end...I mentioned earlier that the accident last spring had me considering installing a third brake light.   Here's what I've come up with.  Let me know what you think...

Off-
Untitled by Tom Sherer, on Flickr

On -
Untitled by Tom Sherer, on Flickr

And from inside -
Untitled by Tom Sherer, on Flickr

I'm still working on the final installation (I wont be using blue masking tape to hold the housing up.).  But, this set up is bearly noticeable when off, and it's going to give me a little peace of mind with all the miles I like to put on this thing.

Speaking of miles...Although it's rained every weekend for the past month, I still got a couple of decent drives in..

Callicoon, NY
Untitled by Tom Sherer, on Flickr

Limerick, PA
Untitled by Tom Sherer, on Flickr

Valley Forge National Park, PA
Untitled by Tom Sherer, on Flickr

Eagle-eyed observers may have noted that there are no graphics on the sides (Sail panels and fender decals).  I haven't installed them yet because the car still needs a final cut and polish.   Classic Auto Paint did some cutting and polishing but did not entirely finish it out.   Mid-November I'll be taking it to a local shop to get the finish polish completed.

After that, it'll be wintertime.  And...Just like that, it's time to make a NEW punch list for off-season projects.  It really does never end.  But, I'm not complainin'. 

Thanks for checking in guys. 
Take care.

-Tom   

Tom
King of Prussia, PA

1981 Turbo Trans-Am
Build thread - http://transamcountry.com/community/index.php?topic=83354.0

FormTA

  • Oracle Forum Member
  • *
  • Posts: 5563
  • Life is short, have fun, Drive a T/A
Re: 1981 Turbo Trans-Am Project
« Reply #137 on: October 21, 2023, 08:46:20 PM »
Wow Tom! Cat looks great! I really like the third brake light. I really should do oemne too. I like how you can't even tell it's there.
You really put the miles on that thing!
79 Trans am low buck LS swapped
79 Formula 301 (Work in progress)
67 RS Camaro (waiting it's turn)
69 Dodge charger on late model charger chassis
49 Ford F1 on a 2003 Chevy ZR2 Chassis (current project)
Names, Luke. If I hear anyone telling me they're my father....

Wallington

  • Oracle Forum Member
  • *
  • Posts: 2220
Re: 1981 Turbo Trans-Am Project
« Reply #138 on: October 21, 2023, 08:53:30 PM »
Looks great, a lot happier than a few months ago. They sure get insurance jobs moving compared to matching projects.
The original 79-81 tail light repros were produced here in Australia, but as with anything, the moulds are elsewhere and quickly become available to anyone to put their brand name on. I wonder how many different lights there actually are, or the same pieces.
3rd light is a neat option, blends in nicely. Is it a purpose made assembly strip that size or a length of LEDs? I looked at a few options as well, nothing too seriously, none really matched the glass angle or sealed the light beam. I didn't do any tests to see just how much was even reflected with the glass.
« Last Edit: October 21, 2023, 08:55:45 PM by Wallington »

5th T/A

  • Oracle Forum Member
  • *
  • Posts: 1384
Re: 1981 Turbo Trans-Am Project
« Reply #139 on: October 22, 2023, 11:25:49 AM »
Tom, beautiful is an understatement! I bet your sleeping a little better now.
1980 T/A with a Pontiac 461

Gone but not forgotten;
1973 T/A 455
1975 T/A 400
1978 T/A W72
1982 T/A cross fire injected

Two wheel toys;
2014 Harley Ultra Classic Limited
2013 Honda CB1100
2010 Yamaha Vmax
1982 Yamaha Seca 750

ryeguy2006a

  • Oracle Forum Member
  • *
  • Posts: 6039
Re: 1981 Turbo Trans-Am Project
« Reply #140 on: October 23, 2023, 05:58:52 AM »
Great work Tom! Glad to see you out in the car again! If you ever find yourself on I81 near Harrisonburg, VA shoot me a text. I'd love to meet up and see that car in person. Also, FWIW Skyline drive is 15 mins from my house and is an amazing drive!

1976 Trans Am LS1 and much more...SOLD
1968 Camaro LSA, T56 Magnum, and much more...SOLD

Current Project: 1955 Nomad LC9, 4L80e, C5 brakes and etc...

TATurbo

  • Active Forum Member
  • *
  • Posts: 817
Re: 1981 Turbo Trans-Am Project
« Reply #141 on: November 17, 2023, 11:10:17 PM »
Thanks Ryan...I might take you up on that next time I'm driving down I-81. I've driven through there 100 times.  Maybe we can hook up for lunch next time I have the TA down that way.

It's been awesome having the car back.  I'm still working to get it fully dialed back in, but it's getting there.  It really has been nice being able to enjoy our favorite leisure pass-time again.

The third brake light has made driving the car much more comfortable for me.  I used to constantly worry that people behind wouldn't recognize my brake lights. (A lot of people driving today probably don't know cars didn't always have three brake lights!) It's given me a lot of peace of mind.   That said...

My mounting solution is a fail...
The light itself is just a universal 35"  "Red Car Third Brake Strip Light - Flexible High Mount Stop Brake Light IP67 Waterproof & 108pcs Lamp Beads" It's an LED strip essentially encased in a rubber housing.

Mounting it like I want, requires a shape like this...
Untitled by Tom Sherer, on Flickr

The top (with the cut-outs slides in the rear headliner trim.  The vertical piece is where the LED strip mounts w/3M dble sided tape.  Then, the bottom flat piece covers out to the window (To control the Light out the back window and keep it from just lighting up the whole back seat.)
My initial attempt was to make that shape with some sheet metal.  The problem with that was that the mount needs a crown in it long ways across, to match the shape of the roof.  Once the metal is bent to the z shape, it wont bend that way (at least not without the appropriate metal working tools (and skills for that matter).

I decided to try making the shape by heating and bending some 1/8" FRP plastic sheeting I had laying around.
After a bunch of attempts to figure out how to work with the stuff...
Untitled by Tom Sherer, on Flickr

I ended up with the setup I showed earlier...
Untitled by Tom Sherer, on Flickr

Unfortunately, working the plastic with heat I ended up with an unstable shape that seems to have some 'bad' memory.  After a few cycles of sitting in the sun, then cooling it lost its shap across the bottom. You can see how it's no longer straight across on the part that goes back to the window...
Untitled by Tom Sherer, on Flickr

Long story short...I'm currently working on a new solution, using three pieces fo FPR (instead of heating and bending one piece).  Then, using epoxy to stick them together.   I think I this method is gonna work.  The problem I'm having now is getting a nice finished look to the whole contraption.   

This whole exercise is worth the time 'cause of the piece of mind the extra visibility is giving me.

Next week I'm taking the car to get the new paint cut and buffed out.  It hasn't felt fully 'finished' yet.  I'm hoping getting that done will do the trick and get the paint all the way back to where it was before Albert crashed into me.

I've been thinking of winter projects...
There are a couple things I need to get taken care of, both are a PIA to deal with...
- I need to  install new, new Turn signal switch (New parts SUCK these days.  The switch in the column now has lasted barely 12 months before it started acting up.)

- The passenger side dome light switch in the door isn't working.  The wire just came off..Should be simple fix, but that passenger side kick panel is permenantly installed with me trying to get it sealed up plus the AC Lines running through it.  Getting it out to gain access to plug in one stupid wire is probably going to take a few days. 

- Pretty much all the interior hard plastic needs to come out for a repaint.  (Replacement parts from the collision do not match the earlier restored parts.  Oh...And the SEM '70 GTO Red' we used first time around is no longer available.  So, I have to send a sample to get a custom color mixed.   I suppose it's cool you can do that these days, but I just know it's going to take multiple tries to get the interior 'right' again.

I do have one project planned that I think will be interesting and cool...
I'm going to try to put together a 4-way sequential turn signal set up for the rear lights.   
I'm not crazy about the LED panels that are available, so I'm going to work get two way 1157 bulbs in all 4 positions, then install a sequencer to sequence all 4 lights across the back for turn signals/flashers.  I may keep the incandescent 1157 bulbs or maybe install 1157 LED replacement bulbs.

Anyway.   Sorry I don't have anything more interesting to report. 

I'll let you know how my 'Custom SEM ColorCoat' order works out.  And, I'll definitely share my sequential turn signal project when I get to that...Probably after Christmas.

Thanks for checking in...Take care everyone.

-Tom
Tom
King of Prussia, PA

1981 Turbo Trans-Am
Build thread - http://transamcountry.com/community/index.php?topic=83354.0

roadking77

  • Oracle Forum Member
  • *
  • Posts: 13228
Re: 1981 Turbo Trans-Am Project
« Reply #142 on: November 18, 2023, 08:00:58 AM »
Looks good Tom, I was  thinking about you on my recent mid west adventure. We spent a couple of days in Nashville and went right through Mt Juliet. I was temped to stop and look up your brother.

I know you drive the heck out of your car, we need to get together this spring for a saturday cruise someplace.
Finished!
77 T/A - I will Call this one DONE!
79 TATA 4sp-Next Project?
79 TATA - Lost to Fire!
86 Grand Prix - Sold
85 T/A - Sold
85 Fiero - Sold
82 Firebird - Sold
'38-CZ 250
'39-BSA Gold Star
'49-Triumph 350
'52-Ariel Red Hunter
'66-BSA Lightning
'01-HD RoadKing

737driver

  • Oracle Forum Member
  • *
  • Posts: 2228
  • "Life is hard, It's Harder when you're Stupid.."
    • My Trans Am - Restoration Project
Re: 1981 Turbo Trans-Am Project
« Reply #143 on: November 19, 2023, 09:10:52 PM »
Great job on all the work you have done! It is awesome to see everything is back together again. Really hoping you have all the opportunities to drive your car. It looks really awesome!
Jim
1979 Trans Am- Heritage Brown -W72 (Pontiac 400) -4Speed-WS6
1972 LeMans Convertible
1977 Trans Am
1972 Firebird
2000 TransAm WS6
1968 Lemans Converible
1979 TransAm Gold WS6 400/4speed
1971 Firebird
1977 MGB  Roadster Convertible

TATurbo

  • Active Forum Member
  • *
  • Posts: 817
Re: 1981 Turbo Trans-Am Project
« Reply #144 on: April 12, 2024, 09:40:48 PM »
Hello TAC!
I’ve been lurking around here this winter but my laptop died, so I haven’t posted anything.  The good news for you is that my commentary should be less long winded typing on my IPad.
 
The biggest off season project we had was redoing around 85% of the interior.  Replacement interior  parts from the accident did not match the stuff we refinished 4 or 5 years ago.  So we pulled all the hard plastic out…
Untitled by Tom Sherer, on Flickr

Cleaned prepped, and painted everything…

Untitled by Tom Sherer, on Flickr

Untitled by Tom Sherer, on Flickr

While everything was out we contacted Legendary Auto Interiors about the leather.  The seat cover leather had a painted on dye that was failing.   It was wearing funny and cracking with natural tan color showing through

Untitled by Tom Sherer, on Flickr

Untitled by Tom Sherer, on Flickr

Untitled by Tom Sherer, on Flickr

Legendary stepped up and replaced all the leather under warranty.  I don’t have any really good pics, but the new leather looks more modern, less old leather couch.

Untitled by Tom Sherer, on Flickr

I’ll get some better pics of the new stuff…but that pic reminds me…We also installed a new shifter plate ‘cause the silver chrome stuff wore off.  Here’s the new one.  I sprayed a clear coat over it to hopefully make that chrome highlight edge last more than 3 seasons

Untitled by Tom Sherer, on Flickr

Another big project was the sequential tail lights.  A favorite of mine since my dad bought a 72 Cougar when I was like 7 years old.   To do this in the TA we had to modify the taillight housings…

Untitled by Tom Sherer, on Flickr

 the two outer bulb positions had to be modified to fit 1157 bulb housings.

Untitled by Tom Sherer, on Flickr

I made a template from the existing holes…

Untitled by Tom Sherer, on Flickr

Untitled by Tom Sherer, on Flickr

Cut that out and did some other trimming to get the 1157 housings to fit…

Untitled by Tom Sherer, on Flickr

Untitled by Tom Sherer, on Flickr


Then pull out the harness to rewire for the new 1157 bulbs and the 4-way sequencer chumpies…

Untitled by Tom Sherer, on Flickr

Here’s a link to the finished product…
https://youtu.be/vq0ACOG6mKg?si=AkB5Ra2WmBqxCH_F

 I would have liked to wire for the instant on brake lights but that requires wiring up to the column signal wires and we had just put the interior back in.  May change that in the future.
 
Of course after redoing that rear harness the fuel gauge stopped working.  After going through the wires again I figured out the gauge somehow died…which was a whole other PIA because the custom backlight color paint

Untitled by Tom Sherer, on Flickr

And custom face…

Untitled by Tom Sherer, on Flickr

I had to take the gauge apart to move the face to the new gauge. 

Then it was on to cleaning a summers worth of body shop dust and repaint overspray from under the hood. 

Untitled by Tom Sherer, on Flickr

Those intake tubes are new…they opened another unexpected project to rewire the IAT and MAF together so I didn’t have to drill an IAT bung into the carbon fiber tubes.

Right now I’m working on getting a set of GTO LS3 coil or fuel rail covers to fit my LS1 w/vintage air’s QuickTime compressor mount…

Untitled by Tom Sherer, on Flickr

Some cutting and relocating the trans and oil dip sticks go the them in…

Untitled by Tom Sherer, on Flickr

I’m working on finishing them up to remove the GTO and repaint.  Then I’m working on an idea to cover the AC compressor with a carbon fiber looking shroud.
 
I’ll post pics of the finished product and the new interior soon.
 Thanks for checking in…I hope everyone has been well.

Take care.
Tom


« Last Edit: April 12, 2024, 10:24:51 PM by TATurbo »
Tom
King of Prussia, PA

1981 Turbo Trans-Am
Build thread - http://transamcountry.com/community/index.php?topic=83354.0

Re: 1981 Turbo Trans-Am Project
« Reply #144 on: April 12, 2024, 09:40:48 PM »

FormTA

  • Oracle Forum Member
  • *
  • Posts: 5563
  • Life is short, have fun, Drive a T/A
Re: 1981 Turbo Trans-Am Project
« Reply #145 on: April 13, 2024, 04:47:16 AM »
Great to hear from you Tom! Car still looking great! Giid to hear legendary stood behind their stuff!

Ya. An engine cover is on my list for my LS1 swaped car too. Those LS just look so unfinished although yours still looks way better than mine but I never detailed mine as well as it looks you did.

Looks like you may have single handedly kept SEM in business with all that red dye consumption!

79 Trans am low buck LS swapped
79 Formula 301 (Work in progress)
67 RS Camaro (waiting it's turn)
69 Dodge charger on late model charger chassis
49 Ford F1 on a 2003 Chevy ZR2 Chassis (current project)
Names, Luke. If I hear anyone telling me they're my father....

5th T/A

  • Oracle Forum Member
  • *
  • Posts: 1384
Re: 1981 Turbo Trans-Am Project
« Reply #146 on: April 13, 2024, 05:44:17 AM »
Tom, you have been very busy. Hard to believe how bad the seat covers deteriorated in such a short period. The replacements look so much better. I had a friend who ordered Legendary interior panels and the color was not same as the original. He got part way through the installation before he realized the colors were off. Since he drilled a few small holes, Legendary refused to give him a refund. In the past I have heard nothing but good things about them, glad they did the right thing for you.

I also loved the Ford sequential turn signals, never would have thought of integrating them into my car. Every time I see your car I notice custom little touches like the little pocket on the left side of your console that I assume is to hold your phone. How did you do that?
1980 T/A with a Pontiac 461

Gone but not forgotten;
1973 T/A 455
1975 T/A 400
1978 T/A W72
1982 T/A cross fire injected

Two wheel toys;
2014 Harley Ultra Classic Limited
2013 Honda CB1100
2010 Yamaha Vmax
1982 Yamaha Seca 750

roadking77

  • Oracle Forum Member
  • *
  • Posts: 13228
Re: 1981 Turbo Trans-Am Project
« Reply #147 on: April 13, 2024, 06:12:39 AM »
Looks good Tom. You are the first person I have heard of that wore out a pair of seats! And I mean that in a good way :grin:
When I did my 77 I had a problem with my legendary door panels but it was my fault. I sent them back and they replaced with the correct part a year after I ordered them. That said a lot to me and I have never looked elswhere.
Finished!
77 T/A - I will Call this one DONE!
79 TATA 4sp-Next Project?
79 TATA - Lost to Fire!
86 Grand Prix - Sold
85 T/A - Sold
85 Fiero - Sold
82 Firebird - Sold
'38-CZ 250
'39-BSA Gold Star
'49-Triumph 350
'52-Ariel Red Hunter
'66-BSA Lightning
'01-HD RoadKing

Wallington

  • Oracle Forum Member
  • *
  • Posts: 2220
Re: 1981 Turbo Trans-Am Project
« Reply #148 on: April 13, 2024, 08:04:23 PM »
What's the story with the leather seat covers? Did Legendary offer a custom material and colour option in factory style? It looks like the original set was exactly that, recoated over an existing shade, and very glossy. The creases just made it looked aged, and original!

The replacements are far better using actual red leather. It looks like a pic of mine early on of my tan leather interior that a guy photoshopped into red for a laugh. Still hurts my eyes, just because you recognise a pic but the colours are all wrong and silly brain tries to adjust. Pity it can't reassemble panels too.

The engine covers may come up nicely if the GTO lettering is removed and then perhaps an inlay strip of some sort in that entire panel, stainless, carbon fibre, even decals along it.
« Last Edit: April 13, 2024, 08:09:35 PM by Wallington »

ryeguy2006a

  • Oracle Forum Member
  • *
  • Posts: 6039
Re: 1981 Turbo Trans-Am Project
« Reply #149 on: April 15, 2024, 07:02:10 AM »
Looking great Tom! That carbon fiber intake tube looks killer! When you upgraded to the 85MM MAF, did you recalibrate your tune? If not, you'll likely have some issues going from the 78MM LS1 style MAF. I can't exactly remember your setup, but wanted throw it out there if that's the case. All that's needed is to update the Hz table in the MAF table so it's not a huge deal.

1976 Trans Am LS1 and much more...SOLD
1968 Camaro LSA, T56 Magnum, and much more...SOLD

Current Project: 1955 Nomad LC9, 4L80e, C5 brakes and etc...

N PRGRES

  • Oracle Forum Member
  • *
  • Posts: 1075
Re: 1981 Turbo Trans-Am Project
« Reply #150 on: April 16, 2024, 07:30:40 AM »
Looks awesome!  Noone is going to miss you coming to a stop!
Dave

81 Trans Am

Re: 1981 Turbo Trans-Am Project
« Reply #150 on: April 16, 2024, 07:30:40 AM »
You can help support TAC!