Author Topic: 1968 Camaro Resto-mod LS3/6 speed; Project Penny Pincher  (Read 18888 times)

ryeguy2006a

  • Oracle Forum Member
  • *
  • Posts: 6039
1968 Camaro Resto-mod LS3/6 speed; Project Penny Pincher
« on: March 08, 2021, 06:28:17 AM »
Once I received the #11 bearing from Tick, I was able to get it pressed on and started the reassembly process. It went pretty smoothly during the install, until I got to the part where I needed to press back on 5th and 6th gears.

Here's where I started back with my assembly. I made sure to inspect and carefully reinstall all of the syncros into the blocker ring assembly. It is also important to lubricate the parts with trans fluid as you install. Don't forget about the bearings too.


Moving on and almost ready to test fit the main case. Up to this point everything slid together and retained with large clips. Next up was to re-install the main bearing, 6th and 5th gear. It's also worth noting that I did need to disassemble part of it at this point because the shift rail for 3/4 needed to be installed still.


Here is what I came up with to install the bearing and gears. I found it online somewhere and it worked well for the first bearing, but I later found out that because the assembly was not 100% square, it was causing me to strip threads on the rod that I bought. I think also in part, it was the composition of the rod that I bought. I didn't realize it at the time, but the rod was a low strength carbon steel rod. I should have opted for a high strength 10.9 or 12.9 unit from McMaster Carr, or others. And for anyone that may be attempting this, the thread size for the T56 Magnum shaft (as well as most Tremec transmissions including standard T56) is M12 x 1.75.


After struggling for several days, I was able to get the 6th gear pressed on so that I could get the main case bolted together. I also made sure to put liquid Teflon around the guide pins, shift detents, and reverse light.


After a bunch of cussing and thoughts about it, I decided to try another way. I removed the 2" cap that I had drilled and in its place I used a 1/2" steel plate that I had with a small hole in it. I also put the pipe piece I had directly on the gear and against the flat steel. This gave me a much straighter pull and it almost effortlessly allowed me to press the gear on. I regret not taking a step back to re-evaluate how I was doing it. Would have saved a lot of aggravation.


Once that gear was back in it's home, the rest of the parts slid right into place.


Here is the final trans back together. I'd be lying if I didn't row through the gears for at least 10 minutes. I still need to get or make a plate for the mid-shifter location, but otherwise it's ready for install. Those 2x4 pieces that I have are for to space the bellhousing off the floor/workbench so that the input shaft doesn't have pressure on it.


I also received my LS3 valley cover which will make for a much cleaner PCV install. I found a good deal on a new crate motor take off on eBay that came with bolts and a new gasket.


Next up is to get everything on the motor bolted together so that I can get the longblock ready for install. I'm planning on installing the motor/trans bolted together as one unit and hopefully only one time. Since I'm really replacing an LS motor for an LS motor and Tremec transmissions that have very similar external dimensions, I'm hoping for no surprises. The biggest question mark for me is going to be the shifter location. If my measurements are correct, it should only be 1.5" farther ahead than my old Fbody T56.

I'm getting so excited to get the motor back together and hear it run.

Cheers,
Ryan

1976 Trans Am LS1 and much more...SOLD
1968 Camaro LSA, T56 Magnum, and much more...SOLD

Current Project: 1955 Nomad LC9, 4L80e, C5 brakes and etc...

ryeguy2006a

  • Oracle Forum Member
  • *
  • Posts: 6039
Re: 1968 Camaro Resto-mod LS3/6 speed; Project Penny Pincher
« Reply #1 on: March 08, 2021, 06:30:15 AM »
Thanks Luke!

Doesn't visually look like I've gotten much accomplished, but the short block has been completely buttoned up. I only had the timing and rear covers on to keep dust and dirt out.

I started out back and got the rear cover aligned with the pan and torqued down. Followed that up with the correct "big bearing" to properly match the TR6060 input shaft.


Next up was the front cover. I still needed to align the oil pump before I could get it final torqued. I used the .002 shims and it centered up very nicely. I oiled everything up with assembly lube, torqued and then installed the timing cover loosely.


Now I'm really starting to get excited about this project. I'm on the downhill side and starting to bolt on new (or new to me) parts. I grabbed my stock LSA balancer and installed it on the crank. I made sure to lubricate the hub so that it didn't tear the new seal. I have a crank pinning kit on the way and once that is here I'll add a few pins to make sure that the crank doesn't spin.


I'm sure there are other ways to accomplish this, but I used the transmission to help align my oil pan. I cleaned up the sealing surface and put a dab of silicone on the 4 corners where the front and rear covers meet the oil pan gasket. I snugged the oil pan to transmission and then torqued the pan.


While the transmission was attached, I test fit my starter. I had to get another starter because the TR6060 uses the smaller size.


Reinstalled my Holley mounts and now it's ready for the heads and valvetrain.


My 18MO shop buddy helped me put all of the bellhousing bolts where he felt they needed to be haha. Love having him help me in the garage.


Then moved onto the heads. I got all of the valve springs installed in the heads and they are ready to go. I put assembly lube on any moving part and now they are ready to install.


Once the heads are on I'll check my push rod length and button up the top end.

Cheers,
Ryan

1976 Trans Am LS1 and much more...SOLD
1968 Camaro LSA, T56 Magnum, and much more...SOLD

Current Project: 1955 Nomad LC9, 4L80e, C5 brakes and etc...

ryeguy2006a

  • Oracle Forum Member
  • *
  • Posts: 6039
Re: 1968 Camaro Resto-mod LS3/6 speed; Project Penny Pincher
« Reply #2 on: March 08, 2021, 06:30:55 AM »
Made some more progress on my engine last week. I installed the LS7 lifters that have been soaking in new oil along with some trays.


Then I cleaned up the deck and head mating surfaces and installed a new LS9 head gasket.


Finished the head install with a set of ARP bolts torqued to their specs.


It was getting late when I was in the garage and got carried away test fitting the engine accessories. I started by test fitting the water pump, and before I knew it the whole accessories were mocked up.


I test fit a new LS1 Fbody belt that I had kept in the event that it would work with my new accessories, but it's way too short. The routing looks good, but I do need to find a smaller idler pulley. This one was a random one that I had just to mock up.


Then I got to looking at the low mount with truck alternator. It's going to be really close, and the positive stud will be contacting the frame. So I'm either going to need to reclock it or try a new alternator.


I finally tracked down the last part that I needed for my Hybrid TR6060-Magnum project. I needed a mid-shift plate to cover up where the stock TR6060 shifter was. I found one listed on eBay along with a shifter and messaged the guy. He sold me the plate by itself, Win. I'll get some new bolts, but here it is installed hand tight to keep out dust/dirt.


I also bought a few other parts. One is a trap door for the trunk so that I can swap out fuel pumps much easier. I like how this trap door is very slim and won't intrude into the truck far.


I also finally found a fitting that works for the fluid pump on the TR6060. It is Dorman Part# 800-732, with a 9/16-18 thread with O-ring on the transmission side and a 5/8-18 inverted flare fitting for the line. I opted to go with a conventional flare nut over an AN fitting because I think it will do a better job of cooling, and a little easier on the wallet.


I also got a 5' section of 3/8" NiCopp line with fittings and a Holley CAN splitter.


Thanks,
Ryan

1976 Trans Am LS1 and much more...SOLD
1968 Camaro LSA, T56 Magnum, and much more...SOLD

Current Project: 1955 Nomad LC9, 4L80e, C5 brakes and etc...

ryeguy2006a

  • Oracle Forum Member
  • *
  • Posts: 6039
Re: 1968 Camaro Resto-mod LS3/6 speed; Project Penny Pincher
« Reply #3 on: March 09, 2021, 08:51:37 AM »
I've been continuing to make progress toward getting this motor installed. I have been jumping around, but I wanted to make sure that I've got everything test fit and ready so I only have to install the motor and trans once.

I started by mocking up the motor and engine harness. Holley gives a lot of extra wiring length, so I'm working on cleaning that all up. I'll wrap it up inside of the cabin, but outside it fits much tighter and cleaner. I also need to add a few wires for the Flex Fuel Sensor and MAC valve. Another little detail is that I had to re-drill the coil brackets to lower them by about 1" so that they clear the fuel rails. I have some really nice mesh wire wrap that I'll finish it all up in. Should look very clean and tidy when I'm done.


I mentioned that I'll be wiring up a MAC Valve, and what I'm going to try and do is use it as a makeshift boost control valve. There are a few people online who have been playing with the Terminator software to use this valve to control boost in certain situations. My intentions would be to turn down the boost while I break in the motor, but it could be used for traction control, valet mode, and etc. Something for me to play with down the road.


I also picked up a cheap LS1 Fbody alternator to try in the low mount position and it wasn't any better than the truck, so I'm back to square one.


I bought these a long time ago, and was looking forward to installing them ever since. With all of the miles on the stock rockers and the added lift from the cam, I opted to go with brass trunnions. I went with the CHE Trunnions for two reasons. I really liked how these had a floating design rather than a pressed in fixed bushing, and secondly by default of their construction the ease of installation. Because they are a floating design it doesn't require any press to install. They all just slip together. Overall it took me about an hour to assemble and lube them all up. Very impressed with the quality here and would recommend them highly.


After I installed the rockers, I measured for pushrods and came up between a 7.375 and 7.400, so I opted to use the 7.400 that I already have. If they end up being too tight and give that sewing machine sound, I'll swap them out for the looser of the two. What was interesting is that when I went to rotate the motor to check for pushrod length on a few different rockers, the motor was frozen. It didn't want to move at all. Now, I have doublechecked everything along the way so I was terrified I screwed something up. I assumed the worst, but it didn't make sense as nothing has changed that I could think of. So ended up pulling apart the front of the engine and found the culprit... oil pump. When I had disassembled to shim, I must have flipped the drive around and it clamped tight. I swore I was careful about orientation, but somehow got flipped 180*. After I corrected that, everything turned freely. While I was in there, I took the opportunity to document my timing marks as I didn't get a picture before. Re-torqued and reinstalled everything.


I then moved onto the clutch master cylinder swap. Last season I wasn't happy with how stiff the pedal was on my car. After researching I found out that Tick uses a 7/8" bore Tilton which by nature is more stiff, because the 3/4" is what came stock. So because I'm going to run a McCleod RXT which will be stiffer than the LS7, I opted to swap those out now. Nice thing about having the parts already fit, is it was a simple remove and reinstall exercise.


I got a crank pinning kit from LSXInnovations and the first one was "lost" in the mail, so they sent me another one. Well the replacement came one day and the "lost" one showed up the next day. I've contacted them to return one, so I'll see what they say.


I cleaned up the low mileage clutch (500 miles) that I bought a while ago and followed the installation instructions per their specs. All went very smoothly. The steel install tool worked so much better than the plastic ones. The trans slid right together.


Then I bent up and installed the fluid pump lines. Unfortunately the driver's side wouldn't fit the tunnel, so I need to make some changes to how it's routed. I'll end up using the stock line that came with the trans and a compression fitting so it will be a quick fix. But I was a little bummed since I liked how clean it was. Oh well.


Then after about an hour of messing around to carefully not hit anything, the motor/trans are installed! Overall the fitment is very similar since the drivetrain that it replaced was almost identical. I was worried that the slightly larger TR6060 bellhousing would be an issue, but it fit with room to spare. That's a huge relief. Another huge relief is that the stock Tremec shifter fits right in almost the same spot as my T56 Fbody trans. Overall a huge win!!


I'm hoping that the rest goes pretty smoothly since I'll be bolting on many pieces that were already fit to the car like the exhaust. I think I can make a slight modification to a truck alternator and it will work, but I need to get one in my hands. Another detail that I decided to do while I'm upgrading everything else was to upgrade from Terminator X to X Max for DBW. I was looking around at my throttle body options and considering a Nick Williams but they are $400 bucks. After looking around I was able to upgrade to Terminator X Max (Thanks MCB), sell my Terminator X base (Thanks Jonathan) and buy a pedal/throttlebody for about the same price. Should give me more control over when safeties can be activated and a few other options. So I'll need to make a few changes to accommodate that, but will be worth it in the end.

Thanks,
Ryan

1976 Trans Am LS1 and much more...SOLD
1968 Camaro LSA, T56 Magnum, and much more...SOLD

Current Project: 1955 Nomad LC9, 4L80e, C5 brakes and etc...

ryeguy2006a

  • Oracle Forum Member
  • *
  • Posts: 6039
Re: 1968 Camaro Resto-mod LS3/6 speed; Project Penny Pincher
« Reply #4 on: March 17, 2021, 11:35:49 AM »
Luke, you did a great job on that LS swap. I think it may be time to start thinking about the 67 RS now:drive:

I made some more progress over the weekend. I decided to change gears and start thinking about my fuel system. I got the tank installed and mocked up so that I could cut an access hole in the trunk. I cringed a little before I made the cut, but it was worth it to be able to pop the fuel pump in and out so easily.


I need to get the hammer and dolly out to flatten out some of the panels. I'll also likely need to stitch weld some of the seams to make a flat spot to mount the access door. My pan is to make it look like semi-factory when it's done.


Mocked up and cut my power steering lines. The fittings and line are Russell Power Flex and were super easy to make. Made for a nice clean routing.


Then I turned my attention to my fuel tank. I bought the fuel sender from Rick's, but it ended up being pushed out several times on backorder, so I decided to make my own. I had a few leftover parts from another attempt I had at making a fuel sender in my last tank and built my own. I had a spare fuel sender that came with another fuel pump housing that I cannibalized the mounting point from. It worked out really well and works great.


The finished product installed in the tank. It's ugly, but works flawlessly.


I also made the change recently and decided to go with a Terminator X Max for the DBW function. I found a good buddy who wanted my Terminator X ECU and he bought that. Win win for both of us. I bought a gold blade LS3 throttlebody and a C6 pedal, just waiting for the new ECU to come in before I can test to make sure that they all work properly together.


I went back and forth on the few options that I have for running a low mount alternator in f-body location, but at the Vette spacing to line up with my CTS-V accessories. The stock truck 105 Amp alternator that I have would work other than the battery stud points right at the frame. After a failed attempt at trying to reclock the alternator, I thought maybe I could bend the stud to fit and get a new alternator. While this worked, it was not ideal. I found out that the Powermaster 484831 alternator has a side post stud, same small case CS130 and would be located roughly in the same spot that my bent stud was and it is a 165 Amp unit. But after mulling it over for a few days I decided against that because I'm just not a big fan of where the stud comes out.


That led me to think outside of the box. I found out that the 14+ Silverado/Sierra alternators are all a side post models, directly bolt into the location I need, are roughly the same size if not a bit smaller and come in 150 or 170 Amp models. Only downside is that they are controlled by PWM+ and will not function properly without the proper signal. I found a cheap 170 Amp unit on eBay this morning and will give this a try. Plus I should be able to program an output in X Max to drive the alternator and can use it to ramp up based on load. Keeping my fingers crossed that it fits because this would solve all of my alternator issues.

Cheers,
Ryan

1976 Trans Am LS1 and much more...SOLD
1968 Camaro LSA, T56 Magnum, and much more...SOLD

Current Project: 1955 Nomad LC9, 4L80e, C5 brakes and etc...

Re: 1968 Camaro Resto-mod LS3/6 speed; Project Penny Pincher
« Reply #4 on: March 17, 2021, 11:35:49 AM »

Nexus

  • Oracle Forum Member
  • *
  • Posts: 2040
Re: 1968 Camaro Resto-mod LS3/6 speed; Project Penny Pincher
« Reply #5 on: March 20, 2021, 08:20:41 AM »
re-subscribed!!
Charlie

79 Esprit but like many, it will be a T/A clone
(22 years and counting but still have her)
http://transamcountry.com/community/index.php?topic=79648.0

jonathonar89

  • Oracle Forum Member
  • *
  • Posts: 2508
    • Mark's Cars Inc.
Re: 1968 Camaro Resto-mod LS3/6 speed; Project Penny Pincher
« Reply #6 on: March 20, 2021, 09:21:22 AM »
re-subscribed!!

We are watching you Ryan  :lol:
Mark's Cars Inc.

https://markscarsinc.com

Jack

  • Oracle Forum Member
  • *
  • Posts: 12429
  • 1971 Esprit TA Clone W72 1972 Formula 68 350 HO
Re: 1968 Camaro Resto-mod LS3/6 speed; Project Penny Pincher
« Reply #7 on: March 20, 2021, 11:16:35 AM »
X3


Regards, Jack

FormTA

  • Oracle Forum Member
  • *
  • Posts: 5558
  • Life is short, have fun, Drive a T/A
Re: 1968 Camaro Resto-mod LS3/6 speed; Project Penny Pincher
« Reply #8 on: March 21, 2021, 05:52:23 AM »
I bet you are itching to get this running! I was out yesterday in the TA. Good work on the fuel sending unit! I like it when things are built, not bought.
79 Trans am low buck LS swapped
79 Formula 301 (Work in progress)
67 RS Camaro (waiting it's turn)
69 Dodge charger on late model charger chassis
49 Ford F1 on a 2003 Chevy ZR2 Chassis (current project)
Names, Luke. If I hear anyone telling me they're my father....

ryeguy2006a

  • Oracle Forum Member
  • *
  • Posts: 6039
Re: 1968 Camaro Resto-mod LS3/6 speed; Project Penny Pincher
« Reply #9 on: March 22, 2021, 07:28:43 AM »
Thanks guys, I'm still making progress.

Luke, you have no idea. It was 65* yesterday and I would have loved to take the car out. Motivation for sure.

The warmer weather has come early this year and I'm now chomping at the bit to get the motor back together. The 14+ Alternator came in pretty quickly and I couldn't wait to test fit it, but unfortunately the dimensions that I found online weren't accurate and it is just a little too big for the low mount position. I was able to get it installed, but it meant shimming the bracket .100" away from the block and would need to lower the sway bar mount  just to get it fit. Dealbreaker, but I'll save this alternator for another project. I had some parts sell unexpectedly so I bought the Powermaster alternator this morning that has the CS130D case which I know fits, is 165 Amps, and has a side post. Here's a picture of just how close the 14+ alternator was. 


Moving on I had to remove the snout of the supercharger in order to replace the stock spring isolator with the revised solid isolator from Eaton. Found a little wear from the spring on the shaft, but luckily there isn't anything that rides on that part of the shaft so it won't affect anything. PSA to all LSA owners, Replace your spring isolators. 


While that was off I also wanted to swap out the stock 2.95" pulley for the Griptech 2.50" pulley and ZPE hub. Wow that stock pulley was a PITA to remove. I ended up breaking the Harbor Freight 3 Jaw puller, but was successful with my bearing puller and impact gun. 


My father in law let me stop over and borrow his shop press and we were able to get the new hub pressed on.


Then after test fitting the LS3 Throttlebody, I realized that on the driver's side of the opening, there was a spot that rose up slightly and after looking at other ported snouts, they smoothed this out to give a straighter shot into the intake. My buddy let me borrow his porting tools and I got to work. Here is the before doing my best to show the restriction. The right side of the picture is what I'm talking about. 


Here is where I roughed it in being very careful to keep a light touch and long sweeping cuts. 


Then I used some sanding drums that I had starting with 80 grit and finished with 100 grit. I definitely thing it's an improvement, but I'm sure it was minimal if any improvement. I washed it out multiple times to get all the grit out. 


Changing directions I also was able to get my trans crossmember modified since the TR6060 Hybrid was a little longer. Ended up needing to move it back about 1.25", but was at the same height. 


I was using my dad's welder since he has a 211 Miller, whereas mine is a smaller 135. Glad I did because it gave excellent penetration. I didn't get the hang of his welder until the other side where I got all the settings perfect. Welds were a little hot at first, so I had to keep dialing it back. I could definitely get used to that welder for sure. 


I also mocked up my engine accessories to make sure there wasn't any clearance issues anywhere. Luckily it all fit just fine, but wanted to be sure. 


Now that the crossmember is finished, I'll be able to bolt up the trans for good and get my measurements for the driveshaft. One last thing though before I can do that is swapping out the differential yoke. I have a pretty bad leak there so I figured while I was addressing that I might as well upgrade to a 1350 yoke to match the trans and driveshaft I'll order. I bought this cool tool that will hold the yoke which will come in handy when I torque the new yoke down. 


I'm hoping to swap the yoke this week and get some measurements for the driveshaft sent out so that can be made. There is a lead time so I want that to be in process while I work on everything else. I need to button up the fuel pump door in the trunk next, and start bolting parts back onto the car. Also hoping to get the supercharger back together soon and test fitting it soon. 

Thanks,
​​​​​​​Ryan

1976 Trans Am LS1 and much more...SOLD
1968 Camaro LSA, T56 Magnum, and much more...SOLD

Current Project: 1955 Nomad LC9, 4L80e, C5 brakes and etc...

ryeguy2006a

  • Oracle Forum Member
  • *
  • Posts: 6039
Re: 1968 Camaro Resto-mod LS3/6 speed; Project Penny Pincher
« Reply #10 on: March 26, 2021, 12:32:05 PM »
I've been keeping busy and making a little bit of progress here and there. I got out into the garage last night and had something to show for it. This is partially an upgrade and partially maintenance. I've had a pinion leak since I build the rear end, but am now addressing that. Apparently you are supposed to add some sealant to the splines on the yoke, not just the nut. Lesson learned. Anyway, it was a great excuse to upgrade to a 1350 yoke while I had to pull the old yoke anyway. Hopefully I can get this back together soon, but I'm waiting on the correct pinion seal.


I should have just gotten the Powermaster 484831 from the beginning since I was sure that it would fit my needs. Failed attempt at using the 14+ Silverado alternator, but at least I tried right?? Anyway, this Powermaster unit checks all the boxes; 165 Amp, side post, and compact enough to fit where I needed it.


Again, I'm a sucker for a good deal. Picked up these Holley Tall Valve covers for half of retail that are brand new. They really serve two purposes for me; one I don't have to clean up my old scrubby ones, and two it moves the coils down so it doesn't interfere with the LSA fuel rails. And I'll add a third, they really look great. I'm either painting them Chevy orange or Torch Red to match the car. Haven't decided.


I also picked up a used Elite Engineering E2 Catch can with all the hoses and one way valve. Looks new, and helps with forced induction from what I understand. I'm going to build a mount off of the supercharger tensioner to keep it out of the way and easy to access. Unfortunately the head mount bracket won't work.


Then the moment that I've been waiting for for a very long time. It's only mocked up at this point to check for interference, but it really changes the look of the engine bay.


My cowl hood bumps up in the middle so this should clear no problem.


This picture is straight across the two fender top body lines.


I'm so pumped about hearing this thing run! Ordered a few more parts and thankfully there is only one more large purchase and a few smaller ones before I can call it done.

Cheers,
Ryan

1976 Trans Am LS1 and much more...SOLD
1968 Camaro LSA, T56 Magnum, and much more...SOLD

Current Project: 1955 Nomad LC9, 4L80e, C5 brakes and etc...

FormTA

  • Oracle Forum Member
  • *
  • Posts: 5558
  • Life is short, have fun, Drive a T/A
Re: 1968 Camaro Resto-mod LS3/6 speed; Project Penny Pincher
« Reply #11 on: March 26, 2021, 04:39:52 PM »
All very cool! But I think I'm most excited about your improved welding skills! Great job! I wish I had time and your patience to do something like this but I don't and I'm quite happy with the new found HP I have.
79 Trans am low buck LS swapped
79 Formula 301 (Work in progress)
67 RS Camaro (waiting it's turn)
69 Dodge charger on late model charger chassis
49 Ford F1 on a 2003 Chevy ZR2 Chassis (current project)
Names, Luke. If I hear anyone telling me they're my father....

RamblerRacer

  • Active Forum Member
  • *
  • Posts: 357
Re: 1968 Camaro Resto-mod LS3/6 speed; Project Penny Pincher
« Reply #12 on: March 26, 2021, 08:09:51 PM »
That is a crazy amount of work and focus.  Probably the most impressive part of the build to me is how you research components and how they fit as a system and integrate it all.  Good stuff.

JT

scarebird

  • Oracle Forum Member
  • *
  • Posts: 1902
  • Former brake guy
Re: 1968 Camaro Resto-mod LS3/6 speed; Project Penny Pincher
« Reply #13 on: March 27, 2021, 10:23:25 PM »
Are you running a vacuum pump to your brake booster?

ryeguy2006a

  • Oracle Forum Member
  • *
  • Posts: 6039
Re: 1968 Camaro Resto-mod LS3/6 speed; Project Penny Pincher
« Reply #14 on: March 29, 2021, 05:40:25 AM »
Thanks guys!

Luke, it makes a huge difference when you have the right tools. I still really want to pick up a TIG welder.

JT, I love/hate doing the research. It's rewarding when you finally find the missing puzzle piece that completes a certain task. But it also takes lots of research on my end.

Scarebird, I'm not running a vacuum pump. There is a port right after the throttle body that is used to supply the booster with vacuum.

1976 Trans Am LS1 and much more...SOLD
1968 Camaro LSA, T56 Magnum, and much more...SOLD

Current Project: 1955 Nomad LC9, 4L80e, C5 brakes and etc...

Re: 1968 Camaro Resto-mod LS3/6 speed; Project Penny Pincher
« Reply #14 on: March 29, 2021, 05:40:25 AM »

ryeguy2006a

  • Oracle Forum Member
  • *
  • Posts: 6039
Re: 1968 Camaro Resto-mod LS3/6 speed; Project Penny Pincher
« Reply #15 on: April 02, 2021, 10:59:20 AM »
Now that the motor and components are all fitting together, I wanted to focus on the systems that I'm changing up and getting them ready to fire up the motor. One thing that I wanted to do is adding a fuel door in the event that I ever needed to change out my fuel pump assembly and/or upgrade the pumps. It will make the job soo much easier/quicker in the future. I wanted to make it sort of look like it could have come this way so I wanted to blend in the bead rolls. I'm pretty happy with how it turned out.

Here's the starting point where I hacked it away.


I made some pie cuts on the bead rolls then used a hammer and dolly to flatten them out. One side popped up and the other side popped down. Once it was all flat, I used my mig to weld it back together then ground it all flush with a flap disk.


I used some sprayed the door with etch primer, seam sealed the bottom side,  then topped it off with some satin black to blend it in with the existing trunk. Once I get the truck cleaned out, I'll go back and spray it over with some trunk splatter paint to give it a more original look.


Tank is installed for good now.


I talked with Carl at Vaporworx and ordered some parts to finish up the install of the PressureWorx kit. If I had bought new I would have had all the terminals and wiring, but since I got it second hand, I needed a few of the terminals. He was super helpful and got back to me right away. Excellent customer service. It's also worth pointing out one reason why I'm so glad that I upgraded to the PWM, since I found some previous work that wasn't my best. I don't remember the soldering being this bad, but check out the corrosion. I believe I did this about 3 years ago, so it happened pretty quickly. This most certainly would have failed at some point in the near future. It pulled apart when I gave it a little tug. Per Carl's (and Andrew's) recommendation, I'll be crimping my connections going forward.


As many have likely found out, the backorder on the Terminator X Max kits is pretty extensive with Holley directly. I waited for about a month and in the end just decided to stick with a cable throttlebody, rather than going DBW right now. Maybe when they are back in stock this fall I'll try again. For now I shopped around and found a great deal on a used Nick Williams 92mm. Came with the sensors too which is a big bonus. It fit great, and just barely cleared the PS reservoir. I'm going to make my own version of the Motionworks DBC bracket using a truck cable holder that I've had for a while and good news is my old throttle cable fits with room to spare. WIN.


Moving back to my yoke swap on the rear differential, I started doing some research on the correct seal. I found out that all of the one's that you get at the parts stores and RockAuto are actually meant for truck 12 bolts. Some people used a small 1/8" shim or don't fully tap in the seal to get the right depth. Then I found out that there is one company that does make the correct seal, and it's available at Summit Racing. Ratech RAT-6109 for those interested. This will allow the seal to sit closer to the seal mating surface on the yoke since it sticks out farther.


Timkin vs Ratech.


This along with silicone on the yoke splines should fix my leaky differential. Then more exciting news is my driveshaft from PEM racing came in. I'm very impressed with the quality and how quickly it shipped to me. This is their Drag Racing 3.5" .125" wall driveshaft with 1350 ends and Spicer solid U-joints included. They had the best price by far, and it came with free shipping! I ended up measuring 42" with my combination, but if you are replicating this build measure yours first. The guy I emailed there said that this combo should be good for around 750+HP, so I should be well under this figure.


Installed my Sonnax 1350 ujoint and test fit everything. Looks like I measured spot on with about 7/8" of stick out of the trans.


I ran out of time to get the yoke reinstalled, but the new seal is in. I'll need to torque it and then check the rotational drag with a torque wrench. Then I can button up the driveline and test fit the exhaust. I'm hoping that my mufflers won't be too close, but if not I may have to modify them or possibly replace.

I'm hoping to get out in the garage tonight and get a lot of work done.

Ryan

1976 Trans Am LS1 and much more...SOLD
1968 Camaro LSA, T56 Magnum, and much more...SOLD

Current Project: 1955 Nomad LC9, 4L80e, C5 brakes and etc...

ryeguy2006a

  • Oracle Forum Member
  • *
  • Posts: 6039
Re: 1968 Camaro Resto-mod LS3/6 speed; Project Penny Pincher
« Reply #16 on: April 13, 2021, 07:33:00 AM »
I've been working outside getting the house around for the early spring we are having. It's been nice enough for the last 3 weeks that I could have been driving my car which is extremely rare in NY. I've been plugging away with little projects here and there and have enough content for an update. After reading about all the problems that guys were having with the stock Tremec shifters leaking, I kept my eye out for a good used one and found a great deal on a barely used Hurst shifter. It didn't come with the shifter adapter, but I made one since Holley wanted $94 plus shipping for the little adapter. The shifter feel is much tighter compared to the stock Tremec. I measured before and after since I had the stock one installed at the time. The throw was about 5" from 3rd to 4th with the stock shifter, and 3.25" with the Hurst. This shifter takes out the slop and makes for a more firm shift. 


What I started with


Finished product, and also got the boot fit up nicer than I had it last fall. 


I have also been working on a DBC throttle bracket for the last few weeks here and there. I finished it up last night and am very happy with how it turned out. 1/8" aluminum plate and a 02ish truck throttle cable bracket that I trimmed the 3rd mount off of. I used a piece of cardboard, then a thin piece of aluminum, then the final piece. 


Final product. It works really well and I also have room if I decide to run a cruise control module. 


I have also been working on prepping the supercharger for the final install. Now that I confirmed that the snout needed no further porting, I replaced the spring isolator with an Eaton solid unit then silicone'd it all back together with Loctite 598. Note that this is what is supposed to be used, not just any black/gray silicone. 


I also bought some aluminum online and made up some plates to reinforce my intercooler brick. I sent those out to be welded and should have them back by the weekend. 


Then externally I had to make a clearance for the fuel fitting off of my fuel rail. I added a fuel pressure adapter so that I can put a regular gauge on there in the event I needed another spot to troubleshoot my fuel pressure. At the time I had lost my fitting, but I used this -6AN fitting I had to mock it up. I was positive that one of my boys took it and put it in a drawer or bucket or something. I'm also planning to make a bracket to mount the fill port for the supercharger coolant off of those two holes. Will make for a nice simple bracket to mount that fill port. 


Well it wasn't the kids that lost it... 


I also starting on my wiring. Carl from Vaporworx recommended 8ga wire from the battery directly to the Pressureworx module, so I'll do just that. I also routed the MAP wires along with the fuel pump wires so that I can utilize the boost referenced feature. Not much to show, but this big mess. I'm glad that I went with Carl's recommendation of 25' of wire because I needed all but about 3'. I was planning on buying 15', but I would have been way short. 


I also had a few parts come in from RockAuto. New knock sensors and a really nice molded hose for my booster. Both were really cheap. That molded hose will work perfectly and routes so cleanly around the supercharger. It's the part number for a ZL1 Camaro, but could be the same for a CTS-V. It needs to be modified slightly, but I'll grab a picture when it's installed. 


Cheers,
​​​​​​​Ryan

1976 Trans Am LS1 and much more...SOLD
1968 Camaro LSA, T56 Magnum, and much more...SOLD

Current Project: 1955 Nomad LC9, 4L80e, C5 brakes and etc...

jonathonar89

  • Oracle Forum Member
  • *
  • Posts: 2508
    • Mark's Cars Inc.
Re: 1968 Camaro Resto-mod LS3/6 speed; Project Penny Pincher
« Reply #17 on: April 13, 2021, 08:20:39 AM »
I’m sure those knock sensors will be more beneficial this time around with the boosted engine.  Also good that you figured out Holley actually has them disabled on their base settings even though they plug into the harness.

Good stuff!
Mark's Cars Inc.

https://markscarsinc.com

scarebird

  • Oracle Forum Member
  • *
  • Posts: 1902
  • Former brake guy
Re: 1968 Camaro Resto-mod LS3/6 speed; Project Penny Pincher
« Reply #18 on: April 13, 2021, 03:27:08 PM »
Scarebird, I'm not running a vacuum pump. There is a port right after the throttle body that is used to supply the booster with vacuum.

My friend has a 68 Chevelle SS with a 6.2 LT1 and tossed a Whipplecharger on it.  His vacuum was not enough to run the brake booster, though I wonder if the booster is to blame here.  We refit it with a manual Corvette master but other issues have cropped up.

TATurbo

  • Active Forum Member
  • *
  • Posts: 817
Re: 1968 Camaro Resto-mod LS3/6 speed; Project Penny Pincher
« Reply #19 on: April 13, 2021, 09:46:37 PM »
Sorta glad to see I'm not the only one who suffered some frustration with uncooperative stuff this winter (Just saw the 6spd rebuild...man that looks SWEET!) I think it'll be well worth the effort.  The shiny insides of a TR6060 are eye candy (Especially for a guy like me who'd never get to see them otherwise).  But...Holy cow Ryan, that SC'd engine looks amazing in there!  Like a big beautiful fresh bag of Jelly Bellies!   
 Glad to see you're back on the downhill side of things.  This car is gonna be a brute! Can't wait to meet it in person.
Congrats on the progress.
« Last Edit: April 14, 2021, 07:31:42 PM by TATurbo »
Tom
King of Prussia, PA

1981 Turbo Trans-Am
Build thread - http://transamcountry.com/community/index.php?topic=83354.0

5th T/A

  • Oracle Forum Member
  • *
  • Posts: 1384
Re: 1968 Camaro Resto-mod LS3/6 speed; Project Penny Pincher
« Reply #20 on: April 14, 2021, 07:48:44 AM »
Ryan,

Everything is looking fantastic. I chuckle at the name Penny Pincher. Back in 1968 General Motors could not have accomplished the same level of performance and refinement that you are able to achieve with an unlimited budget.
1980 T/A with a Pontiac 461

Gone but not forgotten;
1973 T/A 455
1975 T/A 400
1978 T/A W72
1982 T/A cross fire injected

Two wheel toys;
2014 Harley Ultra Classic Limited
2013 Honda CB1100
2010 Yamaha Vmax
1982 Yamaha Seca 750

ryeguy2006a

  • Oracle Forum Member
  • *
  • Posts: 6039
Re: 1968 Camaro Resto-mod LS3/6 speed; Project Penny Pincher
« Reply #21 on: April 19, 2021, 07:32:21 AM »
Thanks for the compliment, I appreciate that. My reasoning for the Penny Pincher is that while I use quality parts on the car, 90% or more of them are used. I typically like to spend 50% of retail, so I'm always pinching my pennies. Although Part 2 of that was because originally I had planned on painting the car burnt orange, so it was kinda like a penny. But I'm happy we went with Red.

I made a bunch of progress this weekend and I officially have reached the end of the parts buying stage... well maybe more tires, but you get the idea. Earlier in the week I broke broke down and finally picked up a bigger torque wrench. I've needed one that goes over the 150 lb ft unit that I have a few times now and this seemed like a good time since I had to torque my crank bolt. Before I torqued it though I wanted to pin the crank which as super easy with the kit from LSX Innovations.


I only ordered the torque wrench, but when I looked in my box there was also an extension set. Funny because I've been meaning to buy another 1/2" extension. Thanks AutoZone!


I picked up another crank holding fixture that bolts in place of the starter because surprise, the overseas one that I bought didn't even come close to fitting. I got the one from MAF and it was a perfect fit. After I bolted it in position I torqued the crank bolt per the instructions. Now can I just say that 235 lb ft is a lot of torque! Glad that's over.


Next up was making a bracket to hold my reservoir/ fill cap. For a little bracket like that, it looks simple, but took me a while to get it just right. It sits about an inch higher than the highest part of the brick so it should do it's job to purge all the air out of the system. I want to replace those bolts with some button head or allen socket bolts.


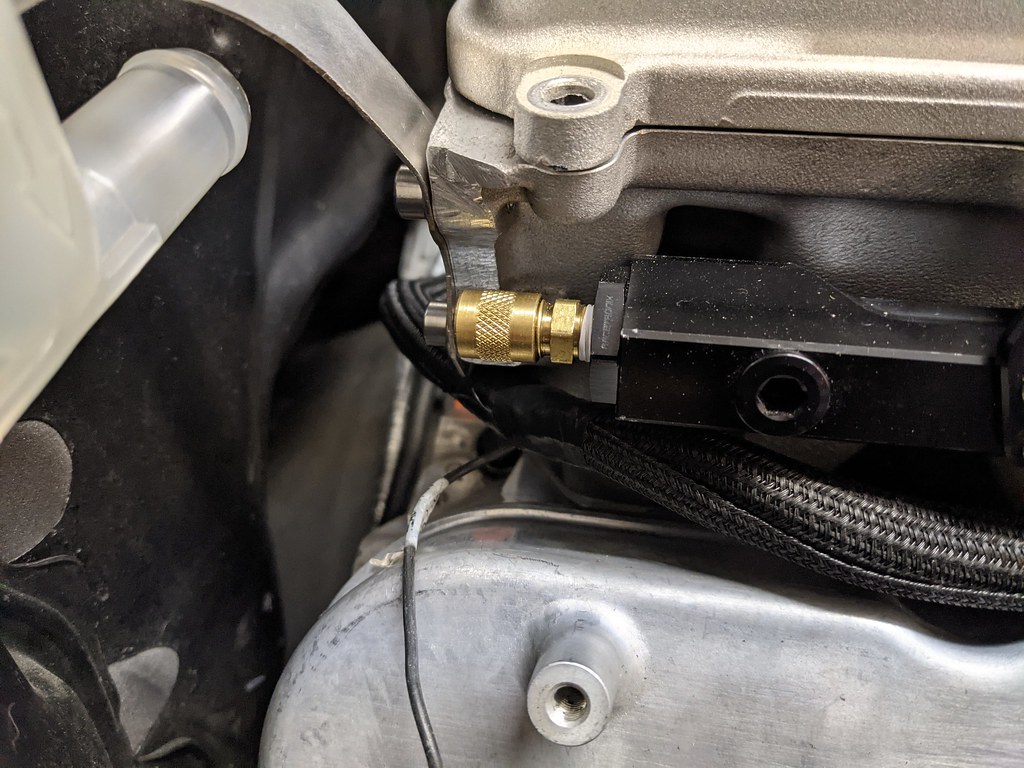
Here is the fuel pressure tester schrader valve I added. Could come in handy someday.


I've been holding off on installing anything on this side of the motor until I got the balancer torqued so I had clear access to the starter area. Installed my eBay find LS3 starter and was anxious to know if it worked. So I installed it, tested the starter solenoid and it easily bumped the motor over. Such a tease...


I also found an nice place to mount my fuel pump controller. Nice and out of the way, on this little mounting plate I made. I have the wires from the battery and crimped the terminals and it's installed on the controller now. Just need to crimp the battery side and then from the controller to the fuel pump itself. Shouldn't be long now and I can test fire the fuel pump and controller. Before I test it though I also need to make a bracket to add the flex fuel sensor inline.


Not sure why I kept putting it off, but I made my fuel crossover too. I used all Racetronix fittings and lines and they installed very easily. Very pleased with them.


I have been working on and off for about 2 weeks trying to figure out the best place to install my catch can. I was hoping to place it roughly in the same spot as the cylinder head mount, but the 8 rib tensioner occupied one of the mounting holes. What I was going to do is shave off 1/4" from the backside of the bracket and then it would bolt in place. Then my father in law came over and said why don't you find a way to maybe bolt it to the tensioner bracket. Then a lightbulb went off and I came up with this pretty clever idea. Since the bolt hole that holds the tensioner on is tapped all the way through and is completely open on the backside, I installed a longer bolt through it and it created a stud that I could use on the backside. Then all I had to do was shorten the bracket that came with it and drill/tap one hole on the bracket. Doesn't harm the integrity of the bracket, creates a nice spot to mount the can low and gives easy access to it for service. Super happy with that install.

Took way more time that I wanted, but I'm super happy with the results. The lines are backwards incase someone notices. I'll need to switch them before I fire up the motor.


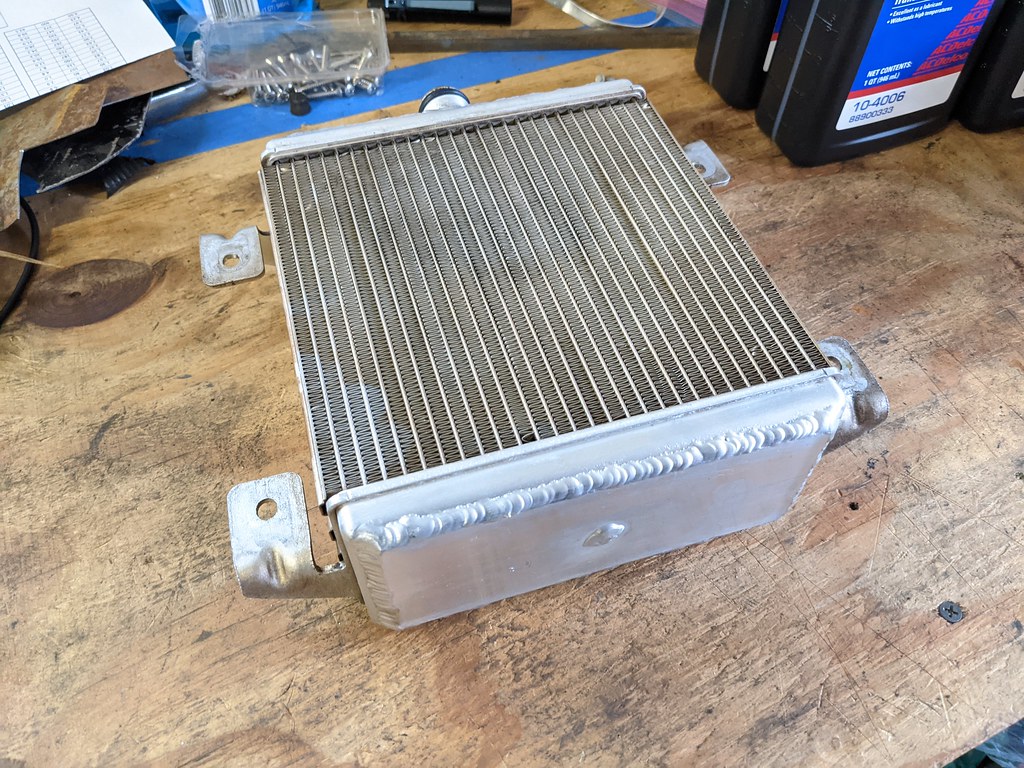
Then my last parts showed up. I had a buddy from Florida help me out and welded my brick for me. Shipped it there and back safely so that made me happy. Brian did a great job, thanks again man! For those that don't know, the stock intercooler bricks can collapse from boost even under stock psi. So it's really important to reinforce them, but especially if you overdrive the supercharger like I did.


Then the PLM heat exchanger came in. I've seen a few guys run this in a first gen Camaro one of which was an RS so I know it fits well. I'm going to copy what the RS guy did so I already know how I'm going to mount it. Just need to make a bracket.


I also opted to use the GM Synchromesh which is supposed to be the best for the TR6060 and T56 Magnum's.


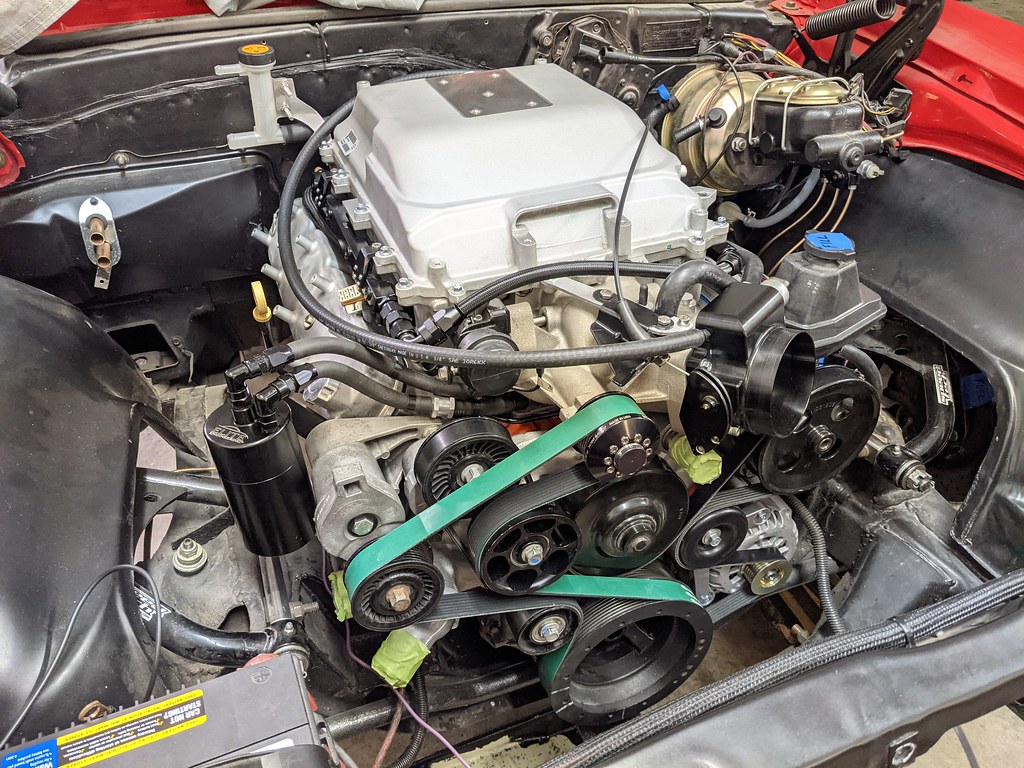
Now that the intercooler brick was here I didn't waste any time and got that installed Friday night. Then I kept grabbing parts off my bench and before I knew it, the motor was completely assembled and final torqued.


I'm getting so excited now! My punch list is getting very short and I'm really down to finishing some wiring for the ECU/Fuel pump, bolting my exhaust back on, fill/top off all fluids, prime the motor and send it! I'm hoping to get a few nights in the garage this week and turn the key next weekend.

Cheers,
Ryan

1976 Trans Am LS1 and much more...SOLD
1968 Camaro LSA, T56 Magnum, and much more...SOLD

Current Project: 1955 Nomad LC9, 4L80e, C5 brakes and etc...

roadking77

  • Oracle Forum Member
  • *
  • Posts: 13228
Re: 1968 Camaro Resto-mod LS3/6 speed; Project Penny Pincher
« Reply #22 on: April 19, 2021, 05:38:42 PM »
Looking nice Ryan, Im sure you cant wait until you can get that beast out on the road!
Finished!
77 T/A - I will Call this one DONE!
79 TATA 4sp-Next Project?
79 TATA - Lost to Fire!
86 Grand Prix - Sold
85 T/A - Sold
85 Fiero - Sold
82 Firebird - Sold
'38-CZ 250
'39-BSA Gold Star
'49-Triumph 350
'52-Ariel Red Hunter
'66-BSA Lightning
'01-HD RoadKing

737driver

  • Oracle Forum Member
  • *
  • Posts: 2228
  • "Life is hard, It's Harder when you're Stupid.."
    • My Trans Am - Restoration Project
Re: 1968 Camaro Resto-mod LS3/6 speed; Project Penny Pincher
« Reply #23 on: April 19, 2021, 10:49:26 PM »
Great progress! That will truly be a really awesome car!,
Jim
1979 Trans Am- Heritage Brown -W72 (Pontiac 400) -4Speed-WS6
1972 LeMans Convertible
1977 Trans Am
1972 Firebird
2000 TransAm WS6
1968 Lemans Converible
1979 TransAm Gold WS6 400/4speed
1971 Firebird
1977 MGB  Roadster Convertible

RamblerRacer

  • Active Forum Member
  • *
  • Posts: 357
Re: 1968 Camaro Resto-mod LS3/6 speed; Project Penny Pincher
« Reply #24 on: April 20, 2021, 12:32:40 PM »
Awesome progress Ryan.
Very impressive attention to details

JT

Re: 1968 Camaro Resto-mod LS3/6 speed; Project Penny Pincher
« Reply #24 on: April 20, 2021, 12:32:40 PM »

ryeguy2006a

  • Oracle Forum Member
  • *
  • Posts: 6039
Re: 1968 Camaro Resto-mod LS3/6 speed; Project Penny Pincher
« Reply #25 on: April 21, 2021, 06:43:58 AM »
Thanks guys. I got a little more work done wiring up the fuel pump controller and I'm nearly finished with that install. Just need to crimp on a few terminals and loom the wiring. I need to build a little bracket for my flex fuel sensor and after I make a few new fuel lines my fuel system will be complete.

1976 Trans Am LS1 and much more...SOLD
1968 Camaro LSA, T56 Magnum, and much more...SOLD

Current Project: 1955 Nomad LC9, 4L80e, C5 brakes and etc...

roadking77

  • Oracle Forum Member
  • *
  • Posts: 13228
Re: 1968 Camaro Resto-mod LS3/6 speed; Project Penny Pincher
« Reply #26 on: April 21, 2021, 07:15:32 AM »
And I get the motivation to put a screw in my door handle pull  :shock:
Finished!
77 T/A - I will Call this one DONE!
79 TATA 4sp-Next Project?
79 TATA - Lost to Fire!
86 Grand Prix - Sold
85 T/A - Sold
85 Fiero - Sold
82 Firebird - Sold
'38-CZ 250
'39-BSA Gold Star
'49-Triumph 350
'52-Ariel Red Hunter
'66-BSA Lightning
'01-HD RoadKing

ryeguy2006a

  • Oracle Forum Member
  • *
  • Posts: 6039
Re: 1968 Camaro Resto-mod LS3/6 speed; Project Penny Pincher
« Reply #27 on: April 23, 2021, 07:20:14 AM »
You're funny Kerry.  :lol:

I had to pull my tank one last time since I forgot to add a grounding wire to the fuel tank. I got that installed and added a metri-pack connector to for the fuel level sensor so that I can pull the tank quickly if needed. I added a ground wire from from the main battery wire feed for the fuel pump. 


Got the tank back in and all the connections made. So glad that I added that trap door. 


8 ga wire that splits into the two feeds for the fuel pump. Should be minimal voltage drop from the battery.


The fuel pump module is all done and installed. I'm waiting on some connectors so I still need to hook up the MAP - and MAP signal wires, as well as looming the wiring. But as is, it will control the fuel pump but without those wires it won't be boost referenced. 


Before I loom up the engine wiring I wanted to hook everything up to confirm that I don't have any wiring or sensor issues. All the wiring, headers, and coils are now installed on the car. I do need to make a few little clearance dents for the plug wires and access to the plugs. I also bought a longer throttle cable so that I can route it a little more neatly than how it is currently. Otherwise the motor is pretty much in the final stage of assembly. 


Hopefully this is helpful for someone out there, but these are the belts I used for the 2.5" upper pulley and the stock CTS-V accessories with the ICT low mount Alternator.


I then moved my attention to the heat exchanger. This was the largest one that I could find that would work with everything in the stock location. I had considered getting a larger exchanger and having some fittings welded to it, but that didn't work out. It would physically fit in the space, but with the hood latch and center brace installed it was clear I would need some major modifications. This exchanger is still much larger than the stock CTS-V and with the upgraded circulation pump, I should be ok. I'll keep an eye on my IAT's once I get the car up and running. 


I'm having a little trouble figuring out how I want to mount my coolant circulation pump in order to maximize the flow while keeping it accessible for servicing. I need to get the exchanger final mounted before I can find a final mounting spot. I also found out recently that the pump actually can be run off of PWM. Pin A is ground, B not used, C is PWM+ signal, and D is 12v Ignition. Most people tie the C and D pins together which makes the pump run at 100% duty cycle. My thought is that I can use Holley to control the circulation and use IAT's as my trigger to increase the duty cycle. For now I'm going to wire it for the pump to run 100% because I just want to get the car up and running right now, but this is a project for later this summer I think. I still need to do more research since Holley only has a PWM- output, so getting the PWM- signal to PWM+ is my homework. 

If I can get out into the garage tonight I'm pretty sure that I can start the car tomorrow!

1976 Trans Am LS1 and much more...SOLD
1968 Camaro LSA, T56 Magnum, and much more...SOLD

Current Project: 1955 Nomad LC9, 4L80e, C5 brakes and etc...

jonathonar89

  • Oracle Forum Member
  • *
  • Posts: 2508
    • Mark's Cars Inc.
Re: 1968 Camaro Resto-mod LS3/6 speed; Project Penny Pincher
« Reply #28 on: April 23, 2021, 07:47:46 AM »
Much respect man.  This swap is a lot more work than I initially thought it was going to be but you’ve hit it out of the park. 
Mark's Cars Inc.

https://markscarsinc.com

ryeguy2006a

  • Oracle Forum Member
  • *
  • Posts: 6039
Re: 1968 Camaro Resto-mod LS3/6 speed; Project Penny Pincher
« Reply #29 on: April 23, 2021, 08:32:21 AM »
Much respect man.  This swap is a lot more work than I initially thought it was going to be but you’ve hit it out of the park.

Thanks! You and me both. In my mind I was pretty much thinking slap the LSA on and make some boost. Lots of little parts and things to think through.

1976 Trans Am LS1 and much more...SOLD
1968 Camaro LSA, T56 Magnum, and much more...SOLD

Current Project: 1955 Nomad LC9, 4L80e, C5 brakes and etc...

roadking77

  • Oracle Forum Member
  • *
  • Posts: 13228
Re: 1968 Camaro Resto-mod LS3/6 speed; Project Penny Pincher
« Reply #30 on: April 23, 2021, 10:28:08 AM »
I would like to have you in my shop for a long weekend. I know my car would be on the road before you left.
Finished!
77 T/A - I will Call this one DONE!
79 TATA 4sp-Next Project?
79 TATA - Lost to Fire!
86 Grand Prix - Sold
85 T/A - Sold
85 Fiero - Sold
82 Firebird - Sold
'38-CZ 250
'39-BSA Gold Star
'49-Triumph 350
'52-Ariel Red Hunter
'66-BSA Lightning
'01-HD RoadKing

ryeguy2006a

  • Oracle Forum Member
  • *
  • Posts: 6039
Re: 1968 Camaro Resto-mod LS3/6 speed; Project Penny Pincher
« Reply #31 on: April 26, 2021, 08:35:41 AM »
Haha, thanks Kerry, How was Carlisle?

Close but no cigar... I worked from 8 - 2am Friday night and didn't quite get it all finished up. I probably could have gotten it to the point of firing this weekend if I chose to not install the flex fuel sensor now. I went back and forth because I don't "need" it, but it's something I eventually want to play with. It would be a huge PITA to do it when the hood is back on so I bit the bullet.

I wanted to focus on getting the fuel system finished up, so the flex fuel sensor was next up on that list. Like always, I mocked it up with cardboard first, then used my final material. Version 1.0 I was planning on using two small bolts to hold on the bracket, but after getting it fit up in there, I realized that I could use one of the mounting studs off of the brake booster and it would give me more clearance around everything.


The fuel lines are always a discussion, but I've been very happy with using the Nylon fuel lines and Dorman fittings. Here's how I've always done them and have had great success. Caulk gun method requires you to use a two post caulk gun and a brake flare tool. It really couldn't be any easier. If it's your first time doing it, I'd suggest using a practice piece to make sure you have the right clamping force and pressure. Position the fuel line in the brake flare tool, use the fitting to measure the correct depth so you can have the right amount of stick out, make sure the line and fitting are both centered in the caulk gun, then slowly press the fitting in. I pressed mine in dry, but you could also use a window cleaner or something that would evaporate to make the press a little easier. If you get the right amount of clamping pressure there is minimal amount of marks left by the brake flare tool. I used a little heat to form the tighter bends around the wiper motor and it was a perfect fit! Very happy with the install.


Fuel system is now fully plumbed and wired up. I bought 10 gallons of fresh 93 octane so I'll fill the tank and then I can check for leaks. Now I can move onto the heat exchanger install. I welded a few flange nuts to the core support and drilled a few holes into the aluminum angle iron to hold it to the car. Then after shuffling the heat exchanger around side to side, I found the best position for functionality and aesthetics. I wanted it both centered in the grill, and also not interfere with the RS headlight doors or the center mount. Once I was happy I drilled the holes for the HX mounts.


The HX will be leaned back about 1/2" in, but for the picture was leaned forward.


Lower mounts, done. Now onto the upper mounts. After scratching my head and looking for pieces of metal for inspiration I found what I needed. Sorry honey, we don't need this shelf anymore. Haha. Hot rodding at it's finest. These little brackets were perfect for what I needed. I'm so happy with the way that they turned out. I literally just put a few bends in them and tweaked slightly and they fit like it was made for this application. The two HX mounting holes on each bracket were perfectly spaced, just needed to be slightly drilled out. I had targeted a hole on the upper core support and the hole on the bracket lined up and was centered perfectly!


I figured that I got lucky on the first one and it would take more effort to mirror the second one. The car gods were looking out for me and I matched the same angle as the passenger side and it fit identical to the other side!! I was so shocked that it worked out that nicely for me. That had to be one of the easiest jobs I've done on this car.


Then I reinstalled the radiator. I love bolting on existing parts. A few bolts and one wiring connector. Lower hose was the same, but I'll need a new upper to be made/bought.


I also had to figure out what to do with the booster hose. The ZL1 hose I bought is 1/2", but the booster fitting I have is 3/8". After looking around my garage I found a cap that just happened to have the same OD as the ID of the 1/2" hose. So I cut the end off of it and installed the sleeve. The hose also was a two piece design with a coupler in the middle. So shortened center of the hose and put it all back together. Couldn't ask for better fitment.


I was able to reuse my metal tube for the CAI by shortening it by ~5" and tweaked the mount slightly and it worked like it did with my LS1. I just had to use the 45 degree coupler vs the 90 degree I used before. I think the filter on it now is 6" which could be a restriction so I'm planning to eventually by a 8" or 9" Green Filter. But for now I want to get the car up and running. Easy change later.


I also was playing around with the wiring a bit to see what all needed to be addressed. I wanted to get everything hooked up to confirm that it all functions before I tuck it all up and make it tidy. I've been there before where there is a problem and you have to undo the nice clean work... I built my own 2 pin to 4 pin CAN adapter for my Holley harness, but I built mine from a splitter I bought on eBay. Nicely built splitter, almost a shame to cut it up. I needed the splitter though since I'll be using both my 3.5" touchscreen, USB cable and the Dakota Digital CAN signal for the gauges.


Looks like a terrible mess, but in reality is very close to being done.


I was so happy when I fit my exhaust up that it will clear my new driveshaft. I was thinking I may have to modify it, but so glad I don't have to. I'm really down to some really basic things before I can get fire up the car. Biggest thing is where I want to mount the HX pump and then routing the coolant lines. After that I need to button up some wiring, fill all fluids, bleed my clutch, build/buy a new upper radiator hose, prime the oil pump, and turn the key. I'll plug away at these things this week and maybe I'll take Friday afternoon off.

Cheers,
Ryan

1976 Trans Am LS1 and much more...SOLD
1968 Camaro LSA, T56 Magnum, and much more...SOLD

Current Project: 1955 Nomad LC9, 4L80e, C5 brakes and etc...

ryeguy2006a

  • Oracle Forum Member
  • *
  • Posts: 6039
Re: 1968 Camaro Resto-mod LS3/6 speed; Project Penny Pincher
« Reply #32 on: April 28, 2021, 01:34:47 PM »
Also thought I'd post this up since I had a question about it before. There is a square stock that I welded to the bottom side of the bracket so that it won't rotate.


1976 Trans Am LS1 and much more...SOLD
1968 Camaro LSA, T56 Magnum, and much more...SOLD

Current Project: 1955 Nomad LC9, 4L80e, C5 brakes and etc...

roadking77

  • Oracle Forum Member
  • *
  • Posts: 13228
Re: 1968 Camaro Resto-mod LS3/6 speed; Project Penny Pincher
« Reply #33 on: April 28, 2021, 01:51:21 PM »
Nice work.  I like the brackets you made, looks like something I would/have done.
Finished!
77 T/A - I will Call this one DONE!
79 TATA 4sp-Next Project?
79 TATA - Lost to Fire!
86 Grand Prix - Sold
85 T/A - Sold
85 Fiero - Sold
82 Firebird - Sold
'38-CZ 250
'39-BSA Gold Star
'49-Triumph 350
'52-Ariel Red Hunter
'66-BSA Lightning
'01-HD RoadKing

jonathonar89

  • Oracle Forum Member
  • *
  • Posts: 2508
    • Mark's Cars Inc.
Re: 1968 Camaro Resto-mod LS3/6 speed; Project Penny Pincher
« Reply #34 on: April 28, 2021, 02:58:46 PM »
Nice work.  I like the brackets you made, looks like something I would/have done.

You guys got me beat.  It’s better than I would do.  My hand at custom parts/work isn’t too impressive  :lol:
Mark's Cars Inc.

https://markscarsinc.com

ryeguy2006a

  • Oracle Forum Member
  • *
  • Posts: 6039
Re: 1968 Camaro Resto-mod LS3/6 speed; Project Penny Pincher
« Reply #35 on: May 04, 2021, 07:13:04 AM »
Thanks man, I appreciate that. It's certainly been a juggling act and most importantly, I have a very understanding wife.

Last Friday night I made a big push to button up all of the remaining items on my punch list. The biggest thing was mounting my heat exchanger pump and routing all of the lines without kinking them. I've been thinking about the placement of the lines for about a week now and finally am happy with this location. By mounting it here I didn't need to drill any holes in the core support and the hoses had a sweeping angles so there aren't any hard turns or kinks.


The BMW CWA50 pump uses a quick connect fitting for the inlet, which I was able to source from RockAuto. It was for a heater hose off of a 2005ish VW Golf.


Then I routed all of the hoses as neatly as I could.


Then after final fitment, I realized that I needed to notch the center support bracket just slightly so the heat exchanger bracket I made would fit better.


I painted and reinstalled the upright supports for the heat exchanger. Then reinstalled the center support, horn and hood latch.


I got some black annodized check valves, 3:1 heat shrink with glue, and an assorted clamp set to finish things up.


I'm not sure if it's 100% needed, but I also bought this inline PCV valve that was recommended by Holley per their instructions for their tall valve covers. I may end up removing it since I also have one in my valley cover.


Then it was time to fill or top off all of my fluids. Trans, rear diff, PS pump, and the engine. Not sure if it was entirely necessary, but I used this crazy contraption to pump oil into the galleys. It's hard to say if it worked or not and it was certainly messy.


Then I got everything plugged back in and realized that my GM oil pressure sensor was junk... I figured it was a long shot since it was a used sensor. I ordered two sensors from Lowdollar Motorsports and they showed up really quickly.


After working all night Friday and a few hours Saturday morning now it was time. I set up my base tune, all the fluids were topped off and everything was as ready as it could be. Finally turned the key and it coughed a few times and nothing. Just would crank, no fire. After walking away for a day and coming back I was able to determine that it was a user error. I somehow flipped the odd and even coil connectors so the engine was the equivalent of being 180* out on a motor with a distributor. I didn't have enough time Sunday to work on it any further, but after flipping those quickly on my lunchbreak yesterday, I tried again with success! What a great feeling that it fired up pretty quickly once all the connections were right. I was nervous about the oil pressure since it was a brand new motor, but it came right up within 1-2 seconds and had a steady 60 psi.

https://youtu.be/soeYhoMNaeU

Now what was the biggest tease is that I had a stubborn clutch that didn't want to bleed. I had the Speedbleeder from Tick, but it still didn't want to bleed. Since the remote bleeder is so long, I just cracked the bleeder and put it in the reservoir overnight. I went out last night to button up a few coolant hose leaks I had and tried to bleed it again. Then finally after about 5 mins there was a huge bubble that came out of the bleeder and that was it. Clutch pedal was great now. I switched from the 7/8" bore that came with the Tick kit, to a 3/4" bore to make the pedal a little softer. Last year I found that the clutch was very touchy and had a very narrow window for a perfect release. I'm very happy with the slightly longer travel and not having the pressure so heavy. Should make for a much more enjoyable drive.

I cleaned everything up and snapped a few pictures. Very pleased with the outcome. The weather is supposed to be decent at lunchtime today so I'm going to get some break in miles under my belt.


Cheers,
Ryan

1976 Trans Am LS1 and much more...SOLD
1968 Camaro LSA, T56 Magnum, and much more...SOLD

Current Project: 1955 Nomad LC9, 4L80e, C5 brakes and etc...

FormTA

  • Oracle Forum Member
  • *
  • Posts: 5558
  • Life is short, have fun, Drive a T/A
Re: 1968 Camaro Resto-mod LS3/6 speed; Project Penny Pincher
« Reply #36 on: May 04, 2021, 01:50:20 PM »
Aw man, that is awesome! You have one radical car there, great job. Can't wait for the test drive report and seat of the pants dyno!
« Last Edit: May 04, 2021, 04:07:32 PM by FormTA »
79 Trans am low buck LS swapped
79 Formula 301 (Work in progress)
67 RS Camaro (waiting it's turn)
69 Dodge charger on late model charger chassis
49 Ford F1 on a 2003 Chevy ZR2 Chassis (current project)
Names, Luke. If I hear anyone telling me they're my father....

jonathonar89

  • Oracle Forum Member
  • *
  • Posts: 2508
    • Mark's Cars Inc.
Re: 1968 Camaro Resto-mod LS3/6 speed; Project Penny Pincher
« Reply #37 on: May 04, 2021, 02:00:32 PM »
I agree FormTA.  Amazing job and great effort on Ryan's part to complete this over a winter. 
Mark's Cars Inc.

https://markscarsinc.com

5th T/A

  • Oracle Forum Member
  • *
  • Posts: 1384
Re: 1968 Camaro Resto-mod LS3/6 speed; Project Penny Pincher
« Reply #38 on: May 04, 2021, 02:44:18 PM »
Ryan,

Congratulations on getting it running. You have done an incredible amount of engineering getting your motor to fit and work in this car. Performance should be wild. Can't wait to see and hear more.
1980 T/A with a Pontiac 461

Gone but not forgotten;
1973 T/A 455
1975 T/A 400
1978 T/A W72
1982 T/A cross fire injected

Two wheel toys;
2014 Harley Ultra Classic Limited
2013 Honda CB1100
2010 Yamaha Vmax
1982 Yamaha Seca 750

ryeguy2006a

  • Oracle Forum Member
  • *
  • Posts: 6039
Re: 1968 Camaro Resto-mod LS3/6 speed; Project Penny Pincher
« Reply #39 on: May 05, 2021, 06:21:10 AM »
Thanks guys, I appreciate it. I am happy to report that I was able to take the car out on the maiden voyage with the new drivetrain. Since I'm still working from home I was able to get the car out for 20 mins or so on my lunchbreak. Keep in mind that the motor is a fresh rebuild so I need to take it easy for the first few hundred miles. Although I have a buddy who brought up a good point. When you buy a crate motor, or any of the engine rebuilders, they break the motor in for about 15-20 mins., then put it right on the engine dyno for full WOT pulls. He's built hundreds of motors and helped with countless others at a big shop down in Charlotte. So I trust what he says, but still made me nervous haha.

That said, I didn't take the car over 4k rpms this time. I was listening for any strange motor sounds, driveline vibrations, watching the oil pressure, watching IAT's (can get very hot because of the supercharger), watching coolant temp, feeling out the transmission, shifting gears, getting a feel for the new clutch and etc. I'm happy to report that the oil pressure cold was about 60 psi, and warm idle was around 35 psi. Right where I wanted them to be. IAT's were higher than I'd like, so I need to check into that. Coolant also got warmer than I'd like at around 200-205. Fans come on around 195, and before with the LS1 it would hit about 198 and then drop to 185 pretty quickly. I think there may be a bubble in the motor somewhere.

The transmission was also something I have been worried about since I tore it completely down. I'm happy to report that it shifts great, and the Hurst Blackjack shifter makes for an incredibly short shift. That is something I need to get used to. It's about a ~3" throw, which is much different than the Pro 5.0 that I had last year. I also now know what everyone means by the T56 being a notchy transmission. Whenever I would change gears last year there was always this little mechanical "notch" that you would feel before you went into a gear. 4th gear in particular had a notch that was more pronounced and would actually grind occasionally which I think was a bad synchro. This year is completely different. Gear shifts are buttery smooth and it just slides into gear. I'm so happy that I didn't seriously mess something up when I re-assembled as well as that the trans was healthy since it was a used unit. VERY happy about that. The transmission shifting is so smooth with the gear shifts which is something I pleasantly surprised with. 

Another thing that I changed was something I had planned on doing regardless of my engine/trans swap. I am running a 4th gen Camaro clutch master kit from Tick and when you get it from them it comes with a 7/8" bore Tilton unit. While this makes for a short throw, it makes the clutch pedal more stiff and also made for a very narrow window for a smooth gear change. I swapped it out for a 3/4" unit that added ~1.5" to the throw, but is so much more enjoyable to shift gears. The sweet spot for clutch engagement is wider so it takes less thought to shift smoothly as well as a more stock feeling pedal feel. I'd say it's only slightly more stiff than "stock", but it's to be expected with a twin disk clutch.

So far I've only had one leak, which was an easy fix since it was just a coolant hose. Needed a different hose clamp since the one I had was a little wonky. My diff isn't leaking which is a huge win!

Overall I couldn't be happier with my first outing, and my first impressions are that this is going to be a beast of a car. I kept running out of gear when I would hit the throttle. I have a lot of work to do on my tune, but the engine would pull hard. Chirps the tires without trying to. :shock: It's really going to be a handful, and I like that.

It's funny I'm relived that the car is back up and running again, but now I have a laundry list of things that I need to do to get the car running better.

Figure out why the coolant temp is getting higher
Why I have higher IAT's ~60 degrees over ambient
Lower the fuel pressure. Since I have 850cc injectors for when I run flex fuel, I lowered to 43psi in the tune, but my actual is about 65-67psi.
It surges at idle when hot, so I need to adjust the blade position and/or adjust the IAC settings
Integrate VSS into the tune so that I can have the reverse lockout function like stock. Right now I have it set to activate when the TPS is under 2%, but when I lift to shift it was open, so that's not good. I think I'll add a secondary condition to something like MAP input.
General cleanup of the tune
Need to replace my battery. It is weak and didn't want to re-start.

That's all I have for now. Hope to get some real seat time this weekend.

1976 Trans Am LS1 and much more...SOLD
1968 Camaro LSA, T56 Magnum, and much more...SOLD

Current Project: 1955 Nomad LC9, 4L80e, C5 brakes and etc...

Re: 1968 Camaro Resto-mod LS3/6 speed; Project Penny Pincher
« Reply #39 on: May 05, 2021, 06:21:10 AM »
You can help support TAC!