Author Topic: 1968 Camaro Resto-mod LS3/6 speed; Project Penny Pincher  (Read 18341 times)

ryeguy2006a

  • Oracle Forum Member
  • *
  • Posts: 6019
Re: 1968 Camaro Resto-mod LS3/6 speed; Project Penny Pincher
« Reply #120 on: November 09, 2021, 09:47:34 AM »
In preparation for the dyno appointment on Monday, I was checking over the car for anything that could be an issue. Then I noticed one last thing... My rear end slid forward on the driver's side again! So this is definitely an issue and since I had already bought all the parts to fix it, I pulled it all apart. As soon as I got the shock plate off, it was clear that the bolt was sheared off.


Quick fix with the new grade 8 hardware.


Went back together and was centered back in the wheel well just like before. Not sure why it broke, but now it should stay in place. 

Now the car was as ready as it was going to be and I headed out to the dyno. I made a couple pulls on the highway and still had rock solid fuel pressure! That bad pump really messed up my VE tables, but I was tweaking on it every time that I drove it since I swapped fuel pumps. I got it dialed in to where I was +/-5% in closed loop and still was after I opened her up. I had prepared 3 different tunes loaded on the handheld for the car. Dyno 1 tune was the same one I've been running all summer. Second and third each had the same tune, other than progressively adding timing in the WOT areas.

I arrived at the Overdrive Automotive and we got right to work. I had my dyno 1 tune in the car, we got the car up on the dyno and he got the car rolling in 4th gear and hit it. You could hear the car load up at first, but then quickly hit the rev limiter. Spun on the dyno! They sprayed some sticky aerosol and tightened the straps a few more clicks. Next run we were able to get a clean pull although he said it was still spinning a little bit around 3500 rpms. 596 HP and 497 TQ! In my head I really wanted to hit 600 rwhp, so the fact that we were this close right out of the gate, I knew that we could do it. He did make a few adjustments on the next few pulls to the timing tables between 60-100 kpa which he said was mostly for drivability and we bumped the rev limiter from 6500 to 6950 on my dyno 1 tune rather than loading dyno 2 or 3.


Here's the video! I love the way it sounds.

https://youtu.be/UFD9SW36-n8

We continued to have traction issues, and he added some solution from VP that really helped with traction for drag racing applications. That was the ticket and we ended up with final numbers of 633 HP and 619 TQ! I couldn't be happier with the results and how it all came together. What's amazing to me is that the tune is still on the more conservative side with my timing. He said that if we wanted to we could keep adding power because with a change of .5* of timing we gained around 7 HP on the last pull. He guessed we could probably add another 2-3 degrees. But I'm more than happy with this power level right now. I can always get a full on dyno tune, run full length headers, pulley changes for more boost and even add e85 to my tune up down the road for more power.


What I've learned from this whole experience is number one... I need more traction! Number 2 is that your tune is everything. Holley makes their software really easy to use and make good power, but it isn't self tuning by any means. You either need to read up and do a lot of homework like I did, or leave it to someone who really knows what they are doing. Even with all of the homework that I did, there is no replacement for an experienced tuner. Tom at Overdrive made a few changes to my car on the fly and it made a big difference as far as the drivability after the dyno. I've learned a lot just watching him and can't wait to continue tweaking the tune. He mentioned adding a 2 step to a clutch pedal, that I may give a try for next year.

I've still got some nice weather in the forecast so I'm looking forward to getting the most out of this year and get some more miles on her.

Cheers,
Ryan

1976 Trans Am LS1 and much more...SOLD
1968 Camaro LSA, T56 Magnum, and much more...SOLD

Current Project: 1955 Nomad LC9, 4L80e, C5 brakes and etc...

5th T/A

  • Oracle Forum Member
  • *
  • Posts: 1346
Re: 1968 Camaro Resto-mod LS3/6 speed; Project Penny Pincher
« Reply #121 on: November 09, 2021, 11:19:31 AM »
633 RWHP is very impressive by anybody’s standards, congratulations!

I am not sure what kind of stress is put on the bolt that snapped. I would think the ubolts around the axels would take most the stress. You were wise in giving your car a once over before the dyno runs.
1980 T/A with a Pontiac 461

Gone but not forgotten;
1973 T/A 455
1975 T/A 400
1978 T/A W72
1982 T/A cross fire injected

Two wheel toys;
2014 Harley Ultra Classic Limited
2013 Honda CB1100
2010 Yamaha Vmax
1982 Yamaha Seca 750

roadking77

  • Oracle Forum Member
  • *
  • Posts: 13146
Re: 1968 Camaro Resto-mod LS3/6 speed; Project Penny Pincher
« Reply #122 on: November 10, 2021, 07:33:10 AM »
Sounds quite respectable Ryan. Good work.
Finished!
77 T/A - I will Call this one DONE!
79 TATA 4sp-Next Project?
79 TATA - Lost to Fire!
86 Grand Prix - Sold
85 T/A - Sold
85 Fiero - Sold
82 Firebird - Sold
'38-CZ 250
'39-BSA Gold Star
'49-Triumph 350
'52-Ariel Red Hunter
'66-BSA Lightning
'01-HD RoadKing

Jack

  • Oracle Forum Member
  • *
  • Posts: 12429
  • 1971 Esprit TA Clone W72 1972 Formula 68 350 HO
Re: 1968 Camaro Resto-mod LS3/6 speed; Project Penny Pincher
« Reply #123 on: November 10, 2021, 10:21:38 AM »
X3 not sure many of us can squeeze anymore out of a 1st or 2nd gen regardless of the power plant.


Regards, Jack

FormTA

  • Oracle Forum Member
  • *
  • Posts: 5472
  • Life is short, have fun, Drive a T/A
Re: 1968 Camaro Resto-mod LS3/6 speed; Project Penny Pincher
« Reply #124 on: November 10, 2021, 07:06:47 PM »
Wow, just wow. That is awesome! To think you built that in your garage is amazing. There is so much that goes into a build like this and you executed it perfectly. The best thing about it is it is a streetable car. You can take the family anywhere comfortably and still rip it when you want to.

Way to go Ryan!
79 Trans am low buck LS swapped
79 Formula 301 (Work in progress)
67 RS Camaro (waiting it's turn)
69 Dodge charger on late model charger chassis
49 Ford F1 on a 2003 Chevy ZR2 Chassis (current project)
Names, Luke. If I hear anyone telling me they're my father....

Re: 1968 Camaro Resto-mod LS3/6 speed; Project Penny Pincher
« Reply #124 on: November 10, 2021, 07:06:47 PM »

ryeguy2006a

  • Oracle Forum Member
  • *
  • Posts: 6019
Re: 1968 Camaro Resto-mod LS3/6 speed; Project Penny Pincher
« Reply #125 on: December 02, 2021, 08:09:52 AM »
Thanks guys! I'm very proud of the car and was happily surprised to see how much power it was making!

I haven't done anything with the car since the snow started flying here in NY. I've been planning out some smaller projects for this winter and found a few good deals on Black Friday.

I'll start by saying a big thank you to EBC brakes! I entered a raffle on Camaros.net, and they picked me for a free set of front brake pads! They let me pick what I wanted so I went with the Red Stuff pads for my C6 Z51 brakes. Should make a difference with stopping power and they are supposed to have almost zero brake dust.


This year I'm not planning on doing any big projects like last year; full engine rebuild, engine swap, trans rebuild, supercharger swap to name a few...

One thing that did bother me last year was that my rear gears are too short now with the supercharger. After a lot of thought and calculations, I decided that I need a 3.42 rear gear instead of the 4.11's I'm running now. I need to get something taller, but unfortunately for me I opted for a 4 series carrier rather than the 3 series when I first built the rear diff. So that means that along with gears I also needed to buy a new carrier. I've only used a posi unit with clutches, but decided that this time I'd like to try a gear type carrier. While searching around for my options I found that for a few dollars more I could get an carrier with 33 splines. So what started as a gear swap, turned into a full upgrade. I bought a 33 spline Eaton TrueTrac, Richmond 3.42 gears, Timken master rebuild kit and a pair of Yukon direct replacement 33 spline axles.


When I built my rear differential originally, I really wanted a TA cover but opted for the stock one due to my lack of budget. Since I was going to have the cover off anyway, I decided now was the time.


The gear swap should only take a few weekends to finish, and I'll have to take my break in period in the spring.

They haven't shipped yet, but I also picked up a set of DSE frame connectors for a really good price on Monday. That will be a much more involved project, but looks pretty straightforward. I'm going to take my time to ensure that my fitment is spot on. I've decided that I'm going to stick with my stock wheel tubs and figure out how to get it to hook. It may involve a set of 15" wheels and sticky tires.

Cheers,
Ryan

1976 Trans Am LS1 and much more...SOLD
1968 Camaro LSA, T56 Magnum, and much more...SOLD

Current Project: 1955 Nomad LC9, 4L80e, C5 brakes and etc...

kentucky yeti

  • Jedi Council
  • Oracle Forum Member
  • *
  • Posts: 13350
  • located in western Ky
Re: 1968 Camaro Resto-mod LS3/6 speed; Project Penny Pincher
« Reply #126 on: December 03, 2021, 07:08:09 AM »
Sweet!
Mike (aka Yeti)

1977 Y82 W72 Auto
2015 F-150 Lariat 4x4 (twin turbo)
2016 Explorer Limited
2012 Mustang

roadking77

  • Oracle Forum Member
  • *
  • Posts: 13146
Re: 1968 Camaro Resto-mod LS3/6 speed; Project Penny Pincher
« Reply #127 on: December 03, 2021, 07:11:54 AM »
I wish I had your energy and enthusiasm  :-)
At least you have a little 'T/A' built into that camaro now, LOL.
Finished!
77 T/A - I will Call this one DONE!
79 TATA 4sp-Next Project?
79 TATA - Lost to Fire!
86 Grand Prix - Sold
85 T/A - Sold
85 Fiero - Sold
82 Firebird - Sold
'38-CZ 250
'39-BSA Gold Star
'49-Triumph 350
'52-Ariel Red Hunter
'66-BSA Lightning
'01-HD RoadKing

ryeguy2006a

  • Oracle Forum Member
  • *
  • Posts: 6019
Re: 1968 Camaro Resto-mod LS3/6 speed; Project Penny Pincher
« Reply #128 on: December 03, 2021, 08:19:08 AM »
I think that TA may be worth an extra 40 HP haha

1976 Trans Am LS1 and much more...SOLD
1968 Camaro LSA, T56 Magnum, and much more...SOLD

Current Project: 1955 Nomad LC9, 4L80e, C5 brakes and etc...

Nexus

  • Oracle Forum Member
  • *
  • Posts: 2040
Re: 1968 Camaro Resto-mod LS3/6 speed; Project Penny Pincher
« Reply #129 on: December 04, 2021, 11:50:34 AM »
All caught up...great numbers!!

That is very cool!!
Charlie

79 Esprit but like many, it will be a T/A clone
(22 years and counting but still have her)
http://transamcountry.com/community/index.php?topic=79648.0

TATurbo

  • Active Forum Member
  • *
  • Posts: 816
Re: 1968 Camaro Resto-mod LS3/6 speed; Project Penny Pincher
« Reply #130 on: December 12, 2021, 10:53:01 PM »
Congrats on exceeding your dyno goal...That's amazing. 
That rear end setup looks amazing!
Tom
King of Prussia, PA

1981 Turbo Trans-Am
Build thread - http://transamcountry.com/community/index.php?topic=83354.0

ryeguy2006a

  • Oracle Forum Member
  • *
  • Posts: 6019
Re: 1968 Camaro Resto-mod LS3/6 speed; Project Penny Pincher
« Reply #131 on: December 13, 2021, 08:06:31 AM »
Thanks Tom and Charles!

As I do most nights, I was checking out FB marketplace to see if anything interesting was posted for sale. I found a guy who has posted up a pair of 18x9 Rocket Attack wheels with Falken 660 tires with about 1k miles on them. He was asking a really good price, but more than I wanted to spend. On a whim, I asked if he would be interested in my 12 bolt axles, carrier and gears. To my surprise he said yes, and after a little back and forth we traded on Saturday. The problem was everything was still installed in my car, so I had to rip it all out on Friday night.

I was able to pull it all out in about 1.5 hours, so I was pretty happy about that. No real drama.


Before I did the swap, I wanted to check a few things because when I was looking up the pros/cons of upgrading to a 33 spline axle in a 12 bolt one thing that came up was the weight of the axles. The guys were saying that the added weight in rotational mass may not be worth the added strength since the 30 splines are really strong anyway. What was great is I happen to have one stock 30 spline axle, one aftermarket 30 spline axle, and 2 aftermarket 33 spline axles. So I thought why not throw them on the sale and measure the diameter of the shafts.

First up was the stock axle shaft. Weighed in at 14.2 lbs, and 1.26" in diameter the majority of the length of the shaft. It was hard to measure since it varied.


Next was the aftermarket 30 spline axle. Weighed in at 14.8 lbs, and had a diameter of 1.32" until it gets close to the splined section where it necked down to 1.26"


And lastly it was my new aftermarket 33 spline axles. Weighed in at 14.8 lbs. (although this didn't include the studs), and had the same 1.32" diameter the entire length of the shaft right to the splines. I'd guess that the studs will only add maybe another .2 lbs. so still very close to what an aftermarket 30 spline weighs. 


So the conclusion that I'm going to draw is that if you are upgrading to an aftermarket axle shaft, there is a minimal weight difference between the 30-33 spline axles. I received my studs and some brake line plugs on Sunday so hopefully I can pull the diff so that I can install the new gears up on my work bench rather than on my back.


Oh, you guys probably want to see some pictures of the wheels.


I really love the wheels, but I'm still unsure if they will actually work on the front unfortunately. They are 18x9 with a 4.5" backspacing and have a 255/35 front tire. I would feel much better with a 5" backspacing, but time will tell if they will work.


I'd love some input from anyone who's run a similar wheel and/or tire size. Rolling the fender lip is out of the question, but I may consider notching the inner fender if necessary. I actually have fiberglass inner fenders so this wouldn't be too bad to modify. If I can get them to work, I'll sell my BMW wheels and then pick up a matching set for the rear in 18x11 with a pair of Falken 660's in 315 flavor! Fingers crossed.

I'd also possibly be open to any creative options that I could do for relatively cheap to effectively increase my backspacing. Only thing I can think of is possibly running a different hub that could tuck the wheel in further, but that also creates other issues.

Thanks,
Ryan

1976 Trans Am LS1 and much more...SOLD
1968 Camaro LSA, T56 Magnum, and much more...SOLD

Current Project: 1955 Nomad LC9, 4L80e, C5 brakes and etc...

Nexus

  • Oracle Forum Member
  • *
  • Posts: 2040
Re: 1968 Camaro Resto-mod LS3/6 speed; Project Penny Pincher
« Reply #132 on: December 16, 2021, 08:51:02 AM »
I really like the look of the new wheels...they look killer

Is the offset similar to the previous set?

are they going to rub the frame and if they do, is this a big deal for you?

how would you go about getting the wheels tucked underneith more?

Can you machine some of the matting surface off the rims or would you need to change the suspension...maybe too drastic.

Just curious as you said rolling the outer fender lip is not an option but judging from that one picture, it looks like the wheel should go inward ever so slightly.

Charlie

79 Esprit but like many, it will be a T/A clone
(22 years and counting but still have her)
http://transamcountry.com/community/index.php?topic=79648.0

ryeguy2006a

  • Oracle Forum Member
  • *
  • Posts: 6019
Re: 1968 Camaro Resto-mod LS3/6 speed; Project Penny Pincher
« Reply #133 on: December 16, 2021, 11:54:54 AM »
Hey Charles,

There really isn't much that I can do to the wheels to get them to fit. Upon further research, I could probably squeak a 18x9 wheel if it had a 5.5" backspace, but then I'd need to run a smaller tire. So basically I just need to sell them and get something that is smaller and fits better. I'm going to just sell them and get a pair that are 18x8 with a 5" backspacing. That's the same specs that I have right now and they fit perfectly.

1976 Trans Am LS1 and much more...SOLD
1968 Camaro LSA, T56 Magnum, and much more...SOLD

Current Project: 1955 Nomad LC9, 4L80e, C5 brakes and etc...

ryeguy2006a

  • Oracle Forum Member
  • *
  • Posts: 6019
Re: 1968 Camaro Resto-mod LS3/6 speed; Project Penny Pincher
« Reply #134 on: December 21, 2021, 07:49:58 AM »
Pretty excited about this next update. I orders some frame connectors and mini-tubs from Detroit Speed. Thanks to MCB for being so easy to work with and having the best prices around. They said the wait for the 67-69 mini-tub kit was 3-4 weeks, but it showed up in 1 week the same day they said the frame connectors were to arrive. Thanks Kim and Melissa. 


I've also pulled the rear differential to get it prepped for the re-gear. It kinda feels like I'm going in the opposite direction, but it is progress. The new gears should make a big difference toward putting the power to the ground and the frequency that I was shifting. In case you missed it in an earlier post, I'm swapping out the 4.10 gears for 3.42 gears. When I originally ordered my Yukon Duragrip carrier, I went with a 4 series rather than the 3 series. So dropping down to a 3.42 gear meant that I needed a new carrier... Hindsight is 20/20 I suppose. I went back and forth between buying a 3 or 4 series a few years ago. But since I needed a new carrier anyway I decided to go with an Eaton TrueTrac and after looking around it was only a few dollars more to upgrade to 33 spline axles. When I originally put my differential together it had one stock axle and one aftermarket. I was planning on getting a new axle at some point anyway so this was an opportunity to get two new stronger axles at the same time. Differential kit with gears came from Quick performance and the axles were from Ron's Machine Shop. Best prices on the internet for both if you are in the market. 


I should have the differential together soon. I got the new Koyo bearings pressed on the carrier and pinion gear. Jim, I'll try and do a sort of step by step for you if I can.

Cheers,
​​​​​​​Ryan

1976 Trans Am LS1 and much more...SOLD
1968 Camaro LSA, T56 Magnum, and much more...SOLD

Current Project: 1955 Nomad LC9, 4L80e, C5 brakes and etc...

Re: 1968 Camaro Resto-mod LS3/6 speed; Project Penny Pincher
« Reply #134 on: December 21, 2021, 07:49:58 AM »

5th T/A

  • Oracle Forum Member
  • *
  • Posts: 1346
Re: 1968 Camaro Resto-mod LS3/6 speed; Project Penny Pincher
« Reply #135 on: December 21, 2021, 01:11:50 PM »
Ryan,

I am really sorry the new wheels didn’t work out, because they do look great. I am still blown away at your RWHP numbers and wondered if you had subframe connectors to keep from twisting things. Looking forward to your rear axel gear change. I have done rear end bearing replacements but never set up a new ring and pinion with carrier replacement. To do it properly is a lot of work and I personally have fears about screwing it up. Even though I have a lot of experience working on everything else automotive.
1980 T/A with a Pontiac 461

Gone but not forgotten;
1973 T/A 455
1975 T/A 400
1978 T/A W72
1982 T/A cross fire injected

Two wheel toys;
2014 Harley Ultra Classic Limited
2013 Honda CB1100
2010 Yamaha Vmax
1982 Yamaha Seca 750

ryeguy2006a

  • Oracle Forum Member
  • *
  • Posts: 6019
Re: 1968 Camaro Resto-mod LS3/6 speed; Project Penny Pincher
« Reply #136 on: December 22, 2021, 07:58:31 AM »
I'm no the fence about just maybe trying them to see if they rub. If the don't I'd just run them as is. Yes, the frame connectors are to stiffen the chassis because of the power. I think for now I've been ok because it doesn't hook, just spins. But I'm hoping to get a set of drag radials for this summer and don't want to tweak the body and crack paint.

I set up the gears the last time around and they turned out great. Really wasn't too bad. I watched several videos on youtube before I attempted it. I think the thing that made me the most nervous at first was setting the pinion gear depth. But what made it super easy was just re-using the stock pinion shim. I matched the thickness and once I got the shim packs for the side carrier bearings it had a good pattern. Hoping it will go that straight forward this time around too.

1976 Trans Am LS1 and much more...SOLD
1968 Camaro LSA, T56 Magnum, and much more...SOLD

Current Project: 1955 Nomad LC9, 4L80e, C5 brakes and etc...

MNBob

  • Oracle Forum Member
  • *
  • Posts: 2018
Re: 1968 Camaro Resto-mod LS3/6 speed; Project Penny Pincher
« Reply #137 on: December 24, 2021, 03:50:23 PM »
Congratulations on your continued progress and the great numbers.  Power like that makes for a fun drive!  Thanks for weighing those those axles; that is surprising and great information.

The 3.42 should make for good cruising on the highway and good mileage.  I need to upgrade some of my rear axle components and a TrueTrac would be my choice as well.  Let us know how doing this yourself goes again.  The subframe connectors and TA diff cover should be beneficial at that power level.  Have you welded the diff. tubes?

1979 TATA Extreme TKO .64
Hedman elite; Pypes 2.5; Borla XS; MSD 6A; Performer intake; open scoop; Sniper QJ;  110 Amp Alt; 4 core radiator/Mark VIII fan; RobbMc mini starter; subframe connectors; solid body mounts; fiberglass rear springs; poly sway bar and link bushings; 81 master; D52’s; Blazer disks; 225/60 & 235/60 17's TrueContact's; relays for PW, PDL, lights; keyless entry

ryeguy2006a

  • Oracle Forum Member
  • *
  • Posts: 6019
Re: 1968 Camaro Resto-mod LS3/6 speed; Project Penny Pincher
« Reply #138 on: January 03, 2022, 10:00:31 AM »
Thanks Bob. The new upgrades should make a big difference. I'm not welding the tubes on the car. I debated it, but they aren't leaking currently and the plug welds look solid on the inside. I have read stories where guys weld them and ruin the housing because it warps... I'd rather not chance it. It's held up so far haha.

I was able to make some time here and there over the holiday break between visiting family to get the rear end set up. I'll do my best to do a quick write-up to hopefully give confidence to others to attempt. Really isn't that difficult with the rights parts and tools.

I started by completely disassembling the differential and took it down to the carwash to get power washed. First step is getting the new bearings pressed onto the pinion gear and carrier. The gear kit that I bought came with brand new Koyo bearings with the master install kit.

Before you can install the bearing on the pinion gear, you first need to add a shim. Best advice I've gotten was to start with the stock shim that came out of the differential. My stock shim was .0315, but if you don't have that shim my instructions that came with my kit said a stock 12 bolt shim is .030. So that would be a good starting point. I found two shims that came to .031 and used that as a starting point.


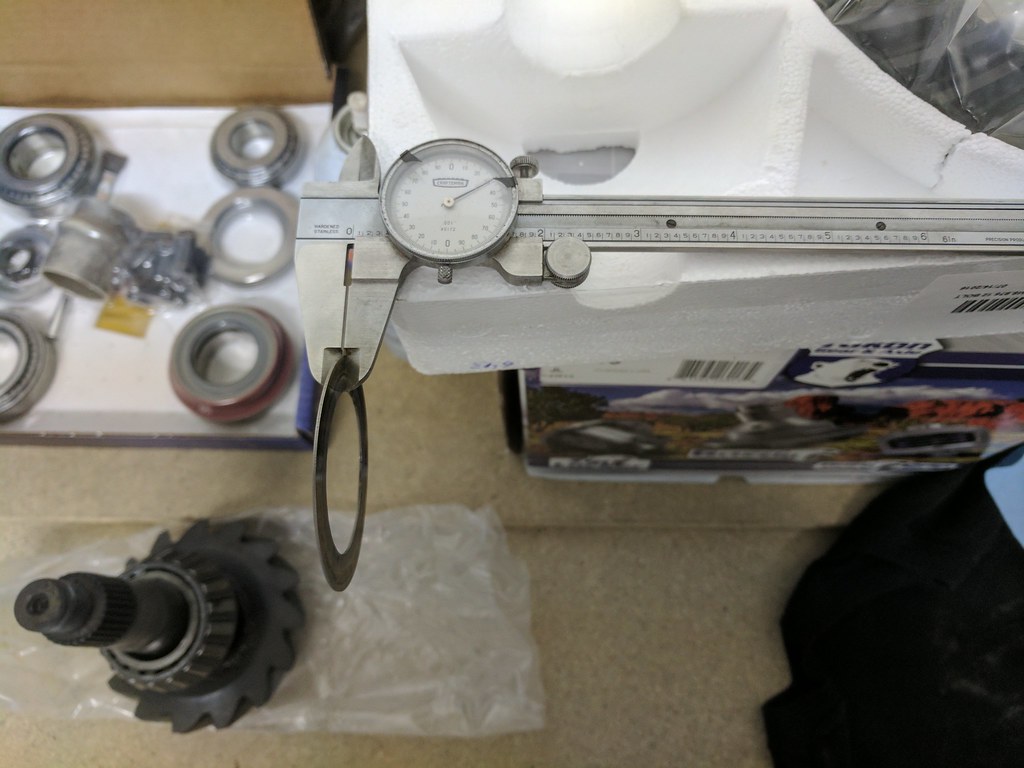
I installed new bearings and races about 3500 miles ago, but if you are doing a complete rebuild, I would suggest knocking out the races and installing new at this point. Next I took my new pinion gear and installed it in the rear end without a crush sleeve. It's important at this step that you just snug the pinion down until there is no play in the bearings. Since there is no washer it would be very easy to get the bearings too tight and ruin them at this stage. Just get the pinion nut tight enough that the play front to back is gone and maybe a touch more to give it a bit of preload. But it doesn't take much. Spin it around to make sure there is no binding. It's also a good idea to put some gear oil on the bearings since they are brand new.


I bought this handy tool to hold the yoke while I tightened the nut and it worked beautifully. I think it was from Ratech, but I can't remember. I used this for both tightening and loosening the pinion nut.

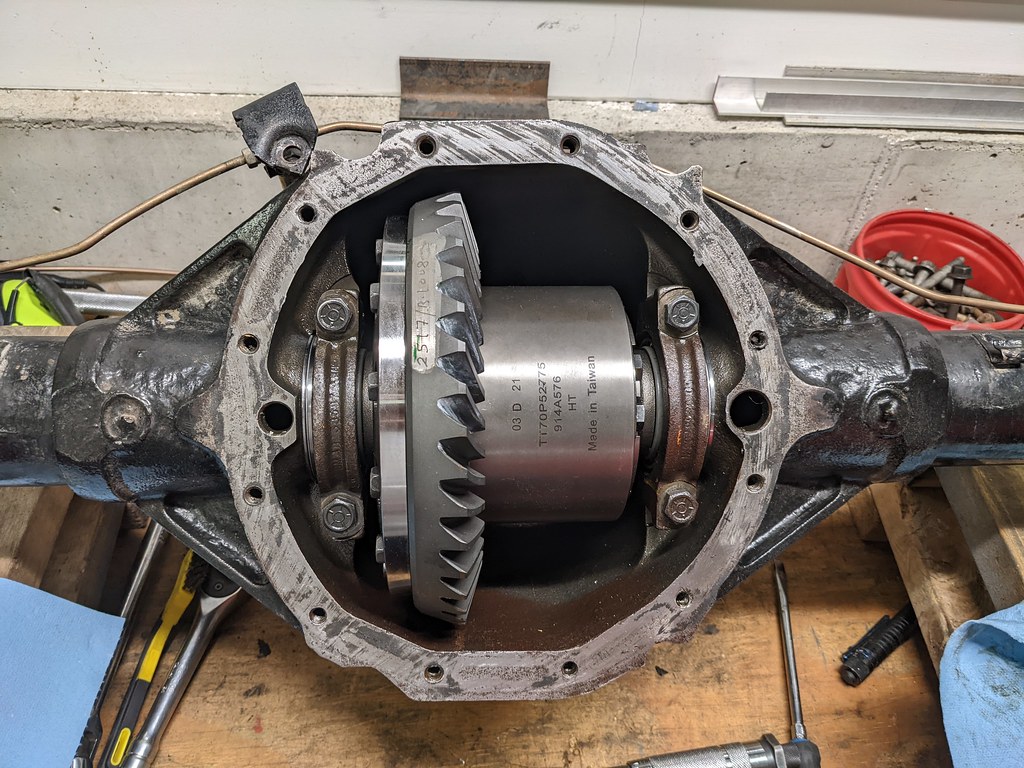
Next up was installing the ring gear onto the carrier. I used a file on both the ring gear and carrier to make sure that the surface was completely clean and flat before installing the gear. I did actually find a little nick in the carrier surface that needed to be filed down. Would have definitely caused it to run out of true. This is an important step and is also in most instructions. The gear fought me a little getting lined up but just take your time and use a little heat. I used a small torch and lightly heated up the ring gear then made sure to get one bolt lined up and tapped it into place with a deadblow hammer. I know it's not recommended, but once I got a few of the bolts started I used them to pull the gear up flush. I only turned the bolts maybe a 1/4 turn at a time and went very slow to walk it up flush. Then I pulled all the bolts, added Loctite and torqued.


I had planned on using my old shims, but realized that at some point the old shim pack had wiggled out of place and was contacting the axle. Not good, but glad I caught it when I did. I mention this because although my rear was making no noises, I think that I didn't have enough preload on my carrier bearings. Either that or the bearings weren't quite pressed on all the way. I was able to pull the carrier out of the rear without prying on it upon disassembly. I think what happened was a kept the shims loose enough that I could pull it in and out for the next step, but never added the shims back in to give pre-load. Gotta post the good with the bad.


Next was to get the carrier installed in the rear to see what adjustments need to be made. What I did was kept the old shims labeled from when I disassembled earlier on. I measured those shims and use that measurement as a starting point. What's nice about these new shim packs is that they use a capture style setup, so they become almost one piece once installed.


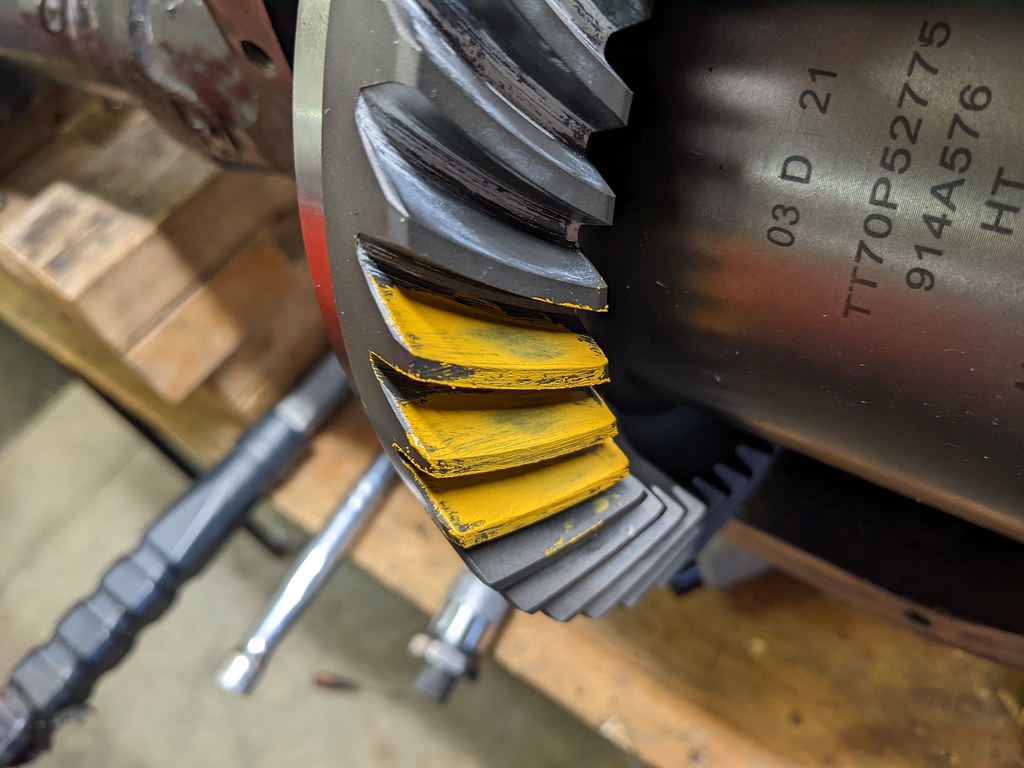
When I used the measurements from the last go around, I found that I needed to add several shims to get the tight preload needed for the carrier bearings. I wasn't taking any chances this time and decided to get them tight from the start even if it's more challenging to get in and out. Initially I was pretty close and had a backlash of .016, but we are shooting for between .007-.009 since my gears and bearings are new.


The instructions said that you need to move in increments of .003 to notice a difference, so I kept moving .005 since that was the smallest shim I had in those packs. I kept fighting with the shims because when I would swap the .005 from side to side, it would either be .006 or .011. So I measured all of my shims and played around with it and got it to .010. I decided that it was good enough. So I painted the gears with the yellow paint to see where my pattern was. The instructions I had gave a ton of scenarios for what was acceptable and mine look good according to the pictures. pattern is mostly centered top bottom and left right on the gear faces.


Then I blew everything apart to prep for final assembly. I pulled off the yoke applied silicone to the splines and both sides of the washer. This time I installed my old crush sleeve and put it all back together with Loctite on the pinion nut. If you are using a new crush sleeve you have to get ready to crush it. It takes something like 400 lb ft to get it to crush so make sure you eat your Wheaties. I re-used my crush sleeve since it was new and still had tons of tension. As a matter of fact it had so much that I had to crush it more to get the 14-19 in lb rotational torque. I used that yoke holder and added a bar for more leverage. I don't have a dial style torque wrench for in lb, but have a bar style and click type. I used both of those to check one another and I feel confident my settings are good.

After I got the pinion nut torqued I reinstalled the carrier with the shim packs and tapped it all back into place. Torqued the carrier caps and I got lucky or something because when I rechecked the backlash, I was right on .009! I'd rather have mine on the loose side anyway than too tight.


Then with it all torqued down, I test fit my TA cover. Looks really good now! I've always wanted one of those covers and so glad I went for it this time around.


It's not quite done yet because I still need to paint the raw steel ends of my axles then install with the c-clips and center plug. Once that's done though I can button it all back up and put it back in the car. I first need to find someone to help me get it off my work bench. It's way heavier now that it's fully loaded!

I also want to say that the car community is so great. Thanks to a fellow member of Camaros.net who sent me some parts he won't be using. Thanks Frank!! It's a set of 67 spring perches for running my springs inboard. These should work perfectly for me.


I also need to re-clock my brake line tabs since they were hitting the exhaust. I didn't realize that, so I will just move them down more in line with the stock brake line tabs. Then I can get the rear back under the car and start on the frame connectors.

Cheers,
Ryan

1976 Trans Am LS1 and much more...SOLD
1968 Camaro LSA, T56 Magnum, and much more...SOLD

Current Project: 1955 Nomad LC9, 4L80e, C5 brakes and etc...

5th T/A

  • Oracle Forum Member
  • *
  • Posts: 1346
Re: 1968 Camaro Resto-mod LS3/6 speed; Project Penny Pincher
« Reply #139 on: January 03, 2022, 02:15:33 PM »
Ryan,

Thanks so much for posting the detailed write up and pictures on your ring & pinion change. I have a couple of questions or comments.

I thought the problems with axel tubes slipping was only an issue on 10 bolt rear ends and not twelve bolt? I haven't decided yet if I am going to weld them or maybe just a couple of tack welds would be enough and keep from distorting anything. Since my car will be driven only with street tires I kind of think wheel spin will keep me from really twisting anything.

When figuring out the shim size between the pinion and bearing you mentioned starting out with the same size shim as originally installed. I thought it was necessary to set the pinion depth to the number scribed on the end of the pinion gear? I wonder if different manufacturer bearings could affect the pinion depth?

Thanks again,

Larry

1980 T/A with a Pontiac 461

Gone but not forgotten;
1973 T/A 455
1975 T/A 400
1978 T/A W72
1982 T/A cross fire injected

Two wheel toys;
2014 Harley Ultra Classic Limited
2013 Honda CB1100
2010 Yamaha Vmax
1982 Yamaha Seca 750

FormTA

  • Oracle Forum Member
  • *
  • Posts: 5472
  • Life is short, have fun, Drive a T/A
Re: 1968 Camaro Resto-mod LS3/6 speed; Project Penny Pincher
« Reply #140 on: January 03, 2022, 08:28:50 PM »
Great write up Ryan! One thing I would like to add is when trying different shims to get the ring and pinion gear where you want them is to take your old bearings and sand the centers out so they slip over and you can adjust easily without have to press them on and off. Makes it quicker to set up a diff. Is it perfect,  no, but it gets you close.

BTW, your work ethic and drive to keep improving your car is extremely impressive!
79 Trans am low buck LS swapped
79 Formula 301 (Work in progress)
67 RS Camaro (waiting it's turn)
69 Dodge charger on late model charger chassis
49 Ford F1 on a 2003 Chevy ZR2 Chassis (current project)
Names, Luke. If I hear anyone telling me they're my father....

kentucky yeti

  • Jedi Council
  • Oracle Forum Member
  • *
  • Posts: 13350
  • located in western Ky
Re: 1968 Camaro Resto-mod LS3/6 speed; Project Penny Pincher
« Reply #141 on: January 04, 2022, 06:50:31 AM »
Great write up Ryan!

BTW, your work ethic and drive to keep improving your car is extremely impressive!

Spoken for truth!
Mike (aka Yeti)

1977 Y82 W72 Auto
2015 F-150 Lariat 4x4 (twin turbo)
2016 Explorer Limited
2012 Mustang

ryeguy2006a

  • Oracle Forum Member
  • *
  • Posts: 6019
Re: 1968 Camaro Resto-mod LS3/6 speed; Project Penny Pincher
« Reply #142 on: January 04, 2022, 06:53:15 AM »
Larry, I'm not sure about the axle tubes being a 10 or 12 bolt thing, but it was a consideration that I had when thinking through the process. I had seriously considered buying an alignment rod with the pucks to jig it up and swap out the axle tube ends to a Moser 7900FM ends. This end gives you a Tornino ford style bearings that press on the axles, but has a GM backing plate bolt pattern and is a flush mount design. Basically it allows you to use your disk brake backing plate as the bearing retainer and I could keep my LS1 rear brakes. Biggest benefit was getting rid of the C-Clip axles.

It was going to be a pretty sizeable cost with buying the jigs, ends and custom axles. After talking with the guys at Quick Performance they basically recommend going with a 35 spline over the 33 spline at that point because there is no cost difference between the axles and differential. That was a lot of effort and cost to get rid of c-clips, but then my buddy made a single comment that made my decision. He said that with a disk brake rear end, the disk will keep the wheel and axle in place in the event of a failure. That was a lightbulb moment, and made for an easy decision.

As for the scribe on the end of the pinion, I'm not sure to be honest. I never noticed that it was there, but that would make a lot of sense. I went back and looked and I see there is a scribe in the gears that says 32, so I can only assume that it means .032. I set mine at .031, so hopefully it's like horseshoes and is close enough. I liked the pattern that I saw so hopefully I'll be ok.

Thanks Tom. That's a good point about the old inner pinion bearing. Anything to make this process easier is definitely a good thing.

Thanks Mike.

1976 Trans Am LS1 and much more...SOLD
1968 Camaro LSA, T56 Magnum, and much more...SOLD

Current Project: 1955 Nomad LC9, 4L80e, C5 brakes and etc...

ryeguy2006a

  • Oracle Forum Member
  • *
  • Posts: 6019
Re: 1968 Camaro Resto-mod LS3/6 speed; Project Penny Pincher
« Reply #143 on: January 14, 2022, 12:53:32 PM »
Continuing on the assembly of my rear differential, I installed and torqued down my ARP Wheel studs to match the front. I've never used a screw in stud before, but according to Yukon I added some high strength thread locker and torqued to 90 lb ft. I actually used 95 lbs just because. Before that I also cleaned up the mating surfaces since they were raw uncoated. I just found some gray paint that I had left over.


Once they were installed, I put the C Clips in and the puck that comes with the TrueTrac. I really like that little puck instead of the pin in the Eaton copy because there is hardly any endplay in the axles now. I also like how the puck is retained in the carrier with the clip. Very nice design overall.


Another little adjustment that I needed to make was how I mounted the brake lines. Where they were on the top of the axle housing rubbed on the exhaust tail pipes, which I didn't realize until I was taking out the differential. So I cut them off and rotated down where the stock lines would have been. I didn't get a picture, but because of the relocation, I had to bend up some new lines to meet up. Both ended up a little short so I used some extra line I had.


Once the new lines were finished, back in the car she goes. Just needs to be filled with oil and that's a done deal.


Good news is that the Rocket wheels fit the rear! So they will work for rears if someone is interested.


Now that the rear is back together, it's time to start on the frame connectors! Out goes the interior. I'll need to modify the rear seat frames anyway for the mini-tubs so I needed the back seats out anyway.


First up before I did any cutting was to make sure that the frame was square. Now I thought it was good to go, but I never had a tape measure on it. Glad I did because I was out of square by about 3/16". Also the frame measured 1/2" more forward on the passenger side from the same reference point on the rear frame. I basically loosened up 3 body bolts and the 2 core support bolts. I left the short side rear frame bolt tight, then pulled on the passenger side wheel with some jackstands under the body and the weight taken off the frame. Worked great. I had to do that twice to get it to move enough, but after that I was 1/16" out of square, and the frame was only 1/16" forward now. Close enough for me.


Cut out my templates and laid them out roughly where they will go.


So because I had to take out the battery and battery tray to get to the core support bolts I figured I'd also install my new coolant overflow tank. It's from a 75-79 Chevy Nova and fits really nicely in the passenger fender space that is unoccupied.


It has a nice single mounting tab that meets up nicely with the ridge on the passenger fender too.


Almost invisible now. You can see the old overflow I had. When I had my 14" fan it was tucked down nice and low, but after the C7 fan was installed, I had to relocate to the fender brace temporarily.


Here's what it looked like before. Not a great picture, but you can see it doesn't flow in that location.


That's all for now. Hoping to start on the passenger side frame connector tonight.

Cheers,
Ryan

1976 Trans Am LS1 and much more...SOLD
1968 Camaro LSA, T56 Magnum, and much more...SOLD

Current Project: 1955 Nomad LC9, 4L80e, C5 brakes and etc...

Jack

  • Oracle Forum Member
  • *
  • Posts: 12429
  • 1971 Esprit TA Clone W72 1972 Formula 68 350 HO
Re: 1968 Camaro Resto-mod LS3/6 speed; Project Penny Pincher
« Reply #144 on: January 14, 2022, 01:24:55 PM »
Looking good. How do you treat the opening once you drill into a panel?


Regards, Jack

Re: 1968 Camaro Resto-mod LS3/6 speed; Project Penny Pincher
« Reply #144 on: January 14, 2022, 01:24:55 PM »

kentucky yeti

  • Jedi Council
  • Oracle Forum Member
  • *
  • Posts: 13350
  • located in western Ky
Re: 1968 Camaro Resto-mod LS3/6 speed; Project Penny Pincher
« Reply #145 on: January 15, 2022, 06:35:00 AM »
Dang, I love this thread  :D
Mike (aka Yeti)

1977 Y82 W72 Auto
2015 F-150 Lariat 4x4 (twin turbo)
2016 Explorer Limited
2012 Mustang

MNBob

  • Oracle Forum Member
  • *
  • Posts: 2018
Re: 1968 Camaro Resto-mod LS3/6 speed; Project Penny Pincher
« Reply #146 on: January 17, 2022, 10:17:42 AM »
Thanks for the detailed write-up and congratulations on finishing that rear end project!

The out of the way coolant tank is a really good idea.
1979 TATA Extreme TKO .64
Hedman elite; Pypes 2.5; Borla XS; MSD 6A; Performer intake; open scoop; Sniper QJ;  110 Amp Alt; 4 core radiator/Mark VIII fan; RobbMc mini starter; subframe connectors; solid body mounts; fiberglass rear springs; poly sway bar and link bushings; 81 master; D52’s; Blazer disks; 225/60 & 235/60 17's TrueContact's; relays for PW, PDL, lights; keyless entry

scarebird

  • Oracle Forum Member
  • *
  • Posts: 1897
  • Former brake guy
Re: 1968 Camaro Resto-mod LS3/6 speed; Project Penny Pincher
« Reply #147 on: January 17, 2022, 11:05:08 AM »
As much as I enjoy watching the different phases of this build, it has "mission creep" worthy of a major Pentagon project.

That said, I plan to yank the 440 out of my Lemans and replace it with a L83/6L80E combo as 10 mpg does not mix with $8/gallon gas. :lol:

ryeguy2006a

  • Oracle Forum Member
  • *
  • Posts: 6019
Re: 1968 Camaro Resto-mod LS3/6 speed; Project Penny Pincher
« Reply #148 on: January 18, 2022, 07:50:33 AM »
Looking good. How do you treat the opening once you drill into a panel?

Hey Jack, I just used a black paint pen and dabbed some paint inside the whole. It's covered by the bolt/washer so it didn't need to match.

As much as I enjoy watching the different phases of this build, it has "mission creep" worthy of a major Pentagon project.

That said, I plan to yank the 440 out of my Lemans and replace it with a L83/6L80E combo as 10 mpg does not mix with $8/gallon gas. :lol:


You got that right! Not quite sure how I shifted from a cammed LS3, to a cammed LS3 with a supercharger haha. I blame the internet! :lol:

1976 Trans Am LS1 and much more...SOLD
1968 Camaro LSA, T56 Magnum, and much more...SOLD

Current Project: 1955 Nomad LC9, 4L80e, C5 brakes and etc...

ryeguy2006a

  • Oracle Forum Member
  • *
  • Posts: 6019
Re: 1968 Camaro Resto-mod LS3/6 speed; Project Penny Pincher
« Reply #149 on: January 31, 2022, 09:11:09 AM »
I've been plugging away working on the frame connectors. I made some good progress so I'll post up some pictures. I can't just take a weekend and knock them out, so I'm posting up the progress I make in 1-2 hour sessions.

Once I got the templates laid out, I scribed the lines and made the cuts. Now since my interior is completely installed, I had to get creative on how to avoid damaging it. Since we regularly get large boxes from Target, I decided to use one for a "tent" and keep the sparks inside this little box.


Then I cut out these seat plates to get to the cuts underneath.


The overall fitment is pretty good for the first test fit. I do have a few gaps larger than I would have liked, but nothing that can't be fixed. What I used for my first cut was a 3' long metal ruler and made sure to line up the template on the bottom with the ruler to connect the rear frame rail with the front. That way I knew that my one line was very straight. I then trimmed with a pair of metal shears until I could fit the connector up.


DSE makes the connectors a little long on the front so that you can trim to fit closely to your frame. they say it should be 1/2" from the front of the frame connector to the back of the sub-frame. I used my handy bandsaw which made really nice clean cuts.


Tacked the end cap in place and then fully welded it up. I had to play around with my settings at first so there were a few more stitches than I wanted, but great penetration so It's all good.


I then test fit the frame plates and assumed they were all the same at first, but they aren't. Make sure that you are using the inner/outer when you mock them up. The ends of the sub-frame are just slightly different.


I clamped them in place and made sure it had a really tight fit. Then put some tack welds on to hold them in place.


I then repeated the process on the driver's side. Everything was the same with one exception, the rear frame rail fitment. The passenger side was nice and tight and the width was going to tie in nicely. Once welded and flap disked, it will blend in very seamlessly. However, the driver's side was about 3/16" too wide at the taper.


That gap was too large to overcome, so I had to modify it. Wasn't really expecting to do that, but we are building custom cars so not completely out of left field. I measured the amount that I needed to narrow it, then cut a pie shaped piece out of it. That large metal ruler came in handy for this too.


Note that I added two reference lines to put the frame rail in the same spot. After I increased the taper, it fit just like the other side.


Welded up the seam and hit with the flap disk until it disappeared.


At this point both sides have been mocked up and fit pretty good. Time to get the frame plates welded to the frame connectors. I stopped over to my dad's for that though since he has a bigger welder that can weld the 1/4" frame plates to the 1/8" connectors.

I still need to play around with his welder since I don't use it all the time. His welder has always had way more welding spatter than mine. I had to chisel them off and grind smooth when I got home. One of these days I'll get a larger welder.


This was my best weld for the day, definitely need more practice.


Then yesterday I was able to get some time in the garage I got the frame connectors welded to my frame. I welded them on the outside and inside.


They tuck up really nicely. I'm really happy that I went with these connectors. They are definitely more involved to install, but I think will do a better job of tying the frames together.


I still need to weld the frame rails to the torque box and inside on the floor pans. As well as a few other areas, but I'm hoping to get that all done this week. Then I can paint and seam seal.

I'll be happy to get this project done and out the way.

Cheers,
Ryan

1976 Trans Am LS1 and much more...SOLD
1968 Camaro LSA, T56 Magnum, and much more...SOLD

Current Project: 1955 Nomad LC9, 4L80e, C5 brakes and etc...

jonathonar89

  • Oracle Forum Member
  • *
  • Posts: 2508
    • Mark's Cars Inc.
Re: 1968 Camaro Resto-mod LS3/6 speed; Project Penny Pincher
« Reply #150 on: January 31, 2022, 06:42:02 PM »
Good job man!  True subframe connectors now.
Mark's Cars Inc.

https://markscarsinc.com

5th T/A

  • Oracle Forum Member
  • *
  • Posts: 1346
Re: 1968 Camaro Resto-mod LS3/6 speed; Project Penny Pincher
« Reply #151 on: February 01, 2022, 07:23:19 PM »
Great job on the subframe welding and installation. I got the impression you weren’t 100% satisfied with your welding, I am envious of your skills. Since your RWHP is probably double of anything the engineers were thinking of back when they designed this car, it’s a wise move. Especially when you factor in traction from a good set of tires.

Do you ever plan on taking your car to the drag strip?
1980 T/A with a Pontiac 461

Gone but not forgotten;
1973 T/A 455
1975 T/A 400
1978 T/A W72
1982 T/A cross fire injected

Two wheel toys;
2014 Harley Ultra Classic Limited
2013 Honda CB1100
2010 Yamaha Vmax
1982 Yamaha Seca 750

ryeguy2006a

  • Oracle Forum Member
  • *
  • Posts: 6019
Re: 1968 Camaro Resto-mod LS3/6 speed; Project Penny Pincher
« Reply #152 on: February 15, 2022, 10:08:41 AM »
I made some more progress on the car, and finished up everything but welding in the seat plates that I had to cut out in the beginning. Now that the connectors are are welded to the front and rear frames, I could focus on connecting them inside the car. Like others have said, the toughest part was connecting the 1/8" frame connectors to the light gauge steel floor pans. It wasn't bad, just have to get the settings right or you can easily melt through the thinner material. I opted to make the welds hotter so that I could get good penetration on the connectors, then just dipped down to touch the pan for a split second. It worked really well and I'm pleased with the results.


Now that the top side was completely welded, I went back and had to drop the leaf spring perch down to finish welding a little section that was inaccessible. I wanted to make sure that most of the welding was done before I went to this step so that I didn't tweak anything.


Once everything was welded to the frame connectors, I went through and painted everything with an oil based paint that I'm a big fan of. It brushes on and creates a really smooth finish when cured. It looks really glossy right now, but will turn Satin when cured. I need to go back and weld in those seat plates and then I'll be 100% finished with the install. Already the car feels much tighter when I jacked up the car on one corner. I think this will make a big difference.


I can't wait to get this wrapped up so that I can get the interior back together. I bought some parts that came in for when I recover the rear seats as well as the right dome light switch. The one I have is too short and will occasionally come on when the door is shut.


The front wheel on the car had some curb rash and it has always bugged me. I was looking on eBay and happened to find that was kept as a full size spare in the trunk and the site had a 20% off deal. Got it for under $200 with a like new tire.


Another thing that has bugged me is the rear view mirror I had in the car was original, but very badly deteriorating. I found a guy who had one local and will be swapping that out soon.


The screw I had that had a better finish was damaged a little so I thought I would try the old steel wool trick. Pretty amazing the difference! Not perfect, but way better.


I'm going to stop and grab some burlap and new seat foam so that I can reupholster the rear seats. Hoping to get this all wrapped up in the next few weeks.

Thanks,
Ryan

1976 Trans Am LS1 and much more...SOLD
1968 Camaro LSA, T56 Magnum, and much more...SOLD

Current Project: 1955 Nomad LC9, 4L80e, C5 brakes and etc...

ryeguy2006a

  • Oracle Forum Member
  • *
  • Posts: 6019
Re: 1968 Camaro Resto-mod LS3/6 speed; Project Penny Pincher
« Reply #153 on: February 22, 2022, 08:00:28 AM »
Made some great progress over the weekend. I can finally call the frame connector install finished. All that was left was welding in the seat riser sections that I had to cut out for the install. Welded those up and sprayed a little paint.


I realized that there should have been a trunk divider which I never had installed when I first put the car together, so I grabbed one with the jute insulation on it. Hopefully that will quiet the car down a little. I also cleaned my seatbelts with hot water, Oxy clean and a little dish soap. The water was black, and I had to do that twice. Looks like they are a little sun faded.


Note the date code 1968 original belts!


Next up was recovering the rear seats. I got busy and didn't take any pictures during the disassembly or recovering process. I added new burlap and kept the original reinforced burlap for added strength. I re-used the cotton padding, but added a 1.5" layer of foam on top. That really filled out the seat covers and gave more support. I used a hog ring kit and carefully installed them all as well as installing some reinforcement wires to help the hog rings not to pull out. I'm not sure why they didn't come with those, but they were simple to install. I used some scrap 12/3 ga wiring I had left over from a house wiring project. I separated the wires into the individual sections and it worked great. Plus the copper will take a lot longer to corrode than a steel wire will rust. Here they are all done. I left them in my boiler room and used a steamer on the wrinkles, but they weren't coming out. I was hoping that they would have come out smoother.


Then yesterday it was in the 50s and sunny so I put them outside for a few hours. BINGO! All the wrinkles were gone on the top of the seat back and the crease line was gone on the seat bottom! That was the ticket and now I'm thrilled with how they came out. Better than I expected actually. Not bad for my first time.


I couldn't help myself, I had to install them last night. Wow what a difference! Little bummed about my sail panels though and how they are almost delaminating...


I also got my new to me rear view mirror installed. It's wayy better than the original one that I had.


I'm hoping to plug away this week and get the carpet and front seats re-installed. It will be nice to have the car back together again.

Ryan

1976 Trans Am LS1 and much more...SOLD
1968 Camaro LSA, T56 Magnum, and much more...SOLD

Current Project: 1955 Nomad LC9, 4L80e, C5 brakes and etc...

kentucky yeti

  • Jedi Council
  • Oracle Forum Member
  • *
  • Posts: 13350
  • located in western Ky
Re: 1968 Camaro Resto-mod LS3/6 speed; Project Penny Pincher
« Reply #154 on: February 22, 2022, 08:29:51 AM »
Every time I watch your work progress, I am even more amazed than the last time I watched it!
Mike (aka Yeti)

1977 Y82 W72 Auto
2015 F-150 Lariat 4x4 (twin turbo)
2016 Explorer Limited
2012 Mustang

5th T/A

  • Oracle Forum Member
  • *
  • Posts: 1346
Re: 1968 Camaro Resto-mod LS3/6 speed; Project Penny Pincher
« Reply #155 on: February 22, 2022, 08:56:33 AM »
Really turned out nice Ryan. I thought I recently saw someone on the forum re-dye their seat belts?

I‘ll be curious to hear your thoughts about the subframe connectors when you take it for a ride.
1980 T/A with a Pontiac 461

Gone but not forgotten;
1973 T/A 455
1975 T/A 400
1978 T/A W72
1982 T/A cross fire injected

Two wheel toys;
2014 Harley Ultra Classic Limited
2013 Honda CB1100
2010 Yamaha Vmax
1982 Yamaha Seca 750

ryeguy2006a

  • Oracle Forum Member
  • *
  • Posts: 6019
Re: 1968 Camaro Resto-mod LS3/6 speed; Project Penny Pincher
« Reply #156 on: February 22, 2022, 09:07:39 AM »
Thanks Mike.

5th, that's an interesting idea. Maybe I'll have to try that with the dye. That is unless I get too excited and just install the rear seats haha. I'll be curious to feel the difference too. It's supposed to rain all day today so I'm hoping that it will wash away the salt so I can possibly take her out for a spin!

1976 Trans Am LS1 and much more...SOLD
1968 Camaro LSA, T56 Magnum, and much more...SOLD

Current Project: 1955 Nomad LC9, 4L80e, C5 brakes and etc...

ryeguy2006a

  • Oracle Forum Member
  • *
  • Posts: 6019
Re: 1968 Camaro Resto-mod LS3/6 speed; Project Penny Pincher
« Reply #157 on: February 28, 2022, 07:26:53 AM »
Been plugging away this weekend to get the interior buttoned up. The easiest one was getting the rear seat bottom installed. Wow, that is a huge difference from the original white seats.


Two years ago:


I also put a little elbow grease into my sill plates. While they are not in the best condition, I picked them up at a swap meet along with the RS turn signals from an original RS/Z28 car. Amazing how that aluminum polish cleaned them up.


Finished up my 4th Gen Nova overflow jug swap. Turned out so great, I'm so happy I found that as an option. I love how it tucks away in the fender, and the script matches the era perfectly.


I also got the shroud pieces and CAI painted with the Trim Black that I painted the rest of my engine bay. Turned out really nice. I'm glad that I painted the CAI, I think it looks a lot better than the polished aluminum.


I also wanted to finalize the supercharger reservoir bracket. I temporarily mounted it last summer and never got around to making a mount. Well because I was driving it haha. My father in law stopped over on night after work and wanted to work on something so I gave him the task of making the bracket. He did a fantastic job, just what I was looking to do.


All done with the lines re-routed and cleaned up.


With that, I decided to clean up the car inside and out. I never cleaned it up before I put the car away last winter... No time like the present!


Cleaned up the engine bay too. I think this is what the final form will look like.


Just to prove that I do drive this car in the winter, I backed down my driveway and grabbed some cool wintery shots. I was on the fence about it, but I'm glad I did. The pictures turned out great. Really cool background. I really like the first one, when the sun peaked out and gave better lighting.


Well I'm going to call the car done for now. Can't wait for spring!!

Cheers,
Ryan

1976 Trans Am LS1 and much more...SOLD
1968 Camaro LSA, T56 Magnum, and much more...SOLD

Current Project: 1955 Nomad LC9, 4L80e, C5 brakes and etc...

Jack

  • Oracle Forum Member
  • *
  • Posts: 12429
  • 1971 Esprit TA Clone W72 1972 Formula 68 350 HO
Re: 1968 Camaro Resto-mod LS3/6 speed; Project Penny Pincher
« Reply #158 on: March 01, 2022, 08:36:01 AM »
You are brave Ryan, and the car looks beautiful.


Regards, Jack

ryeguy2006a

  • Oracle Forum Member
  • *
  • Posts: 6019
Re: 1968 Camaro Resto-mod LS3/6 speed; Project Penny Pincher
« Reply #159 on: March 01, 2022, 09:07:19 AM »
Haha, don't worry Jack. I only backed about 800 ft. down my driveway, took the pictures and then right back in the warm garage. Then immediately hosed it down. :cool:

1976 Trans Am LS1 and much more...SOLD
1968 Camaro LSA, T56 Magnum, and much more...SOLD

Current Project: 1955 Nomad LC9, 4L80e, C5 brakes and etc...

Re: 1968 Camaro Resto-mod LS3/6 speed; Project Penny Pincher
« Reply #159 on: March 01, 2022, 09:07:19 AM »
You can help support TAC!


You can help support TAC!