Author Topic: 1968 Camaro Resto-mod LS3/6 speed; Project Penny Pincher  (Read 26906 times)

Nexus

  • Oracle Forum Member
  • *
  • Posts: 2062
Re: 1968 Camaro Resto-mod LS3/6 speed; Project Penny Pincher
« Reply #40 on: May 06, 2021, 06:52:40 AM »
Wow is all I can say
Charlie

79 Esprit but like many, it will be a T/A clone
(22 years and counting but still have her)
http://transamcountry.com/community/index.php?topic=79648.0

ryeguy2006a

  • Oracle Forum Member
  • *
  • Posts: 6090
Re: 1968 Camaro Resto-mod LS3/6 speed; Project Penny Pincher
« Reply #41 on: May 07, 2021, 12:29:01 PM »
Thanks! I'm glad to be driving it again. I lowed the timing by several degree's and it made a huge difference. Idles very cleanly now.  :cool:

1976 Trans Am LS1 and much more...SOLD
1968 Camaro LSA, T56 Magnum, and much more...SOLD

Current Project: 1955 Nomad LC9, 4L80e, C5 brakes and etc...

ryeguy2006a

  • Oracle Forum Member
  • *
  • Posts: 6090
Re: 1968 Camaro Resto-mod LS3/6 speed; Project Penny Pincher
« Reply #42 on: May 24, 2021, 06:46:59 AM »
Ok, time for an update! I've mostly been driving the car and tweaking my tunes to get the car to perform how I want it. I'm no professional by any stretch of the imagination, but I've got the car running pretty good. One little detail was just not right for me however. The engine wasn't building boost the way that I was expecting and to be honest, I was a little disappointed. It didn't want to build any boost over 100 kpa (0 psi, WOT, or atmosphere) in gears 1, 2, or 3. It would start to build about 4-5 psi in 4th gear, and I would see full boost 11-12 psi (180ish KPA) in 5th and 6th. While glad to see the boost numbers, the upper gears aren't ideal for building the boost on the street. After spending hours reading on the internet and the owner of Boost District, Roshan and I did a video chat. Can't say enough good things about that customer service, especially since I wasn't even a customer of his! Would direct anyone to his site if you are thinking of an LSA supercharger, or parts for one. 

During the chat he had me do a few diagnostic checks and confirmed that everything was functioning correctly. I was leaning toward it, but he was convinced that it was a weak bypass valve that was causing the issue. Basically anytime the vacuum drops below about 70kpa, the motor should be building boost. That generally comes on right off of idle around 1200-1500 rpm.

I bought a new Bypass valve and compared it with the old one. While the old one looked to be in good shape, the spring tension on the new was noticeably more stiff and did hold the vacuum better. I got it installed Saturday afternoon and took it around the block for a test drive. Now, with the old bypass the thought went through my mind, "What is all the fuss over these superchargers?". After the new fully functioning bypass installed I totally understand what the fuss is all about. It felt like a completely different car and was blowing the tires on command. I was starting to build boost right off of idle, and would quickly ramp up to 200 kpa (14psi) in any gear now. What a simple fix and what a night and day difference! I only got a chance to do a quick drive, but what a difference that made. I'm not 110% happy with this swap, and is fully meeting my expectations of what the LSA supercharger would do. Time to change my pants and get more seat time, haha. 

Earlier in the week I was browsing the Holley FB posts and came across a guy selling a Terminator X Max ECU and wideband sensor for not much more than a new stock X ECU. Both were new and never installed because he immediately upgraded to Dominator. I sent him a message and he came down on his price even more, so I bought it. When I first bought my Terminator X, I didn't go with the X Max because I had no plans to go DBW or Auto trans, but what I didn't realize until afterwards that you can easily use the speed sensor input for the auto trans for the T56. The trouble with the VSS signal with the T56 is that Holley won't read a VR sine wave signal, but would need a square wave signal to read properly. But the X Max can read that signal. What it is important for me is now I can easily use an output to control my Reverse Lockout. I can also now upgrade to use the DBW throttlebody in the future. I have the pedal and TB, just need the harness to complete. 


Here is a J4 connector and pins so that I can give Holley the VSS signal from my trans. I also found out that pin B17 is an input for the trans temperature and because my TR6060 hybrid trans has a temp sensor on it, I'm going to tap into it and see if it will read properly. 


When I build my glove box panel, it was just big enough for the base X ECU, but the X Max is a little over 2" longer so I had to modify my panel. It's not pretty, but it is hidden. Had to drill some holes to access the upper mounting holes for the ECU. 


All tucked away and reinstalled. It took a little bit of playing around, but I got the settings right to have the ECU read speed and the reverse lockout functions just like stock. Love that!!


I also ordered a set of 3" mandrel bent tailpipes for 67-69 Camaro hoping that they would be able less work to bolt in. Wrong, they didn't even come close with my mufflers. Now I need to decide if I want to get new mufflers and then make it all work, or add these tailpipes to what I have now. Flowmaster super 60's. My car sounds amazing, but is just too loud. I need to quiet it way down. Any muffler suggestions would be greatly appreciated. Leaning towards Hooker Aeroflow. 


Lastly for this update, I noticed after my drive Saturday that my shifter is now leaking... It's a Hurst Blackjack shifter and I love the feel of how it shifts and is very precise. I'm going to call them to see what can be done to fix this leak. I think it's coming up the seal and into the top cup. It's on top of the shifter plate, so I'm confident it's not the shifter base seal. The top plate comes off with 4 allen keys, so I'm going to pull that off and see if I can possibly clean it up and seal with silicone or what Holley tech has to say. 


Hopefully I can get my mufflers quieted down, seats bolted back in and can take the family out for a cruise. I have about 30 more miles before I change out the break in oil and cut open the oil filter. The motor feels really tight, but I want to cut the filter just to know what's going on inside the motor.  

Cheers,
​​​​​​​Ryan

1976 Trans Am LS1 and much more...SOLD
1968 Camaro LSA, T56 Magnum, and much more...SOLD

Current Project: 1955 Nomad LC9, 4L80e, C5 brakes and etc...

RamblerRacer

  • Active Forum Member
  • *
  • Posts: 357
Re: 1968 Camaro Resto-mod LS3/6 speed; Project Penny Pincher
« Reply #43 on: May 24, 2021, 05:48:04 PM »
Ryan,
Great news on getting the boost issued cleared up.
Your dedication to this project is awesome

JT

FormTA

  • Oracle Forum Member
  • *
  • Posts: 5703
  • Life is short, have fun, Drive a T/A
Re: 1968 Camaro Resto-mod LS3/6 speed; Project Penny Pincher
« Reply #44 on: May 24, 2021, 06:31:29 PM »
I would say I'd like a ride but I think I would be scared!
79 Trans am low buck LS swapped
79 Formula 301 (Work in progress)
67 RS Camaro (waiting it's turn)
69 Dodge charger on late model charger chassis
49 Ford F1 on a 2003 Chevy ZR2 Chassis (current project)
Names, Luke. If I hear anyone telling me they're my father....

Re: 1968 Camaro Resto-mod LS3/6 speed; Project Penny Pincher
« Reply #44 on: May 24, 2021, 06:31:29 PM »

5th T/A

  • Oracle Forum Member
  • *
  • Posts: 1511
Re: 1968 Camaro Resto-mod LS3/6 speed; Project Penny Pincher
« Reply #45 on: May 24, 2021, 08:07:39 PM »
Nice job mounting the ECU and fuse panel where the glove box used to be. Good that the ECU is not in a harsh environment. You must be all smiles with the boost issues resolved. One heck of a thrill ride now. Be careful!
1980 T/A with a Pontiac 461

Gone but not forgotten;
1973 T/A 455
1975 T/A 400
1978 T/A W72
1982 T/A cross fire injected

Two wheel toys;
2014 Harley Ultra Classic Limited
2013 Honda CB1100
2010 Yamaha Vmax
1982 Yamaha Seca 750

Nexus

  • Oracle Forum Member
  • *
  • Posts: 2062
Re: 1968 Camaro Resto-mod LS3/6 speed; Project Penny Pincher
« Reply #46 on: May 25, 2021, 06:53:19 AM »
I have nothing intelligent to add here but I must say that it is such an awesome setup. I'm excited to see some track numbers!!

We are going to see some track numbers right?
Charlie

79 Esprit but like many, it will be a T/A clone
(22 years and counting but still have her)
http://transamcountry.com/community/index.php?topic=79648.0

ryeguy2006a

  • Oracle Forum Member
  • *
  • Posts: 6090
Re: 1968 Camaro Resto-mod LS3/6 speed; Project Penny Pincher
« Reply #47 on: May 25, 2021, 07:17:03 AM »
Thanks guys. I'm pretty stoked that I've resolved that boost issue as well. I'll be honest when I first had it going I was a little disappointed, but now I understand what all the fuss is about. It's crazy fun.

Luke, anytime you want to come up I'll take you for a ride haha

Charlie, I'd love to take it down the dragstrip sometime. I have to drive 1+ hours for the closest one, but it would be fun to see what kind of times I could get. What I really want to do is take it to a road course. I have a buddy that does one in his Miata and I think I'll be running at a private course towards the end of the summer.

1976 Trans Am LS1 and much more...SOLD
1968 Camaro LSA, T56 Magnum, and much more...SOLD

Current Project: 1955 Nomad LC9, 4L80e, C5 brakes and etc...

Nexus

  • Oracle Forum Member
  • *
  • Posts: 2062
Re: 1968 Camaro Resto-mod LS3/6 speed; Project Penny Pincher
« Reply #48 on: May 25, 2021, 08:03:12 AM »
That'll be a blast for yeah!!
Charlie

79 Esprit but like many, it will be a T/A clone
(22 years and counting but still have her)
http://transamcountry.com/community/index.php?topic=79648.0

MNBob

  • Oracle Forum Member
  • *
  • Posts: 2019
Re: 1968 Camaro Resto-mod LS3/6 speed; Project Penny Pincher
« Reply #49 on: May 28, 2021, 12:36:47 PM »
I went back and read your entire thread today and congratulations on all your hard work.  That motor looks really clean and nice in that engine bay!

They say that all the Tremec rail transmissions have a notchy feel.  I have the APT white lightening shifter and the shifting is great. I have read good things about the Blackjack shifters.  That is some type of seal issue.

Some of the guys I know with Corvettes are looking to install a supercharger like that.  They seem to fit in well and give a big power boost.  I am glad you figured out that valve problem.  Who would have thought of that?

I am probably going to have to add a hydraulic clutch with the engine swap to BBC.  I will look for a 3/4" unit as I want light pressure.

You will always have a punch list when you first get things up and running.  You have certainly dealt with everything else so I sure it won't take you long!
1979 TATA Extreme TKO .64
Hedman elite; Pypes 2.5; Borla XS; MSD 6A; Performer intake; open scoop; Sniper QJ;  110 Amp Alt; 4 core radiator/Mark VIII fan; RobbMc mini starter; subframe connectors; solid body mounts; fiberglass rear springs; poly sway bar and link bushings; 81 master; D52’s; Blazer disks; 225/60 & 235/60 17's TrueContact's; relays for PW, PDL, lights; keyless entry

ryeguy2006a

  • Oracle Forum Member
  • *
  • Posts: 6090
Re: 1968 Camaro Resto-mod LS3/6 speed; Project Penny Pincher
« Reply #50 on: June 04, 2021, 06:50:43 AM »
Thanks Bob, I appreciate the compliments! The list seems to never end haha

It took a little longer than I hoped to get an update, but I finally was able to get things complete enough to take it for a test drive last night. All I can say is WOW. When that boost comes on it just pulls so hard. Right now I think it does more of blowing the tires off, but I'm ok with that for now. I'd like to get a sticker set of 275 tires to see what happens when that power gets to the ground! I need to be careful because last night I punched it in 4th and when I got out of it I was over 100 mph! It went from 50 to 100 very quickly. I don't think I ever posted a picture of the new bypass valve. Brand new from GM.


After the test drive I doublechecked to see if my fix for the leaky shifter worked, and I'm happy to report no more leaks! I had to take apart the top shifter assembly and diagnose why it was leaking in the first place. I popped off the top cover and took apart the upper assembly that holds the fulcrum.


Here you can see that it was leaking all around that bottom plate and appears to come out on the right side.


Upon further inspection, it appears that there was some thread sealant that wasn't allowing that to sit flush against the lower plate.


So I cleaned that all off and dabbed a tiny amount of silicone around the fulcrum base when I reinstalled. I also added some thread tape to the four bolts that attach the upper and lower together. Just a little added insurance since they protrude into the trans case and are exposed to fluid.

While this was all happening I also needed to quiet down the car. While it sounded fantastic with the Flowmaster 50's, it would make my ears ring after every drive. So they had to go if I wanted anyone in my family to ride with me. After a bunch of sound clips, research and feedback from car buddies, I decided on a pair of Borla ProXS with a 14" case. They were significantly smaller than the 50's that came off of the car so I was actually able to tuck up my exhaust a little higher than before. I had to trim about 4" off of the pipes that come right before the mufflers to push them forward for a better approach to install the tail pipes. Minor modification, but necessary.


Next up was a pair of 3" Mandrel bent tail pipes from Flowmaster. While they didn't fit out of the box, I think that was completely my fault as I build my own exhaust from scratch. My mufflers are at an angle while the tail pipes are straight. So I just had to make a small cut to give the angle needed for my exhaust. My new band saw made quick work of that and gave a straight cut to just turn and weld.


The passenger side fit up really nicely and gave me plenty of room around the leaf and quarter panel. The driver side ended up being about 2" more rearward, so I ended up cutting it out of a straight section I had to match the passenger. Got it all welded up and re-installed. I still need to trim a little bit off of the end, but I'm very happy with the placement. I'm also debating on leaving it as is, or cutting it at an angle to match the quarter panel. For now I'm going to leave it straight and see how I feel about it.


Now for full transparency, the exhaust hangers are not finished, but I they are currently secured to the chassis. I am using the same rubber isolator mounts from before that are solid, but will need to be modified for the new location of the mufflers. The tail pipes may or may not be held up with mechanics wire, but I'll never tell... I have some proper hangers on order now, so once they come in I'll be able to get a final position for the tail pipes so I can get the tips just right.

Next up is to get my wiring cleaned up, the interior completely reinstalled and put some miles on her. Oh and maybe give it a bath haha.

Cheers,
Ryan
« Last Edit: June 04, 2021, 06:56:16 AM by ryeguy2006a »

1976 Trans Am LS1 and much more...SOLD
1968 Camaro LSA, T56 Magnum, and much more...SOLD

Current Project: 1955 Nomad LC9, 4L80e, C5 brakes and etc...

TATurbo

  • Active Forum Member
  • *
  • Posts: 821
Re: 1968 Camaro Resto-mod LS3/6 speed; Project Penny Pincher
« Reply #51 on: June 05, 2021, 09:17:53 PM »
Congrats on all the progress.  From here it seems like that was way quicker than I thought it would take.  I'm stoked to see you've got it on the road.  That's awesome.
We definitely need to get together sometime later this summer.  I can't wait to meet your '69 in person.  I love boost, but have never had a supercharged car. Only turbos, which I understand is quite a different feeling.  I think I rode in a first gen Camaro with a big 6-71 blower (or whatever those big ones with that require a bug catcher through the hood are) once...I was like 13 at the time. IIRC it was like my brother's fiance's neighbor's car.  It scared the crap out of me! 
 
Tom
King of Prussia, PA

1981 Turbo Trans-Am
Build thread - http://transamcountry.com/community/index.php?topic=83354.0

FormTA

  • Oracle Forum Member
  • *
  • Posts: 5703
  • Life is short, have fun, Drive a T/A
Re: 1968 Camaro Resto-mod LS3/6 speed; Project Penny Pincher
« Reply #52 on: June 06, 2021, 07:38:27 AM »
He says that was slow... It took me 5 years once I really got started on mine but I took it apart and started work on it about 20 years ago... Ryan doesn't mess around.  His Camaro build took what?, one year? And the supper charger a winter project.  I thought he'd have it ready by fall, I should have known.... It's his constant progression that motivates me to get my butt in gear and get my projects moving. He was a great help and motivator on my TA project and once I get these darn flares done I'll star my Camaro project. Keep up the good work Ryan! That is an awesome car and even better that it's a family car in more ways than one.
79 Trans am low buck LS swapped
79 Formula 301 (Work in progress)
67 RS Camaro (waiting it's turn)
69 Dodge charger on late model charger chassis
49 Ford F1 on a 2003 Chevy ZR2 Chassis (current project)
Names, Luke. If I hear anyone telling me they're my father....

MNBob

  • Oracle Forum Member
  • *
  • Posts: 2019
Re: 1968 Camaro Resto-mod LS3/6 speed; Project Penny Pincher
« Reply #53 on: June 06, 2021, 10:36:54 AM »
I didn't think that shifter leak was anything serious.  The tailpipe area is always the toughest on exhaust.  I have the Borla XS Pro mufflers and like them.  Let us know what you think.

Yeah, everyone has home and family to compete with car progress.  I have been in home repair land for 3 weeks solid.  But Ryan really has gotten a lot accomplished.
1979 TATA Extreme TKO .64
Hedman elite; Pypes 2.5; Borla XS; MSD 6A; Performer intake; open scoop; Sniper QJ;  110 Amp Alt; 4 core radiator/Mark VIII fan; RobbMc mini starter; subframe connectors; solid body mounts; fiberglass rear springs; poly sway bar and link bushings; 81 master; D52’s; Blazer disks; 225/60 & 235/60 17's TrueContact's; relays for PW, PDL, lights; keyless entry

duffinatur

  • Active Forum Member
  • *
  • Posts: 471
    • My 76 build
Re: 1968 Camaro Resto-mod LS3/6 speed; Project Penny Pincher
« Reply #54 on: June 06, 2021, 11:20:17 PM »
Awesome work, Ryan!   
76 Trans Am LS1/4A TA (a recreation of my very first car)
74 Olds Cutlass Supr (status: when I have time)
Pontiac G8 GT (sold, looking for another)
09 GMC SLT 4x4 (winter)

Re: 1968 Camaro Resto-mod LS3/6 speed; Project Penny Pincher
« Reply #54 on: June 06, 2021, 11:20:17 PM »

ryeguy2006a

  • Oracle Forum Member
  • *
  • Posts: 6090
Re: 1968 Camaro Resto-mod LS3/6 speed; Project Penny Pincher
« Reply #55 on: June 07, 2021, 11:37:34 AM »
Thanks guys! Pretty stoked to have the families approval for the new mufflers! I took the whole family out early yesterday a few times around the block and my wife said "I wished we had drove for longer" Well get ready honey haha. I'll start checking out the car shows now!!

1976 Trans Am LS1 and much more...SOLD
1968 Camaro LSA, T56 Magnum, and much more...SOLD

Current Project: 1955 Nomad LC9, 4L80e, C5 brakes and etc...

ryeguy2006a

  • Oracle Forum Member
  • *
  • Posts: 6090
Re: 1968 Camaro Resto-mod LS3/6 speed; Project Penny Pincher
« Reply #56 on: June 07, 2021, 12:51:19 PM »
https://www.youtube.com/watch?v=V063nUHHJfw

Not the greatest video, but they sound really good. Maybe it's just going to take some getting used to, but inside the car doesn't have the greatest sound. But when my dad sat in the car and revved it for me, darn did it sound amazing. Although it doesn't sound as good in the cabin as I was thinking, it's significantly quieter. I think that the tradeoff is well worth it.

1976 Trans Am LS1 and much more...SOLD
1968 Camaro LSA, T56 Magnum, and much more...SOLD

Current Project: 1955 Nomad LC9, 4L80e, C5 brakes and etc...

Nexus

  • Oracle Forum Member
  • *
  • Posts: 2062
Re: 1968 Camaro Resto-mod LS3/6 speed; Project Penny Pincher
« Reply #57 on: June 08, 2021, 07:11:18 AM »
Well that put a smile on my face!!

sounds awesome
Charlie

79 Esprit but like many, it will be a T/A clone
(22 years and counting but still have her)
http://transamcountry.com/community/index.php?topic=79648.0

ryeguy2006a

  • Oracle Forum Member
  • *
  • Posts: 6090
Re: 1968 Camaro Resto-mod LS3/6 speed; Project Penny Pincher
« Reply #58 on: June 11, 2021, 11:10:55 AM »
Thanks Charlie! Almost ready to call it done for the summer :shock:

1976 Trans Am LS1 and much more...SOLD
1968 Camaro LSA, T56 Magnum, and much more...SOLD

Current Project: 1955 Nomad LC9, 4L80e, C5 brakes and etc...

jonathonar89

  • Oracle Forum Member
  • *
  • Posts: 2510
    • Mark's Cars Inc.
Re: 1968 Camaro Resto-mod LS3/6 speed; Project Penny Pincher
« Reply #59 on: June 11, 2021, 11:29:27 AM »
Thanks Charlie! Almost ready to call it done for the summer :shock:

I like this statement!  Good job man!
Mark's Cars Inc.

https://markscarsinc.com

ryeguy2006a

  • Oracle Forum Member
  • *
  • Posts: 6090
Re: 1968 Camaro Resto-mod LS3/6 speed; Project Penny Pincher
« Reply #60 on: June 21, 2021, 09:05:45 AM »
It's been a few weeks since I posted. Finally took some time to clean up the wiring and tuck it nicely under the dash. I also installed the Custom Auto Sound radio that I picked up. It sounds great and I loaded it up with 1k songs and a flash drive for cruising. It sounds really good and looks way better than that double din unit I had under the dash last year. 


I got all of my oil around to do my first oil change on the new motor. I've driven it around 200 miles on the break-in oil and decided it was time to get that oil out of there. At the suggestion of many of my friends who build motors, I wanted to cut the filter open to see what debris it collected. So I bought a used pipe cutter on eBay that would cut up to a 3" pipe. It was way cheaper than the dedicated filter cutters that I found. Not pretty, but I like the patina on it. 


Unfortunately, I started having problems (I think coincidentally) after I installed my tailpipes. The car was running great, but then slowly started to develop a strange AFR spike. Almost like someone was turning a switch on and off. It would be cruising along at 14.7 right where I commanded it, then spike to 22+ and the car would nose over slightly. Give it throttle and it would clear up, but as soon as you drop down to a normal 5-10% TPS, it would start doing that again. I thought it was in my tune, but after logging it and checking things out, I think I have a hardware issue. 

I pulled the plugs and understandably they were all indicating rich. Since it was dumping fuel to compensate for that lean condition. Plug 2 looks cleaner because I cleaned it off. All the others were as removed. 


Now I think this may have been unrelated, but I found that Cylinder 7 had the strap pushed down and not sure if was even delivering spark. Would explain the fuel smell I have had especially at idle. But this was on the driver's side and my wideband is on the passenger side. So this wouldn't have explained the lean issue I was having. 


At this point, I'm leaning towards a clogged/bad injector. I need to pull them out and inspect. I'm really hoping that is the case and not something deeper in the motor... Here is a screenshot of the log that I took where you can see it going crazy. The yellow line is where Closed Loop was turning on and off. As soon as it transitions the compensation spikes. The upper red line is AFR which is happy and where it should be, then something happens and the middle of the chart it spikes over 20 AFR. 


Hopefully I can get this figured out soon. I'm missing out on some prime cruising weather. On a good note, I've officially fixed all the leaks on the car. I had a leaking pinion ever since I put the car together, but when I replaced the yoke, new seal and sealed the splines it hasn't leaked a drop. I also got the shifter leak fixed, and the few coolant leaks fixed. Hopefully I get this fueling issue fixed and I'll be back in business. I've got some brand new NKG plugs for when I get this straightened out. For now I'm just going to re-use these one's so I don't contaminate a fresh set. 

Cheers,
​​​​​​​Ryan

1976 Trans Am LS1 and much more...SOLD
1968 Camaro LSA, T56 Magnum, and much more...SOLD

Current Project: 1955 Nomad LC9, 4L80e, C5 brakes and etc...

ryeguy2006a

  • Oracle Forum Member
  • *
  • Posts: 6090
Re: 1968 Camaro Resto-mod LS3/6 speed; Project Penny Pincher
« Reply #61 on: June 25, 2021, 09:26:44 AM »
I'm back with an update and bearing good news. I found the source of my troubles! I had a bad spark plug wire where it contacts the spark plug. The terminal didn't "click" into place like it should normally and was loose fitting on the plug. It was a brand new spare MSD wire I had on the shelf and it was the last one I would have suspected. I test fit another spare I had and it clicked on tightly, so I swapped that one onto the car. I also installed the new spark plugs and it runs great, just like it did before. But the greatest thing is my fuel smell is almost completely gone now. I must have been running with that dead cylinder this whole time assuming it was my tune up. So word to the wise, check your plugs! The strange thing is I did check the header tubes and they were all hot enough to boil water when I sprayed them. I guess I need a thermal IR gun to confirm in the future. 

Here is a comparison of the NGK BR7EF plugs to the Denso that I had in it. You can see how much taller the Denso is. I did use a borescope to check out the cylinders and pistons, especially Cylinder 8 where I had that damaged plug. I saw zero damage and nothing unusual. That was a huge relief. 


In the meantime before I figured out it was the plug wire, I bought this neat little kit online that allows you to clean your injectors. It's a little adapter that goes on top of a carb/brake clean can and has a hole fit for an injector. It also came with a little harness with gator clips to activate the injector. I confirmed that I had a clean spray pattern on all the injectors, but I suppose it was good preventative maintenance if anything. It was super cheap on Amazon, $12. 


I also forgot to share my father's day gift from the family. Some new Astrovents for my dash. The one's I have in there now are originals that look ok from a few feet away, but didn't work well and were pealing. These will make for a nice upgrade!


Now that the car is back on the road and firing on all 8 cylinders, it is an absolute blast to drive. It didn't seem to give a clean sweep from idle up and always had a little gas smell. With the new plugs (ordered some new plug wires too, but they are on the way) it was really easy to tuned up. Since I was having issues, I started with a fresh fuel table and a revised AFR table. It only took a few minutes of driving around for the fuel learning to kick in and it cleaned up really nicely. I thought I was happy with the tune before, but I'm way happier now. It runs really well now. Very responsive and idles perfectly. In my driving around I was able to clean up a slight bog off idle which was my only real issue I had before. On the way home I got a little brave and goosed it around a truck. Was going around 60 at the time, but to my surprise when I downshifted it broke the tires loose! This newfound power is definitely going to take some getting used to. Next on the list is a set of sticky tires!

I'm hoping to change the oil tonight and get it cleaned up for a car show in town. I've shared with a few people the issues that I was having with my Dad's 71 Chevelle and we finally figured that out with his car about a month ago. So this is the first time that we both have running/driving cars and can attend a show at the same time. Really stoked to park our cars next to one another. I'll post some pictures after the show. 

Cheers,
​​​​​​​Ryan

1976 Trans Am LS1 and much more...SOLD
1968 Camaro LSA, T56 Magnum, and much more...SOLD

Current Project: 1955 Nomad LC9, 4L80e, C5 brakes and etc...

Doright

  • Active Forum Member
  • *
  • Posts: 237
Re: 1968 Camaro Resto-mod LS3/6 speed; Project Penny Pincher
« Reply #62 on: June 26, 2021, 09:48:43 AM »
I just read your whole thread Really cool project. You did a Great job!

I am curious as too how much power that Monster makes?
Dennis Barnett 
A&P Mechanic & FCC
Those who sacrifice liberty for security deserve neither!
B. Franklin

ryeguy2006a

  • Oracle Forum Member
  • *
  • Posts: 6090
Re: 1968 Camaro Resto-mod LS3/6 speed; Project Penny Pincher
« Reply #63 on: June 28, 2021, 06:22:15 AM »
Thanks Dennis! It's been a lot of work, but I'm incredibly happy with the way it turned out. Not sure on power, but I'd estimate that it at least 600 whp.  :cool:

1976 Trans Am LS1 and much more...SOLD
1968 Camaro LSA, T56 Magnum, and much more...SOLD

Current Project: 1955 Nomad LC9, 4L80e, C5 brakes and etc...

5th T/A

  • Oracle Forum Member
  • *
  • Posts: 1511
Re: 1968 Camaro Resto-mod LS3/6 speed; Project Penny Pincher
« Reply #64 on: June 28, 2021, 08:41:04 AM »
Ryan,

I am very happy to hear your engine problem was only a bad plug wire. With such a powerful engine I can see how you might not even notice it was a little down on power. After all the hours you put into this project hopefully you can just enjoy driving it for a while.

I agree that EFI is really nice from a drivability standpoint. They seem to do a good job tuning on their own. If you want to play with the AFR it sure is a lot less work than playing with a carburetor.
1980 T/A with a Pontiac 461

Gone but not forgotten;
1973 T/A 455
1975 T/A 400
1978 T/A W72
1982 T/A cross fire injected

Two wheel toys;
2014 Harley Ultra Classic Limited
2013 Honda CB1100
2010 Yamaha Vmax
1982 Yamaha Seca 750

Re: 1968 Camaro Resto-mod LS3/6 speed; Project Penny Pincher
« Reply #64 on: June 28, 2021, 08:41:04 AM »

ryeguy2006a

  • Oracle Forum Member
  • *
  • Posts: 6090
Re: 1968 Camaro Resto-mod LS3/6 speed; Project Penny Pincher
« Reply #65 on: June 28, 2021, 09:34:55 AM »
You are correct, the Holley EFI does a great job of learning the fuel curves. What I've learned from working on both my car and my Dad's (He's running Terminator EFI which is a 4150 carb replacement) is that your engine and wiring has to be right before you can start tuning. Don't immediately blame the EFI because when you do all the prep work on the motor and wiring, it does a fantastic job.

Great news is that my dad and I were able to make the car show and it was uneventful. No tow trucks, or any funny business. Both of our cars are running great and it was really cool having him there with me. My little guy helped me get the car all cleaned up so that was a fun time with him. I put some water in that spray bottle and he emptied it twice on the car and wheels. 


I completely forgot to get some pictures, but one of my dad's friends was there and took pictures of all the cars. They sent them to us thankfully, but aren't full resolution. 


My son loved checking out this firetruck that was there. 


I already bought the upper radiator hose to replace the makeshift one that I bought to get the car up and running. When I was at the show, I had no less than 6 people mention that my upper hose was weeping. Well that was it, time to replace that hose. 


Much better! 


I also cleaned up the engine bay and snapped some pictures. Here's the engine bay all detailed and in it's final form. The only changes that I may make in the future may be some cooling modifications for the supercharger's heat exchanger. Some ducting to direct air across the heat exchanger, a possible rework of the mounts that will integrate in a dedicated cooling fan and adding a larger reservoir. 


Cheers,
​​​​​​​Ryan

1976 Trans Am LS1 and much more...SOLD
1968 Camaro LSA, T56 Magnum, and much more...SOLD

Current Project: 1955 Nomad LC9, 4L80e, C5 brakes and etc...

jonathonar89

  • Oracle Forum Member
  • *
  • Posts: 2510
    • Mark's Cars Inc.
Re: 1968 Camaro Resto-mod LS3/6 speed; Project Penny Pincher
« Reply #66 on: June 28, 2021, 10:16:32 AM »
Good stuff.  I bet it was cool for the kids to go to a car show with dad and grandpa.  I’m glad you got that spark plug wire figured out.  That’s awesome you get to play with the Holley efi on an LS and a traditional V8.
Mark's Cars Inc.

https://markscarsinc.com

roadking77

  • Oracle Forum Member
  • *
  • Posts: 13523
Re: 1968 Camaro Resto-mod LS3/6 speed; Project Penny Pincher
« Reply #67 on: June 28, 2021, 01:47:28 PM »
x2  Looks like you were able to have some good family time.
Finished!
77 T/A - I will Call this one DONE!
79 TATA 4sp-Next Project?
79 TATA - Lost to Fire!
86 Grand Prix - Sold
85 T/A - Sold
85 Fiero - Sold
82 Firebird - Sold
'38-CZ 250
'39-BSA Gold Star
'49-Triumph 350
'52-Ariel Red Hunter
'66-BSA Lightning
'01-HD RoadKing

Jack

  • Oracle Forum Member
  • *
  • Posts: 12453
  • 1971 Esprit TA Clone W72 1972 Formula 68 350 HO
Re: 1968 Camaro Resto-mod LS3/6 speed; Project Penny Pincher
« Reply #68 on: July 18, 2021, 05:35:33 AM »
Its nice having a car that you can trust taking anywhere, looks like a good time.


Regards, Jack

ryeguy2006a

  • Oracle Forum Member
  • *
  • Posts: 6090
Re: 1968 Camaro Resto-mod LS3/6 speed; Project Penny Pincher
« Reply #69 on: July 19, 2021, 08:07:58 AM »
Thanks Jonathan, Kerry and Jack. It's really nice just hoping into the car and taking the family for a ride.

Here's a few updates from when the site was down.

I finally got around to doing my first oil change to change out the break-in oil and assess for any bad news. I'll be honest I was kinda dreading this and put it off. I was pleasantly surprised to find no major metal shavings or chunks in the oil. To be expected after all new bearings, there was a slight amount of glitter in the filter, but nothing in the oil that I drained out.


Then I swapped on a new matching set of plug wires to get rid of the mismatched set I had before.


I made some templates out of cardboard, and modified my HX brackets to tip the whole exchanger forward.


Once I was happy with the fitment, I welded the brackets back together. I also removed the J-nuts that I had before and drilled/tapped the brackets so it all fit a little tighter.


I was really happy with the cardboard templates, so I made some shrouds out of a spare piece of stainless plate I had.


Added some side filler plates and trimmed the upper piece up for a cleaner look.


Hard to get a picture of the "finished" product, but I wanted to test it out before I went and painted everything. That way if I had to modify it, I wasn't re-doing anything. Took the car out for a drive and unfortunately it didn't seem to help much at all. Slightly lower, but the temps still crept up to about 140* AND it was a cooler day than when I had the really high temps. Then I hot wired the pump like was suggested and watched everything. Well come to find out after about 3-5 minutes of running the water gets aerated! The water looks almost gray. So then I would kick the pump on and watch the water flow through the stock clear reservoir. What was happening inside is that the high volume circulation pump I have was draining the feed hose before the return could feed it more coolant. Once it all leveled out, the water became aerated. Air mixed with the water doesn't bode well for cooling. Thankfully I bought an Edelbrock reservoir a few weeks ago so I quickly hooked that up to see if this would help. Well it certainly did as ended up adding around 60oz of water even though that reservoir is only about 32oz. I kept working the hoses and shaking the HX and more and more air bubbles came out.

Went out and tested again with the newly installed reservoir and Bingo, that was the issue. Air in the system and a powerful circulation pump that was draining the lines. Oh and the JD bottle was for spill support not moral support haha.


After letting the car idle around this is what the temps ended up being. I bumped the on/off temps for my coolant too and that seemed to help with my radiator cooling too. It was about 78* when I took that picture.


Then I took the car to my favorite road, and let it spin through 3rd.


Going up my driveway I found this little guy running around. Had to chase him back into the fence haha. Sometimes I'm so glad that I have these guys as neighbors, rather than people haha.


My dad and I went to another car show on the 4th that was about 20 mins away. All the temps kept in check and it was a good time. I remembered to take some pictures this time!


To top off a great day at a car show and the car running tip top, I looked down on the way home at my MPG's. Cruising around it was clocking around 20-22 mpg. I took a picture and sent it to a few of my buddies where on coast, it was clocking over 30+ mpg's haha.


Can't wait to put some more miles on it. Next Sunday I have my second AutoX event, so I'm really looking forward to that. So glad that I got all of the bugs worked out.

Cheers,
Ryan

1976 Trans Am LS1 and much more...SOLD
1968 Camaro LSA, T56 Magnum, and much more...SOLD

Current Project: 1955 Nomad LC9, 4L80e, C5 brakes and etc...

ryeguy2006a

  • Oracle Forum Member
  • *
  • Posts: 6090
Re: 1968 Camaro Resto-mod LS3/6 speed; Project Penny Pincher
« Reply #70 on: July 19, 2021, 08:10:37 AM »
After I finished up the revised shrouding, I wanted to do a "stress test" to see if my current setup could hold temperature or if I needed to upgrade to a larger/better fan. I got my wish by accident and was stuck in stand still traffic earlier this week. It was around 80* and cruising down the highway the ECT was around 190-192 with the IAT was around 95. That's where the engine temps normally ran the last two years with the LS1, so I was stoked because it was really efficiently cooling the new motor AND the IAT's are right where they should be around 20* over ambient. Well that changed when I was in stand still traffic for about 15-20 mins. I changed the fan temps to come on at 200 off at 205, so the engine temps went up to around 205 pretty quickly and the IAT just slowly gained a degree or two every minute. I had to pick up my wife from the service department for her car, and by the time I got there the engine temps were around 225 and the IAT's were 140. The temps just slowly creeped up which tells me that the fan just couldn't keep up.

I was hoping to get through the summer with this fan, but I don't want to hurt something by pinching pennies, so I picked up a low mileage take off C7 fan. Not sure if I'll try and use the stock shroud or make my own mount in my existing shroud. I want to get my hands on it and I'll make that decision later. It should be a huge difference. My cheapo eBay fan is rated around 2000 CFM, but I extremely doubt that is true. Maybe half of that. I found a company online called DeWitts who tested the stock C7 600 watt fan vs their upgraded 19" fan. The stock fan tested at 2900+ CFM at 90% duty. This should work really nicely for my needs.

1976 Trans Am LS1 and much more...SOLD
1968 Camaro LSA, T56 Magnum, and much more...SOLD

Current Project: 1955 Nomad LC9, 4L80e, C5 brakes and etc...

jonathonar89

  • Oracle Forum Member
  • *
  • Posts: 2510
    • Mark's Cars Inc.
Re: 1968 Camaro Resto-mod LS3/6 speed; Project Penny Pincher
« Reply #71 on: July 19, 2021, 12:15:11 PM »
That has to not be fun seeing those temps creep up.  I’ve had that happen to me a few times.  I could not believe but one time my ‘98 Trans Am started overheating when it was below 0 outside.  Pulled over, popped the hood and everything looked good.  When I started it back up, it got back to normal temperature.  I imagine the car didn’t have enough antifreeze in the mix so maybe the fluid in the radiator froze up.  Never had a problem after that with that car.

You’ll get it figured out man.  Good to see you got the car going either way.
Mark's Cars Inc.

https://markscarsinc.com

ryeguy2006a

  • Oracle Forum Member
  • *
  • Posts: 6090
Re: 1968 Camaro Resto-mod LS3/6 speed; Project Penny Pincher
« Reply #72 on: July 21, 2021, 07:52:50 AM »
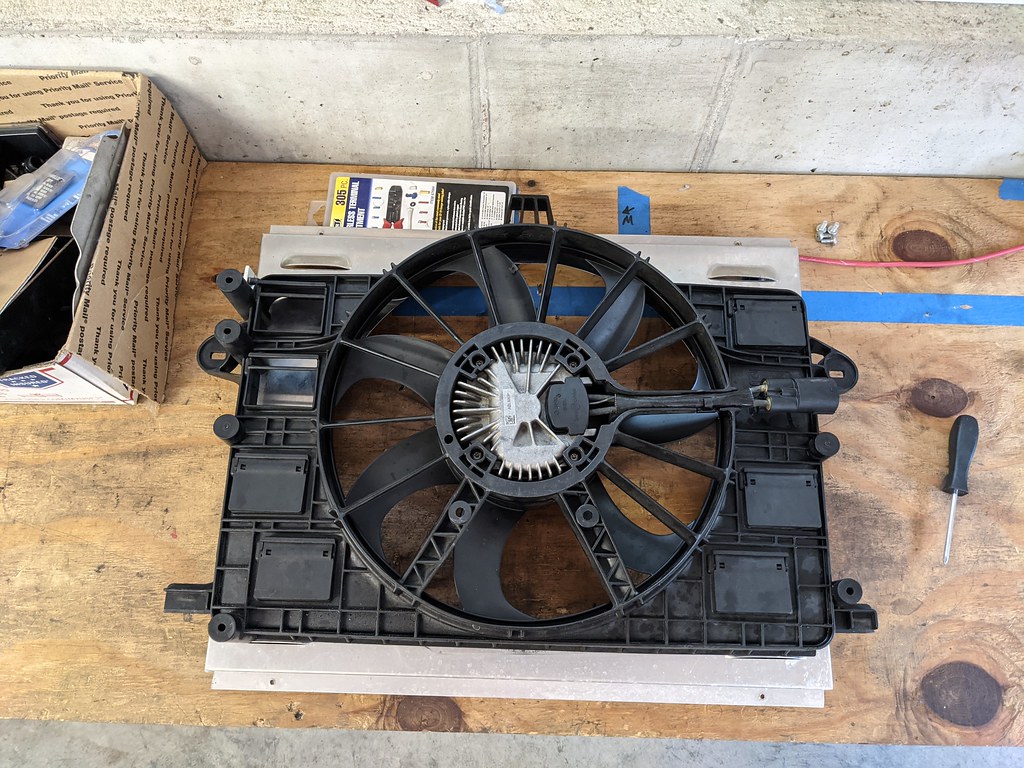
I'm happy to report that the C7 fan install is now complete. I really liked how my current shroud covered the entire core so I wanted to find a way that I could mount the fan assembly to it. I started by removing the shroud and then test fitting the unmodified C7 fan.


The picture makes it look bigger than it is, but it has about 3/4" on both sides of the shroud when centered. Just way too deep and needs to be trimmed down. First picture is unmodified and mocked up. Could definitely be used as is, but I wanted it to fit tighter to the radiator.



Here's a close up of the motor. The 600 in there means that it's the 600 Watt version of the C7 fan. The earlier models could have come with a 500 Watt version.


I also debated on removing the fan from the shroud and making my own custom mount similar to what VA does with their aftermarket fan for 67-69 Camaro's. It fits nearly perfect in the 16" fan opening.


This is a VA shroud for my car that I saw at a Car show this past weekend. I think that is based of the Gen6 Camaros as it uses an even bigger 850 Watt fan!


Problem that I didn't want to deal with was how far away from the shroud it was going to sit. I could have fabricated something, but I didn't want to do that at this point.


One thing that was pretty interesting was that the inside of the fan shroud has these little ribs that are the same depth the entire way around the inside of the shroud. Stock there are 4 of those ribs, so after deciding that I as going to modify the C7 shroud, I cut 2 ribs off which was about 5/8".


With the 2 ribs cut, you can still use the stock mounting tabs, but since my radiator wasn't quite wide enough to easily use them, I decided to cut another two. Ended up being quite a bit of material that I removed.


I took measurements before and after cutting and the shroud must be parallel since the measurements were the same. Width is 21 3/8", side height is 13.5" and the height at the center is 15 3/8"


Here is right before one of the final test fits. I found that in between two of the ribs for the upper part, it lined up perfectly with the upper nuts that were already on the shroud. For the rear, I found a space between two ribs, but added my own Rivnut. Really easy and mounted very solidly.


Then I mounted up a 70 amp breaker for the fan. It draws a lot of juice and this was recommended to me by Andrew. I was able to use a little pillar and threaded a bolt I had into it for a solid mount. Very pleased with how it all came out. I had a few missing "flaps" and found a guy on a Corvette forum who had a few spares. So they are on the way, but for now I made a few temporary pieces. I'm not sure if I will end up trimming the shroud in front of the "flaps" to encourage more airflow at speed or not. I want to run it and see how it performs. If I am not getting the cooling I want I'll modify them for more airflow.
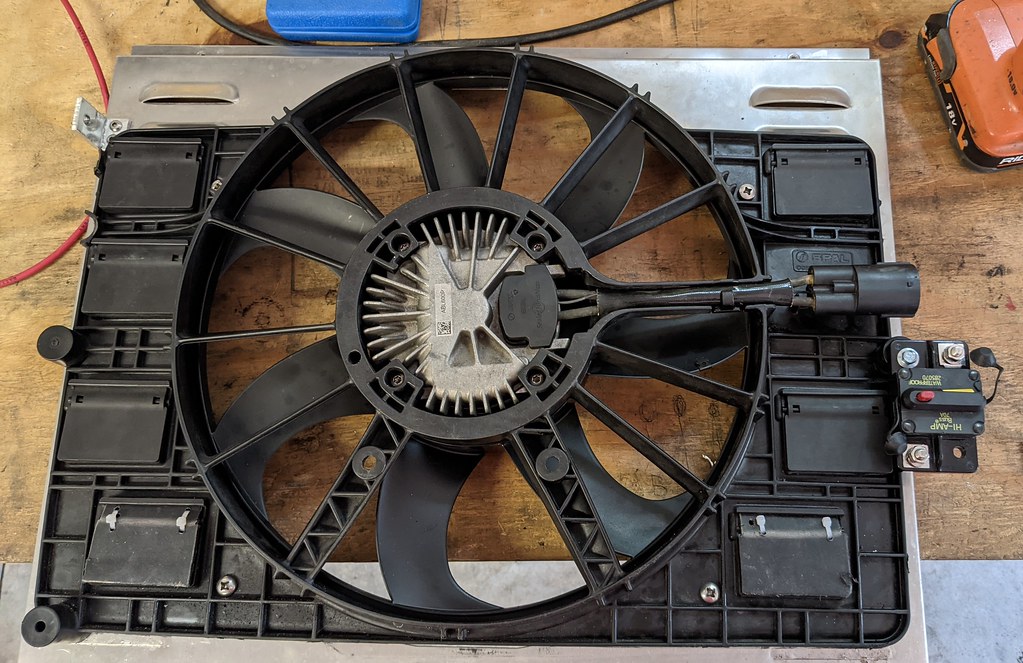


Installed in the car and ready to wire up. I'm really pleased with how it turned out.


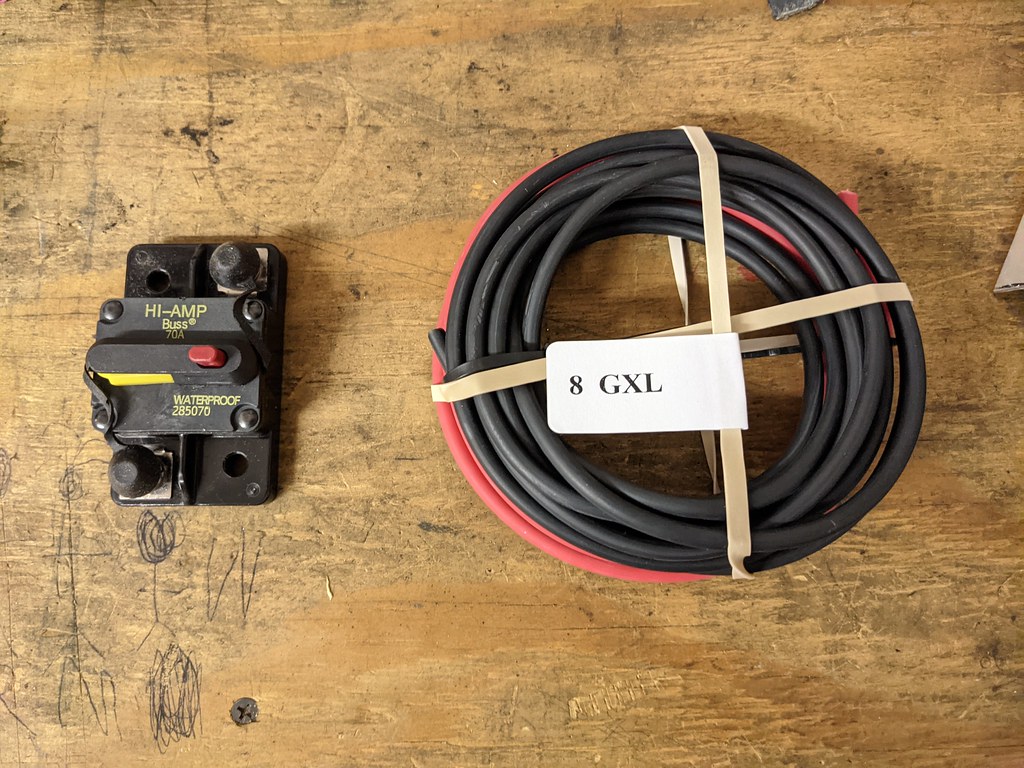
I bought some more 8 ga wire, a 70 amp circuit breaker and a Yazaki connector kit (bought on eBay) with an assortment of terminals to get it all wired up.
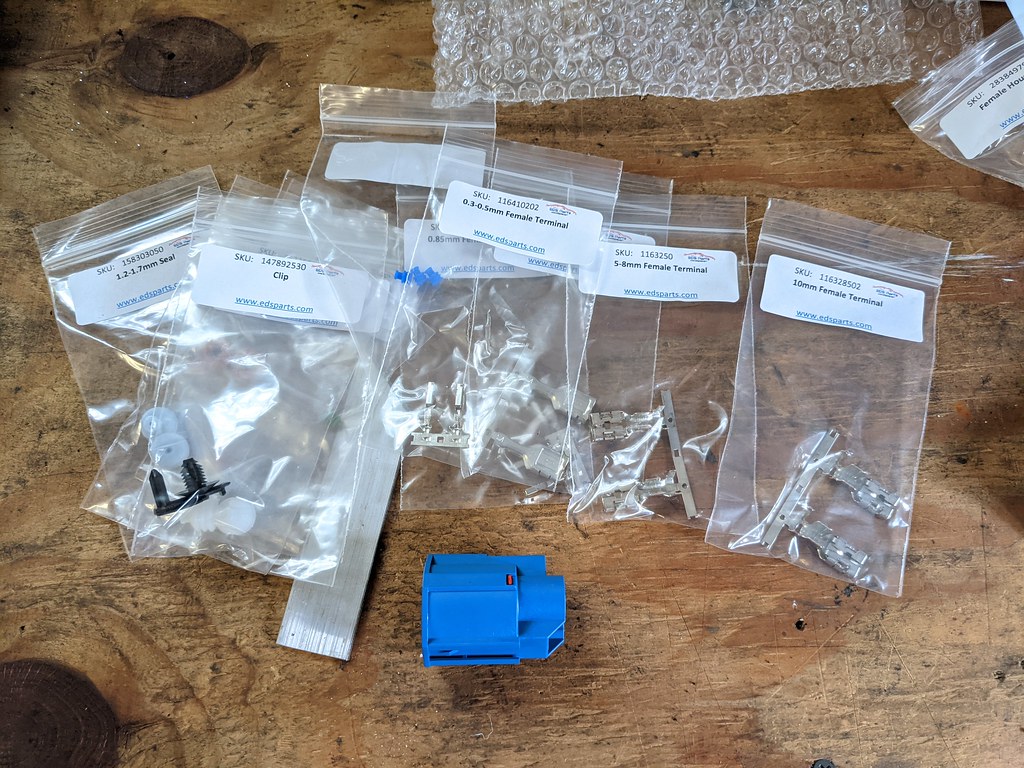


I found that my big crimpers did a great job on the open barrel terminals once I bent them over slightly. One thing on this connector that was a little different was there is this inner white locking piece that had to be popped up in order to insert the terminals into the slots. Otherwise it was very straight forward.


Used some appropriately sized terminals and glued heat shrink. I didn't get any pictures, but the ground side goes directly to the battery. The positive side goes from the connector, to the breaker, then directly to the battery. From all my research it is critical to get the appropriately sized wire for this job. You will not be able to get away with 12 ga wire. According to Spal, this wire could get hot enough to melt the connector, so make sure the wire is sufficiently sized for the job.


The last thing was adjusting the tune in Holley to use a PWM- signal rather than a straight ground. I tested it in the garage and it worked great. I didn't get a chance to test it as it was raining, but I'm hoping to within the next few days.


Thanks,
Ryan

1976 Trans Am LS1 and much more...SOLD
1968 Camaro LSA, T56 Magnum, and much more...SOLD

Current Project: 1955 Nomad LC9, 4L80e, C5 brakes and etc...

5th T/A

  • Oracle Forum Member
  • *
  • Posts: 1511
Re: 1968 Camaro Resto-mod LS3/6 speed; Project Penny Pincher
« Reply #73 on: July 21, 2021, 12:04:00 PM »
Beautiful job on the electric cooling fan and shroud from a C7.

I have noticed many after market fans and shrouds do not have the flaps in the shroud surrounding the fan. The OEM's know what they are doing, allowing for considerably more air flow through the radiator while the car is moving at higher speed. I also believe the OEM fans are well built and often less noisy than some aftermarket.

If I end up needing to go to electric fans I will copy what you did.
1980 T/A with a Pontiac 461

Gone but not forgotten;
1973 T/A 455
1975 T/A 400
1978 T/A W72
1982 T/A cross fire injected

Two wheel toys;
2014 Harley Ultra Classic Limited
2013 Honda CB1100
2010 Yamaha Vmax
1982 Yamaha Seca 750

ryeguy2006a

  • Oracle Forum Member
  • *
  • Posts: 6090
Re: 1968 Camaro Resto-mod LS3/6 speed; Project Penny Pincher
« Reply #74 on: July 23, 2021, 06:30:03 AM »
Thank you sir! So far the fan is doing a much better and faster job of cooling off the engine. It is about the same for the IAT's which is interesting to me. Need to get a really hot day to really test it out.

If you do end up going with the C7 brushless fans, you'll need a PWM controller to be able to turn it on. It isn't a traditional on/off fan, but rather uses a PWM (Pulse Width Modulation) signal to turn on the fan based on the duty cycle that you command. Basically the controller can turn on the fan at 30% speed to cool down the engine rather than 100%, or it can go to 100% if needed and slowly ramp down. Another really nice feature is it has a soft start so that there isn't a spike in amp draw when it turns on. Some very smart people designed this fan, I'll just say that.

1976 Trans Am LS1 and much more...SOLD
1968 Camaro LSA, T56 Magnum, and much more...SOLD

Current Project: 1955 Nomad LC9, 4L80e, C5 brakes and etc...

MNBob

  • Oracle Forum Member
  • *
  • Posts: 2019
Re: 1968 Camaro Resto-mod LS3/6 speed; Project Penny Pincher
« Reply #75 on: July 29, 2021, 10:16:25 AM »
Nice job on the fan install; it looks like it was made that way.  PWM is the only way to go.  While mine worked with a relay, I did get the spiking and more fan noise because it was running at 100%.  It is nice that your EFI software has PWM built in as you have complete control over how it operates.
1979 TATA Extreme TKO .64
Hedman elite; Pypes 2.5; Borla XS; MSD 6A; Performer intake; open scoop; Sniper QJ;  110 Amp Alt; 4 core radiator/Mark VIII fan; RobbMc mini starter; subframe connectors; solid body mounts; fiberglass rear springs; poly sway bar and link bushings; 81 master; D52’s; Blazer disks; 225/60 & 235/60 17's TrueContact's; relays for PW, PDL, lights; keyless entry

ryeguy2006a

  • Oracle Forum Member
  • *
  • Posts: 6090
Re: 1968 Camaro Resto-mod LS3/6 speed; Project Penny Pincher
« Reply #76 on: August 02, 2021, 06:06:47 AM »
Thanks Bob. I'm continue to be impressed with the capabilities that Holley gives you. I love to tinker on things and this software allows me to do that. I've nailed down the tune and the supporting components now and it's a great cruising car.

I'm pleased to report that the fans are working really well. I actually got stuck in stand still traffic over the weekend for about 15 mins and the temps stayed in right around 202-204. I have them commanded to come on at 202 and off at 198. The IAT's were good as well. They were around 90* cruising and crept up to around 108 and pretty much stayed there. The ambient temps were right around 70, so I'd like to do a stress test to find out what it does if the temps are 85-90 doing the same thing.

I'm still running the fan shroud as is and never cut open the inside. I think that I'm going to modify it to give the fan a more open space to draw the air from. I think that may encourage more airflow to possibly lower the IAT's. When I'm cruising down the highway I'm usually about 15-20* above ambient, so I know that it's cooling efficiently.

1976 Trans Am LS1 and much more...SOLD
1968 Camaro LSA, T56 Magnum, and much more...SOLD

Current Project: 1955 Nomad LC9, 4L80e, C5 brakes and etc...

ryeguy2006a

  • Oracle Forum Member
  • *
  • Posts: 6090
Re: 1968 Camaro Resto-mod LS3/6 speed; Project Penny Pincher
« Reply #77 on: August 09, 2021, 07:07:04 AM »
After cruising around I wasn't entirely happy with how the IAT's were reacting with the fans on. They weren't dropping like I was expecting, so after thinking on it a while I decided to make a change to the shroud. I found another guy who had the entire opening of the cooling fan he was running open (Thanks John), and the fan was riveted to the shroud. I really liked that idea and decided to copy that same concept. That meant I had to cut the shroud open and make some mounting tabs.


I'd guess that I gained an additional 30% more airflow through the C7 shroud rather than all of the air coming through the 16" opening that the shroud had before. Now there is a more direct path for the air to flow, but not only when the fans are on but at speed when the flaps are open.


I found a nice guy over on the Corvette forums that had a wrecked C7 and had 4 perfect flaps, which is exactly how many I needed. He gave them to me, all I had to do was pay shipping!


After a ton of test fits, I started to rivet them together. They turned out great and I'm very happy with the way it turned out now. Should have just done this from the beginning. Before when I was first cutting up the shroud, I saved the decal that came on the shroud originally. I wanted to put it back on when it was finished, and I'm glad I did. I think it was a nice finishing touch.


I also needed to shorten up my upper radiator hose. I didn't quite trim it enough when I first installed it, so now it doesn't touch the fan.


I'm finally happy with the way this turned out. It looks great and is actually more rigid now than it was before. The real test is if all the efforts were worth it. I finished this up on Friday night to hopefully make it to a car show on Saturday morning. Great news is that it was 80* out and I was able to get out to the show and test the fans out. The engine coolant didn't change at all, but the IAT's stayed lower. Huge win! I drove the car for about 100 miles and the whole car performed flawlessly, but especially the IAT's. I stopped to let the car idle for around 10 mins to see what it would do. The IAT's were right around 95* cruising then when I stopped they slowly crept up to around 125* and seemed to stay right around that temp. To me that seems pretty good considering all the engine bay heat and no airflow. I could probably get it a little better if I made a CAI shroud around my filter. I'll probably do that at some point, but for now I'm really pleased. The best part was the IAT's cooled right back down once I was moving again. Dropped 15* quickly then slowly went back down to around 95*.

Cheers,
Ryan

1976 Trans Am LS1 and much more...SOLD
1968 Camaro LSA, T56 Magnum, and much more...SOLD

Current Project: 1955 Nomad LC9, 4L80e, C5 brakes and etc...

5th T/A

  • Oracle Forum Member
  • *
  • Posts: 1511
Re: 1968 Camaro Resto-mod LS3/6 speed; Project Penny Pincher
« Reply #78 on: August 09, 2021, 08:37:48 AM »
Excellent,

When I saw your previous post I had mistakenly assumed the flaps were already functional. My opinion this is the best way to build a fan shroud. Almost all the aftermarket shrouds that I have seen do not have flaps.

Great job and nice explanation with pictures. This is a good reference for someone contemplating electric fans.
1980 T/A with a Pontiac 461

Gone but not forgotten;
1973 T/A 455
1975 T/A 400
1978 T/A W72
1982 T/A cross fire injected

Two wheel toys;
2014 Harley Ultra Classic Limited
2013 Honda CB1100
2010 Yamaha Vmax
1982 Yamaha Seca 750

TATurbo

  • Active Forum Member
  • *
  • Posts: 821
Re: 1968 Camaro Resto-mod LS3/6 speed; Project Penny Pincher
« Reply #79 on: August 11, 2021, 10:59:32 PM »
I love that I always learn something from your posts! I didn't know about cooling fans using PWM.
It's cool to see the tweaks and mods you're using to get the car dialed in just the way you like.
Can't wait to meet this car in person...It's a beautiful thing (for a Camaro, I mean) :-P
« Last Edit: August 11, 2021, 11:01:05 PM by TATurbo »
Tom
King of Prussia, PA

1981 Turbo Trans-Am
Build thread - http://transamcountry.com/community/index.php?topic=83354.0

Re: 1968 Camaro Resto-mod LS3/6 speed; Project Penny Pincher
« Reply #79 on: August 11, 2021, 10:59:32 PM »
You can help support TAC!