Author Topic: My 301 NA Refresh Build  (Read 18762 times)

Nexus

  • Oracle Forum Member
  • *
  • Posts: 2040
My 301 NA Refresh Build
« on: March 21, 2021, 06:35:08 PM »
So I have decided to to freshen up my 301, and not do a full rebuild...at least for now. I will be making some well researched decisions that will definitely not be the best decision to make if you are doing a proper rebuild but it is the direction I'm going in. Also, I am experimenting with a few things that may turn out to be a poor decision but we shall see when I do a proper rebuild in a few years after I get it on the road. This will not make everyone happy but I'm not too concerned and if my decisions backfire (pun intended), I will have learned a lesson.

still with me?

So, I started out by pulling the engine that Ruby came with

20191114_120637 by Charles Marson, on Flickr

pulled it apart

20191126_155139 by Charles Marson, on Flickr

20191126_153616 by Charles Marson, on Flickr

20191126_154255 by Charles Marson, on Flickr

As you can see, there was a tremendous amount of rust everywhere.

I decided to pickle this engine and find a replacement

20200930_144036 by Charles Marson, on Flickr

20200930_151538 by Charles Marson, on Flickr

Bring in the replacement

2020-11-30_10-55-20 by Charles Marson, on Flickr

Got it running

20201215_202638_1 by Charles Marson, on Flickr

Yanked it out

20201223_103518 by Charles Marson, on Flickr

and pulled it apart

2021-02-03_11-32-40 by Charles Marson, on Flickr

2021-01-13_11-15-01 by Charles Marson, on Flickr

Charlie

79 Esprit but like many, it will be a T/A clone
(22 years and counting but still have her)
http://transamcountry.com/community/index.php?topic=79648.0

Nexus

  • Oracle Forum Member
  • *
  • Posts: 2040
Re: My 301 NA Refresh Build
« Reply #1 on: March 21, 2021, 06:41:23 PM »
Since the last pic, I have cleaned, sandblasted and painted parts while I made decisions on the block.

20210318_155837 by Charles Marson, on Flickr

20210318_155900 by Charles Marson, on Flickr

20210316_211240 by Charles Marson, on Flickr

20210316_211254 by Charles Marson, on Flickr

Charlie

79 Esprit but like many, it will be a T/A clone
(22 years and counting but still have her)
http://transamcountry.com/community/index.php?topic=79648.0

Nexus

  • Oracle Forum Member
  • *
  • Posts: 2040
Re: My 301 NA Refresh Build
« Reply #2 on: March 21, 2021, 06:48:15 PM »
The JB weld experiment:

So in an event to keep things low cost, the aluminum on my 301 has seen better days as you can see in the photo all the pitting the coolant neck has.

20210311_083308 by Charles Marson, on Flickr

20210311_083319 by Charles Marson, on Flickr

So, pull out the JB weld I had on hand and fill in the pitting.

20210316_191911 by Charles Marson, on Flickr

the final result is this

20210316_211254 by Charles Marson, on Flickr

The experiment comes in when the aluminum and the JB weld get heated up and being too different types of material. We shall see how it does when I pull the engine apart in a few years and give it a proper rebuild!!


funny thing is, the bare metal pics are of a different housing and the one I used looked very similar in condition but I forgot to take pics.
Charlie

79 Esprit but like many, it will be a T/A clone
(22 years and counting but still have her)
http://transamcountry.com/community/index.php?topic=79648.0

Nexus

  • Oracle Forum Member
  • *
  • Posts: 2040
Re: My 301 NA Refresh Build
« Reply #3 on: May 12, 2021, 07:50:16 PM »
Well, since the last post, I am still working on restoring the water pump housing as the aluminum was really pitted on both units I had and I'm thinking it's from people using non aluminum friendly coolant.

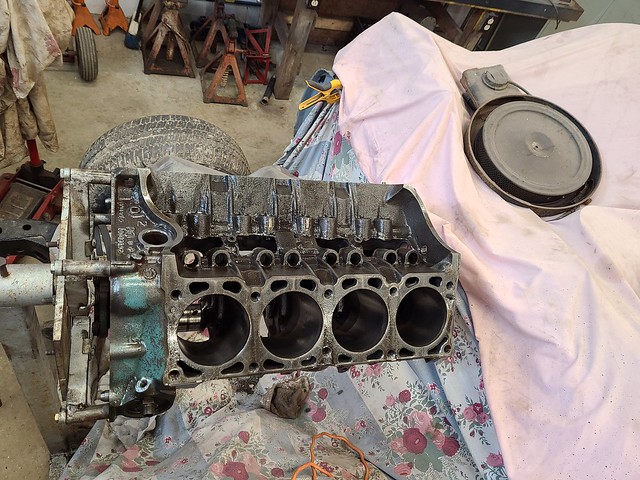
I have also cleaned up all the casting flash and wire brushed all the surfaces on the block, and soon I'll notch the top of the cylinders to aid in exhaust gas removal. Everything was coated in WD40 to keep the rust at bay until I can get it cleaned and painted.

2021-04-29_10-11-11 by Charles Marson, on Flickr

2021-04-29_10-11-01 by Charles Marson, on Flickr

DISCLAIMER!!

What I have decided to do with this build is not the most popular way to refresh an engine, and I'm sure others will shutter but with that said, too bad, get over it...lol

Also, I am not building this for maximum power, or racing of any kind. I won't be thrashing the engine so for now, this will suffice and will likely work well unitil I can do it up right.

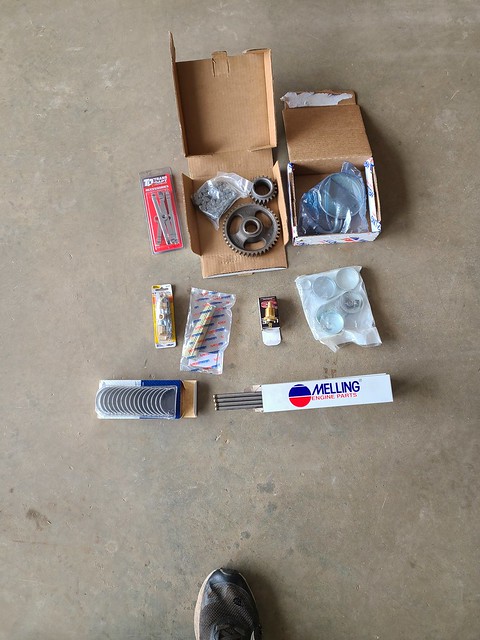
This is a super budget refresh build so I saved money where I could (like machine shop work) and purchased parts that I could find at the cheapest possible price. Also I am not replacing the rings, crank bearings, lifters and anything else that was working just fine before I pulled it apart.

So with that said, I purchased new connecting rod bearings, to install which will wear prematurely because of the scratches in the crank/bearing surface but It should hold out ok until I can rebuild this properly and at that point, I will purchase some better quality parts that were recommended to me.

Due to rusty push rods, I replaced those and also picked up a new, budget friendly timing chain set. A new pickup screen for the oil pump, frost plugs, temperature sensor, exhaust manifold studs, fresh fuel tank pickup screen, indirectly related to the engine and some shiny rocker cover tabs to spread out the tension from the bolts were also purchased.

2021-05-12_08-25-16 by Charles Marson, on Flickr

Also something that excites me the most is that we decided to go ahead to to install the Atomic EFI I got for Christmas sooner than later.

2020-11-30_08-17-19 by Charles Marson, on Flickr

Didn't seem to make sense to spend money on things that weren't staying with the car so with that in mind, I purchased a 7 pin electronic distributor from an 81 301, and a fuel pump and fuel filters.

2021-05-11_04-53-25 by Charles Marson, on Flickr

2021-05-11_04-53-07 by Charles Marson, on Flickr

Charlie

79 Esprit but like many, it will be a T/A clone
(22 years and counting but still have her)
http://transamcountry.com/community/index.php?topic=79648.0

Jur5664

  • Active Forum Member
  • *
  • Posts: 71
Re: My 301 NA Refresh Build
« Reply #4 on: May 13, 2021, 05:09:27 AM »
Hi,
good job and your feeling with the project :cool:
I'am from France and I may have to get out my 400 with headers on my Formula 1977.
I need to change the exhaust gaskets, and may have/need to remove the engine from the car.

Question, you seem to have remove both the trans and the engine at the same time, right ?
What is the minimum height to ceiling to work on  the removing the engine usiingng your workshop crane ?
Headers render the removing more complicated ?
Thank's and carry on your project on your way
Sorry for my English writing.

Cheers  :lol:

Re: My 301 NA Refresh Build
« Reply #4 on: May 13, 2021, 05:09:27 AM »

Nexus

  • Oracle Forum Member
  • *
  • Posts: 2040
Re: My 301 NA Refresh Build
« Reply #5 on: May 18, 2021, 07:03:13 AM »
First, your English is good so no worries there!!

Crane height: This will depend entirely on what you are using for a crane but with my setup and the engine leveler,  you might get away with around 2 meters, give or take several centimeters. I believe the leveler is important when taking them but many people have done it without.

Your headers will have to come off before removal and I've seen people just leave them hooked up to the rest of the exhaust and laying in the engine compartment, BUT...the more room you have to work with the better and it taking them off completely is what I would recommend.

Now...you said you need to change the exhaust gaskets, I wouldn't remove the engine to do this personally. Unless you have other major work to do, the headers, albeit a PIA, can all be done with the engine in place. Just raise the car to give you some working space under it, as you will need to get to things from underneath and from above so you not too high.

20201223_103456 by Charles Marson, on Flickr
Charlie

79 Esprit but like many, it will be a T/A clone
(22 years and counting but still have her)
http://transamcountry.com/community/index.php?topic=79648.0

Doright

  • Active Forum Member
  • *
  • Posts: 237
Re: My 301 NA Refresh Build
« Reply #6 on: August 26, 2021, 10:48:04 AM »
Charlie
I realize this is a really old thread but...

Kudos for keeping the 301 non turbo

I have had one of these cars along with several 400 cars and 455 firbirds

I can honestly say My 301 car was one of my favorites It mad excellent torque for what it was! and Gave excellent MPG
When I got mine it ran ok but had hi mileage and had several broken exhaust bolts in the heads causing exhaust leaks which required me to remove the heads to repair, well if I pull the heads I might as well do a Valve job and if I was going to do a Valve job I might as well do the lower end with fresh slugs. so mine was a little different as I went with a full rebuild that I did myself.

I would be extremely careful measuring everything to be sure every thing is in speck before just reusing things like Pistons, bearing, rings.
I am not against reusing these parts as long as they are within spec!

Dennis Barnett 
A&P Mechanic & FCC
Those who sacrifice liberty for security deserve neither!
B. Franklin

Nexus

  • Oracle Forum Member
  • *
  • Posts: 2040
Re: My 301 NA Refresh Build
« Reply #7 on: August 27, 2021, 06:20:31 AM »
Thank you for the good advice sir!!

With everything else going on this summer in my life, I haven't had much time to work on it in awhile but I'll be getting the ball rolling again shortly.
Charlie

79 Esprit but like many, it will be a T/A clone
(22 years and counting but still have her)
http://transamcountry.com/community/index.php?topic=79648.0

Nexus

  • Oracle Forum Member
  • *
  • Posts: 2040
Re: My 301 NA Refresh Build
« Reply #8 on: September 05, 2021, 09:25:34 AM »
Finally did a bit of work on the heads

I did this work a little while ago

2021-06-26_04-05-35 by Charles Marson, on Flickr

Wednesday I was able to stirp it down more, remove the casting flash, clean everything up but I still need to remove 4 broken exhaust studs

2021-09-02_10-11-14 by Charles Marson, on Flickr
Charlie

79 Esprit but like many, it will be a T/A clone
(22 years and counting but still have her)
http://transamcountry.com/community/index.php?topic=79648.0

scarebird

  • Oracle Forum Member
  • *
  • Posts: 1897
  • Former brake guy
Re: My 301 NA Refresh Build
« Reply #9 on: September 05, 2021, 05:43:13 PM »
It would be really great if there was an intake made that allowed the use of non-301 heads here.

Nexus

  • Oracle Forum Member
  • *
  • Posts: 2040
Re: My 301 NA Refresh Build
« Reply #10 on: September 06, 2021, 07:07:12 PM »
A couple of guys at 301 Garage have custom made intakes to fit non 301 heads!!

interesting stuff
Charlie

79 Esprit but like many, it will be a T/A clone
(22 years and counting but still have her)
http://transamcountry.com/community/index.php?topic=79648.0

Nexus

  • Oracle Forum Member
  • *
  • Posts: 2040
Re: My 301 NA Refresh Build
« Reply #11 on: September 29, 2021, 08:21:53 PM »
So, I recently pressure washed the block and heads with hot water, dried them with air and heat, and coated everything in WD40 to keep the rust at bay. I then reinstalled the pistons into the block, reinstalled the crank, and when I started torqueing the connecting rod bolts, my torque wrench apparently was crapped out because I broke one of the studs. Furthermore, the gamble I took on ordering standard stock connecting rod bearings didn't pay off because the crank had already been ground once. Should've taken the 10 mins to measure but like a big dope, I didn't!!

What to do?

Well, I decided to retrieve the spare 301 that I pickled, pulled the crank and pistons from it and much to my amazement, the crank looks great. Also this crank has never been ground...I measured so the connecting rod bearing I already purchased will fit this crank. I also punched out a rod stud and replaced the broken one with one of the 16 spares I now have!

We shall see how all of this pans out!!

BTW...Torque wrench went into the scrap metal bin!!
Charlie

79 Esprit but like many, it will be a T/A clone
(22 years and counting but still have her)
http://transamcountry.com/community/index.php?topic=79648.0

tajoe

  • Oracle Forum Member
  • *
  • Posts: 5264
Re: My 301 NA Refresh Build
« Reply #12 on: October 11, 2021, 08:10:29 PM »
Hey Charlie, 1st off, let me congratulate you on being the 1st to open up the 301 category, (after the crash).

2nd, what's up with the 301 garage? Did the originator (Joe) throw in the towel, and hand it off to Mini, (another Joe?) It seems the site is dying a slow death. I can't even get on these past few days, cause it won't load. It's too bad, cause it's the only place to find dedicated and knowledgeable 301 enthusiasts. I guess TTA is the go to site, now.   

As for your build, what are your intensions with the car? I realize and sympathize with your need to keep costs to a minimum, (I'm in the same boat), but with your bottom end apart, why wouldn't you spring for new crank brgs, and rings? As cheap as they are, and difficult to access, I would think, (at this point) they would be worth the investment. You're already running the risk of blow-by by pulling the heads, and pistons. You haven't mentioned the cam, but if you kept the lifters labeled for the lobes they came off of, I could see saving cash there. Easy enuff to change, (if problems arise later,) W/O pulling the motor. But new rings and a good hone, would go a long ways, for very little $. And I assume seeing your heads are apart, you'll at the very least, put a good lapping on the valves. Maybe just check the guides for looseness, for your own info.

I do like your home-made organizer tray with the valves and springs stored. Hope your lifters are the same way. And that cut crank is still useable for future possibilities. Hang on to it, cause 301s are getting slimmer to find by the day. And thanks for sharing your project. It's good to see. (Thumbs up) :)
"You can sell an old man a young mans car,
but you can't sell a young man an old mans car"
                                       Bunkie Knudsen
<

Nexus

  • Oracle Forum Member
  • *
  • Posts: 2040
Re: My 301 NA Refresh Build
« Reply #13 on: October 12, 2021, 06:51:20 AM »
So what I ended up doing was removing my spare engine from it's diesel pickled home, removed the crank and bearings, cleaned everything up, and installed it into the block!!

This is the result from the pickled engine with 115,000 kms on it!

I got the old bearings cleaned up and the crank sitting in place. Installed the caps with the plasti gauge and torqued everything and the readings came as follows:

Front = .003 (0.001 - 0.0015)
Intermediate = 0.002 (0.001 - 0.0025)
Rear = 0.002 (0.0025 - 0.0035)

so after much searching, nobody North of the boarder online or in my city could get me replacement bearings, and I ended up ordering a set from Summit which cost $150.00 to have shipped to my door!!

The only reason for not doing the rings, is that I had good compression numbers and felt t wasn't necessary but the thought continuously goes through my mind!!            we'll see!!

Not sure about 301 garage but I do know Joe has has had to take care of some personnel in his life but Joe #2 is around and I can log in no problem. It did take awhile for me to in though!!

Want me to send Joe #2 a message for you?
Are you using same forum name over there?
Charlie

79 Esprit but like many, it will be a T/A clone
(22 years and counting but still have her)
http://transamcountry.com/community/index.php?topic=79648.0

tajoe

  • Oracle Forum Member
  • *
  • Posts: 5264
Re: My 301 NA Refresh Build
« Reply #14 on: October 12, 2021, 07:40:40 AM »
so after much searching, nobody North of the boarder online or in my city could get me replacement bearings, and I ended up ordering a set from Summit which cost $150.00 to have shipped to my door!!


Not sure about 301 garage but I do know Joe has has had to take care of some personnel in his life but Joe #2 is around and I can log in no problem. It did take awhile for me to in though!!

Want me to send Joe #2 a message for you?
Are you using same forum name over there?

When you say "North of the border", are you talking Yukon Alaska, by dog sled? I see listings here from Summit, to Rock auto, to our local Advanced Auto parts, and more, the crank main brgs for less than $50. Rings, (std) too. (altho some are out of stock) I can't believe the shipping costs on a small package like that could cost that much. We must be spoiled here in the US. If we were to co-ordinate something at this end, and purchase them here, I'll check into the Fed Ex shipping cost for a pkg that size and weight, and see what they offer, (if you're interested). Also need to know What country/town/province you're in.

As for the 301 garage, my screen name there is "84ta", but you don't need to send them any message. Thanks for the offer. I was able hook up there this morning. I need to look closer at the TTA website. Wonder if Joe #2 is on this site?
"You can sell an old man a young mans car,
but you can't sell a young man an old mans car"
                                       Bunkie Knudsen
<

Re: My 301 NA Refresh Build
« Reply #14 on: October 12, 2021, 07:40:40 AM »

Nexus

  • Oracle Forum Member
  • *
  • Posts: 2040
Re: My 301 NA Refresh Build
« Reply #15 on: October 13, 2021, 07:43:49 AM »
Rock Auto has some but they were out of stock on standard size bearings and I called several auto parts stores here with no luck!!

I live in Sudbury Ontario Can. which is located on the North side of lake Huron and it isn't known for its vast supply of old vehicle parts!!

Also, I had ordered the parts several days ago and they have been shipped but I'll keep that in mind!!
Charlie

79 Esprit but like many, it will be a T/A clone
(22 years and counting but still have her)
http://transamcountry.com/community/index.php?topic=79648.0

Nexus

  • Oracle Forum Member
  • *
  • Posts: 2040
Re: My 301 NA Refresh Build
« Reply #16 on: April 17, 2022, 07:11:28 AM »
So this finally happened!!

2022-03-22_02-05-29 by Charles Marson, on Flickr

2022-03-22_02-05-39 by Charles Marson, on Flickr

2022-03-22_02-05-59 by Charles Marson, on Flickr

Third times the charm!!

First two sets of crank bearings did not fit when ordered them from Summit. Once was my own fault, second was theirs. miniTA at 301 garage pointed me in the right direction!!
Charlie

79 Esprit but like many, it will be a T/A clone
(22 years and counting but still have her)
http://transamcountry.com/community/index.php?topic=79648.0

tajoe

  • Oracle Forum Member
  • *
  • Posts: 5264
Re: My 301 NA Refresh Build
« Reply #17 on: April 17, 2022, 07:20:23 AM »
Hey Charlie, looks like fwd progress to me. Are those Silvolite pistons? They don't have the dish, so I guess they're gunna be used for N/A application? (Duh, I just saw your title :-?) And you say the 301 garage is still active? I visited in the past a few times, and don't see much activity.
Please continue posting on your up-dates. Looking fwd to light-off. :smile:
« Last Edit: April 17, 2022, 07:21:54 AM by tajoe »
"You can sell an old man a young mans car,
but you can't sell a young man an old mans car"
                                       Bunkie Knudsen
<

Nexus

  • Oracle Forum Member
  • *
  • Posts: 2040
Re: My 301 NA Refresh Build
« Reply #18 on: April 22, 2022, 09:39:35 AM »
Thanks, I'm looking forward to it also!

301 garage has definitely lost traction but I think that is true for a lot of online forums as FB has taken over.
Charlie

79 Esprit but like many, it will be a T/A clone
(22 years and counting but still have her)
http://transamcountry.com/community/index.php?topic=79648.0

tajoe

  • Oracle Forum Member
  • *
  • Posts: 5264
Re: My 301 NA Refresh Build
« Reply #19 on: November 06, 2022, 08:27:07 PM »
Bump.
Hey Charlie, you got your ears on? Anything happening here?
"You can sell an old man a young mans car,
but you can't sell a young man an old mans car"
                                       Bunkie Knudsen
<

Nexus

  • Oracle Forum Member
  • *
  • Posts: 2040
Re: My 301 NA Refresh Build
« Reply #20 on: July 04, 2023, 12:46:52 PM »
Not too much happening, as life interrupted, and I need to research the timing end of things before I put more of the engine together.

As is always in my life, something else more important always comes up and this gets shoved to the back of the line.

Something I followed, and not sure at this point if it's correct, is that I brought the #1 cylinder to TDC, pointed the timing dots toward each other, then rotated the crank so that the #6 cylinder was TDC, making it roughly 180 degrees (if I remember correctly) from where it was, and then added the timing chain.

I need to verify if this was the correct procedure, for my 301 and I need to find out If I really need a cam degree tool.

Charlie

79 Esprit but like many, it will be a T/A clone
(22 years and counting but still have her)
http://transamcountry.com/community/index.php?topic=79648.0

5th T/A

  • Oracle Forum Member
  • *
  • Posts: 1346
Re: My 301 NA Refresh Build
« Reply #21 on: July 04, 2023, 02:53:47 PM »
It's been many years since I have done a Pontiac timing chain. Because of a disintegrating plastic coating on the cam gear, they would fail far more often than other makes. I did a lot of these on Pontiac V-8 and also the four cylinders on the early Tempest.

Bring the number one piston to TDC (front piston on drivers' side). The gear on the crank should have the dot at the top (12 o'clock) position. The dot on the cam gear should be at the 6 o'clock position. When you slide the gears on, both dots will be pointing at each other.  When you are ready to install the distributor, you will have to rotate the crank until the number 1 cylinder is on TDC of the (compression stroke). When number 1 cylinder is at TDC of the compression stroke the dot on the cam gear will be at the 12 o'clock position.

Since these were street driven cars we never bothered with a degree wheel and never had any problems.

I'll see if I can find a written procedure in a shop manual or at least a picture of the gears properly installed.
1980 T/A with a Pontiac 461

Gone but not forgotten;
1973 T/A 455
1975 T/A 400
1978 T/A W72
1982 T/A cross fire injected

Two wheel toys;
2014 Harley Ultra Classic Limited
2013 Honda CB1100
2010 Yamaha Vmax
1982 Yamaha Seca 750

tajoe

  • Oracle Forum Member
  • *
  • Posts: 5264
Re: My 301 NA Refresh Build
« Reply #22 on: July 04, 2023, 06:57:05 PM »
Welcome back, Charlie. We can feel for ya with life's unexpected challenges.

I've heard many concerns about the proper way to install the chain and gears. One question I hear is "do I put both dots at 12 o'clock, or the crank gear at 12, and the cam at 6"? Which doesn't matter cause once the crank spins 1 revolution, the cam dot will be at 6 anyway, seeing the cam gear spins 1/2 speed of the crank.
Because of the keyways, you can only put the gears on one way. If you 1st install the crank gear onto the crank, then line it's dot up to 12, then drape the chain over the cam gear, with it's dot at 6 o'clock, you can begin installing the cam gear and chain, by rotating, and aligning the cam snout keyway, to the cam gear. Fortunately with the Pontiac V8, the crank gear is a slip fit, so once I have the cam key in the right position, and the crank gear also, I'll slide on the 3 assembled pieces, ensuring the dots are aligned once in place. It sounds more complicated than it is. Keep at it, when you can.

As far as degreeing a street motor, it just depends what your application is. The minor error in the aftermarket components won't be felt, seat of the pants. And degreeing is always a compromise. More advanced valve timing helps the bottom end, and just the opposite the other way. I've at times advanced my cams maybe 3°, to help with holeshots. Not that I've ever been able to tell. Mostly phycological.
"You can sell an old man a young mans car,
but you can't sell a young man an old mans car"
                                       Bunkie Knudsen
<

Nexus

  • Oracle Forum Member
  • *
  • Posts: 2040
Re: My 301 NA Refresh Build
« Reply #23 on: July 09, 2023, 06:55:19 AM »
It's been many years since I have done a Pontiac timing chain. Because of a disintegrating plastic coating on the cam gear, they would fail far more often than other makes. I did a lot of these on Pontiac V-8 and also the four cylinders on the early Tempest.

Bring the number one piston to TDC (front piston on drivers' side). The gear on the crank should have the dot at the top (12 o'clock) position. The dot on the cam gear should be at the 6 o'clock position. When you slide the gears on, both dots will be pointing at each other.  When you are ready to install the distributor, you will have to rotate the crank until the number 1 cylinder is on TDC of the (compression stroke). When number 1 cylinder is at TDC of the compression stroke the dot on the cam gear will be at the 12 o'clock position.

Since these were street driven cars we never bothered with a degree wheel and never had any problems.

I'll see if I can find a written procedure in a shop manual or at least a picture of the gears properly installed.

This is very helpful

Thank you!
Charlie

79 Esprit but like many, it will be a T/A clone
(22 years and counting but still have her)
http://transamcountry.com/community/index.php?topic=79648.0

Nexus

  • Oracle Forum Member
  • *
  • Posts: 2040
Re: My 301 NA Refresh Build
« Reply #24 on: July 09, 2023, 06:57:59 AM »
Welcome back, Charlie. We can feel for ya with life's unexpected challenges.

I've heard many concerns about the proper way to install the chain and gears. One question I hear is "do I put both dots at 12 o'clock, or the crank gear at 12, and the cam at 6"? Which doesn't matter cause once the crank spins 1 revolution, the cam dot will be at 6 anyway, seeing the cam gear spins 1/2 speed of the crank.
Because of the keyways, you can only put the gears on one way. If you 1st install the crank gear onto the crank, then line it's dot up to 12, then drape the chain over the cam gear, with it's dot at 6 o'clock, you can begin installing the cam gear and chain, by rotating, and aligning the cam snout keyway, to the cam gear. Fortunately with the Pontiac V8, the crank gear is a slip fit, so once I have the cam key in the right position, and the crank gear also, I'll slide on the 3 assembled pieces, ensuring the dots are aligned once in place. It sounds more complicated than it is. Keep at it, when you can.

As far as degreeing a street motor, it just depends what your application is. The minor error in the aftermarket components won't be felt, seat of the pants. And degreeing is always a compromise. More advanced valve timing helps the bottom end, and just the opposite the other way. I've at times advanced my cams maybe 3°, to help with holeshots. Not that I've ever been able to tell. Mostly phycological.

Also very helpful!!

thank you
Charlie

79 Esprit but like many, it will be a T/A clone
(22 years and counting but still have her)
http://transamcountry.com/community/index.php?topic=79648.0

Re: My 301 NA Refresh Build
« Reply #24 on: July 09, 2023, 06:57:59 AM »